Technology
Review of Xiaomi Poco X5 Pro phone, price and specifications
Published
7 months agoon


Price review, camera, screen, design, software, hardware, battery, charging speed and other specifications of Xiaomi Poco X5 Pro.
Review of Xiaomi Poco X5 Pro phone, price and specifications


Introduction


Checking the technical specifications of Xiaomi Poco X5 Pro at a glance
Body: 162.9×76.0x7.9mm, 181g; Gorilla Glass 5 front, plastic back, plastic frame; IP53, resistant to dust and water splash.
Display: 6.67 inch OLED, 1B color, 120Hz, Dolby Vision, HDR10+, 500 nits (typ), 900 nits (HBM), 1080x2400px resolution, 20:9 aspect ratio, 395ppi.
Chipset: Qualcomm SM7325 Snapdragon 778G 5G (6nm): Octa-core (1×2.4 GHz Cortex-A78 & 3×2.2 GHz Cortex-A78 & 4×1.9 GHz Cortex-A55); Adreno 642L.
Memory: 128 GB RAM 6 GB, 256 GB RAM 8 GB; UFS 2.2.
OS/Software: Android 13, MIUI 14.
Rear Camera: Wide (main): 108MP, f/1.9, 1/1.52″ 0.7µm, PDAF; Ultra Wide Angle: 8MP, 119˚, 1/4″ 1.12µm; Macro: 2 MP, f/2.4.
Front camera: 16 MP, (wide), 1/3.06 inch, 1.0 µm.
Video recording: Rear camera: 4K@30fps, 1080p@30/60/120fps, 720p@960fps, gyro-EIS. Front camera: 1080p@30/60fps.
Battery: 5000 mAh; 67W wired, PD3.0, QC3+.
Other specifications: Fingerprint reader (mounted on the side). NFC (market dependent); infrared port; 3.5 mm jack; Stereo speakers
Looking at the specifications of the Poco X5 Pro, we can’t see many omissions. The phone has many fan favorite features like dual 5G SIM, NFC, dual speakers, IR blaster and audio jack. And just like other Poco and Redmi phones, this phone is also splash resistant.
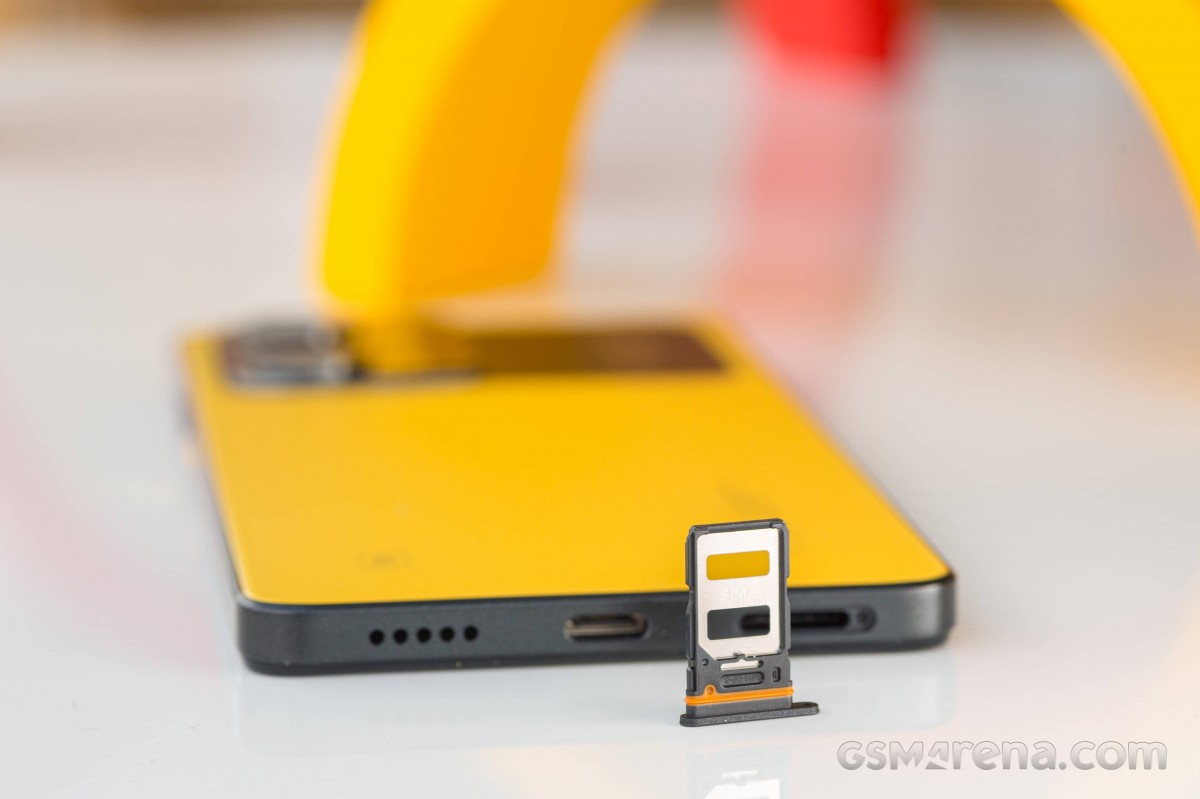
However, one feature that has been left out since the Poco X4 Pro is the microSD expansion slot. And there are people who do not take it well.
Unboxing Xiaomi Poco X5 Pro
The Poco X5 Pro comes in a black box that includes a 67W power adapter, a 6A rated USB cable, and a clear protective case.


The X5 Pro also comes with an anti-scratch film already applied to its screen. It’s a smudge magnet and we ditched it after a few days, but many people will appreciate having it.
Checking the design, build quality and handling of the Xiaomi Poco X5 Pro phone
We’ve mentioned that the new Poco X5 Pro comes with an advanced design, though we hope we haven’t gotten your hopes up too high. The new model is quite reminiscent of the Poco X4 Pro and Redmi Note 11 devices, but it has a few changes that we really appreciate.


In fact, the Poco X5 Pro has a familiar shape – flat front and back panels and a smooth bezel, a shape that allows the phone to stand on its own when needed. It is also splash resistant like all recent Xiaomi phones.
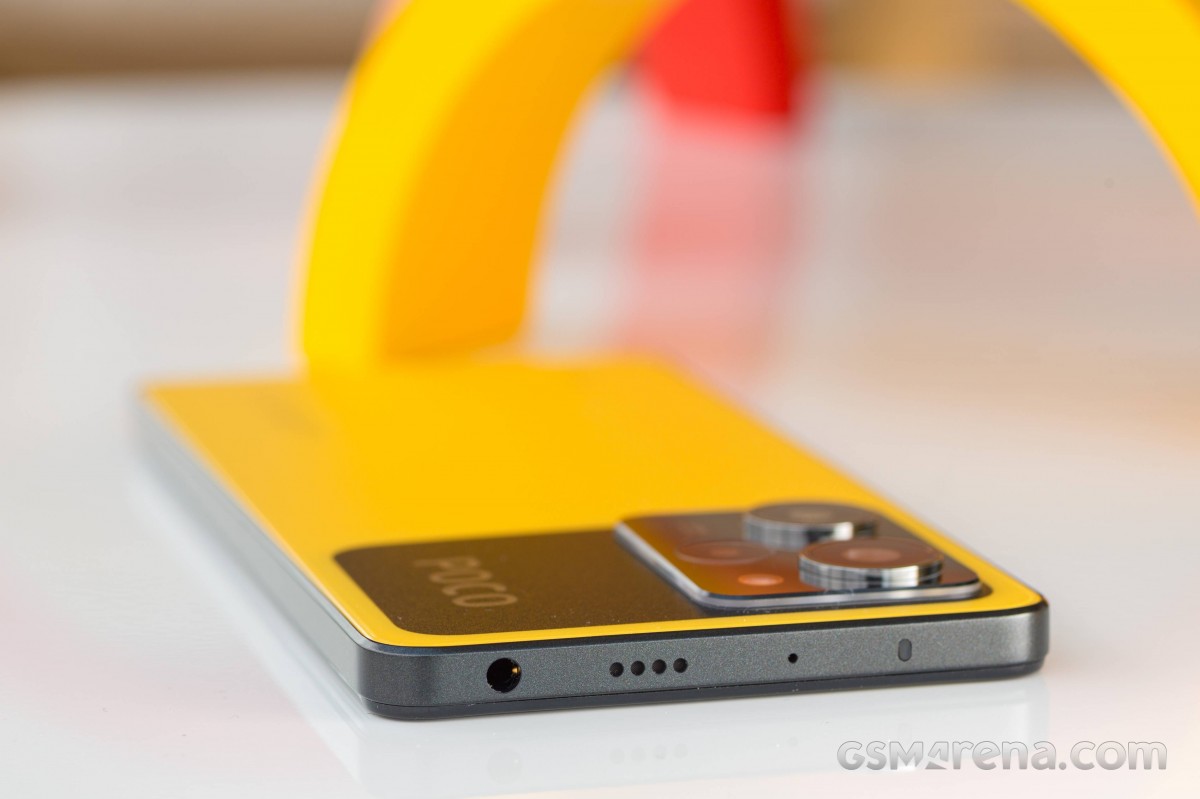
The design is slightly faded. In the last generation, there was some sort of holographic gradient going on at the back. The cover is now monochrome and matte, and the glass portion of the camera bump is smaller.
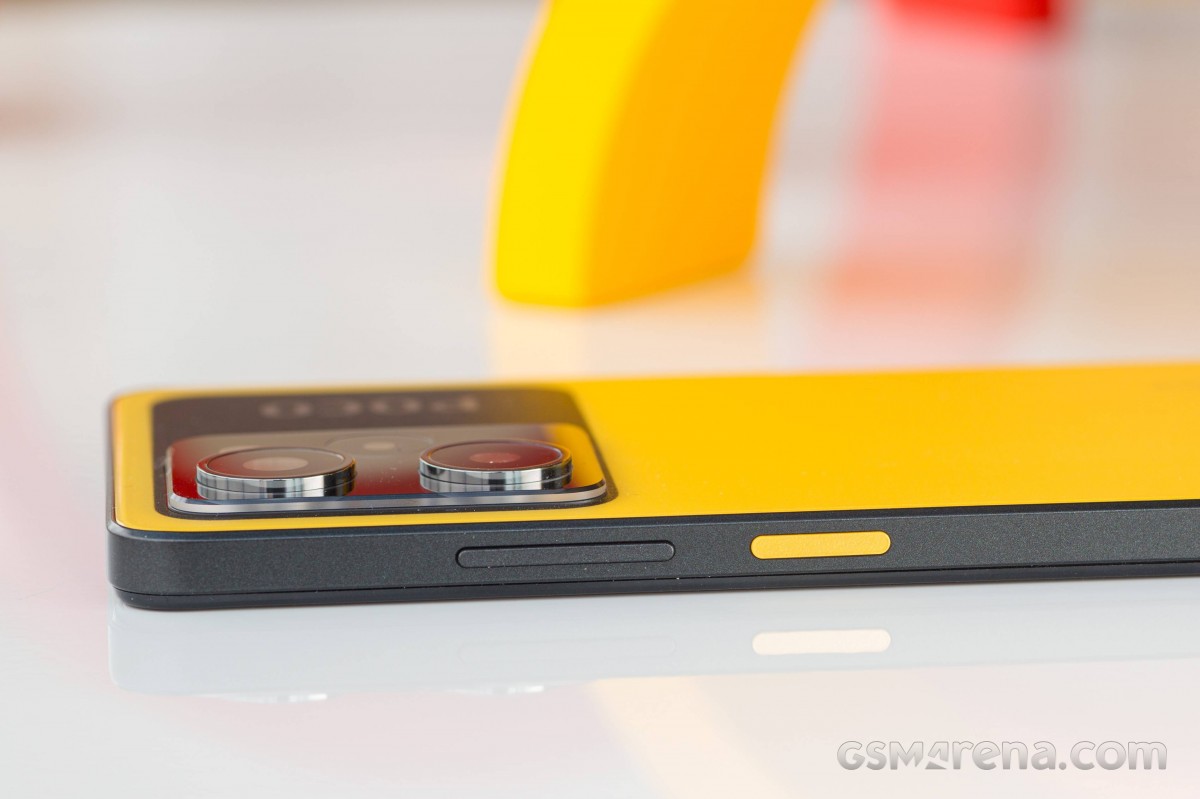
Poco X5 Pro is available in black, blue and yellow colors. And obviously we have the yellow model to review.


Yellow has been a signature color for Poco and it looks good on the Poco X5 Pro.


Like many Poco and Redmi phones, the screen is covered with a sheet of Gorilla Glass 5. The back and frame are made of plastic, both of which have a pleasant matte finish.
Let’s take a closer look at the Poco X5 Pro now.
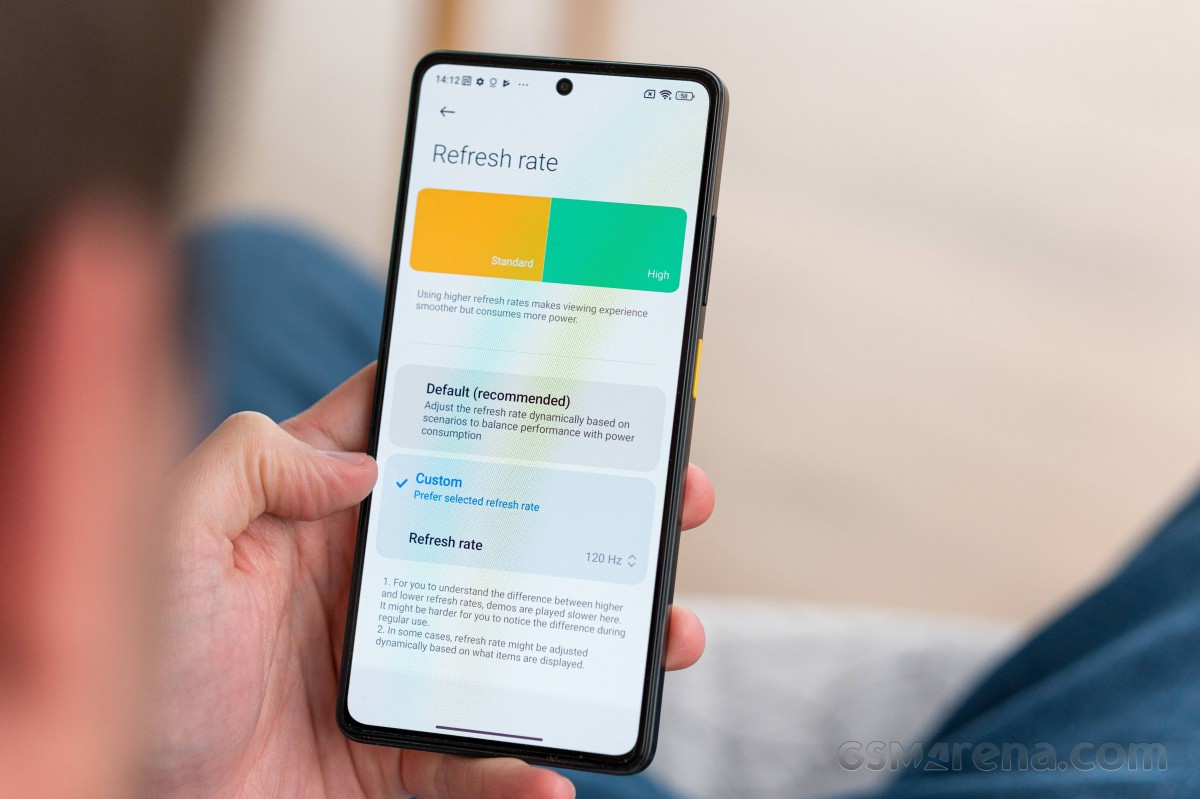
On the front is an improved AMOLED display with a diagonal size of 6.67 inches. It supports 1080p resolution, HDR10 certification and a 120Hz refresh rate, but the Poco X5 Pro also offers 10-bit color depth and Dolby Vision.


There’s a small hole in the top center, where you’ll find an old 16-megapixel camera.
The screen has relatively uniform edges, which is not always the case in mid-range phones.








Xiaomi Poco X5 Pro screen review
The Poco X5 Pro has an upgraded 6.67-inch AMOLED display from the Poco X4 Pro and Redmi Note 11. The improved panel supports 10-bit color depth and can display more than 1B colors. And in addition to HDR10, it now supports Dolby Vision content.
The rest of the specs are fairly familiar – 1080 x 2400 pixels resolution or 395ppi, 120Hz refresh rate, 240Hz touch response, wide color support and Gorilla Glass 5 protection.


The display supports 1920 Hz PWM exposure to minimize eye strain in low light conditions.
Poco promises 500nits of normal brightness and 900nits of maximum brightness, and we’re happy to confirm those numbers with our display testing. The minimum white point brightness was 2 nits, which is excellent.
Color accuracy
Poco X5 Pro display supports DCI-P3 wide color space and this is the default setting. Display color options offer three different color models – Vivid (default, DCI-P3), Saturated (DCI-P3 with saturation boost), and Standard (sRGB). You can adjust the color temperature for each mode. There is also a custom mode where you can choose the color spectrum and fine-tune the colors, saturation, hue, contrast, gamma.
The Vivid option (default) faithfully reproduces DCI-P3, and we found it to be fairly accurate, with the exception of bluish-white and gray tones (fixable by selecting a warm color temperature). The standard option corresponds to sRGB and provides accurate rendering, including whites and grays.
refresh rate

Streaming
The Poco X5 Pro comes with Widevine L1 DRM support, and Full HD streaming with HDR10 and Dolby Vision support is available on popular platforms, including Netflix.
Poco X5 Pro battery life review
It is powered by a 5,000 mAh battery and uses the Snapdragon 778G 5G chipset, which has quickly become one of the most popular mid-range phones. We’ve seen a few smartphones like the Xiaomi 11 Lite 5G NE and the Samsung Galaxy A52s match the Poco X5 Pro’s battery life.
The Poco X5 Pro earned an endurance rating of 113 hours, satisfying our call, web browsing, and video playback tests. Standby performance was slightly above average.
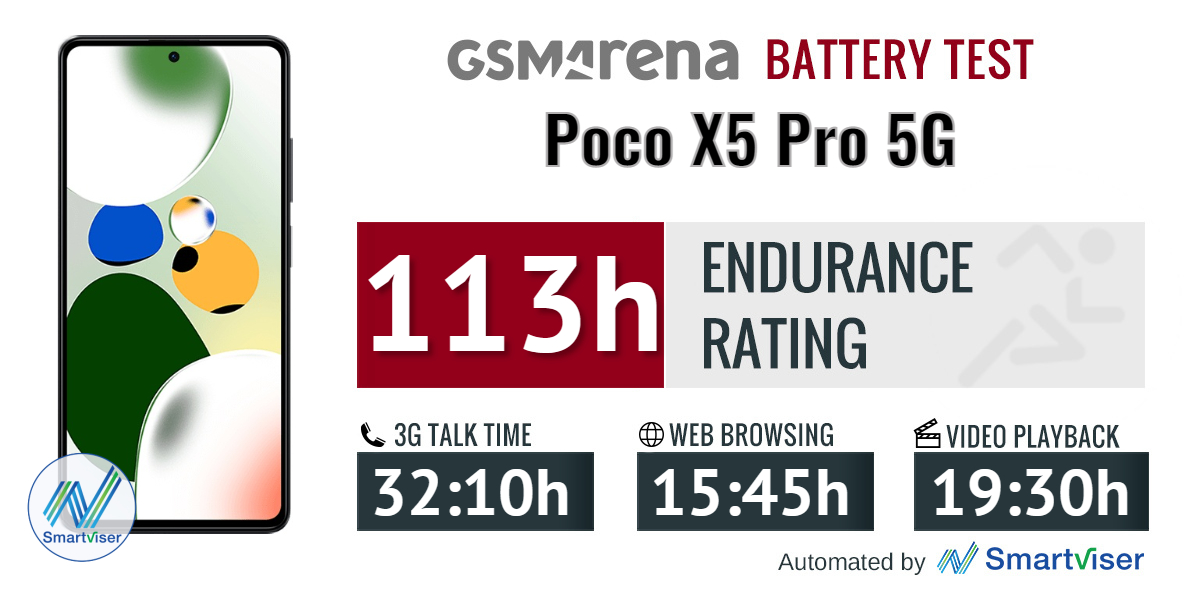

So let’s see how the Poco X5 Pro compares to other phones.


Checking the charging speed of Poco X5 Pro


Checking the speakers of Xiaomi Poco X5 Pro


Xiaomi Poco X5 Pro software review
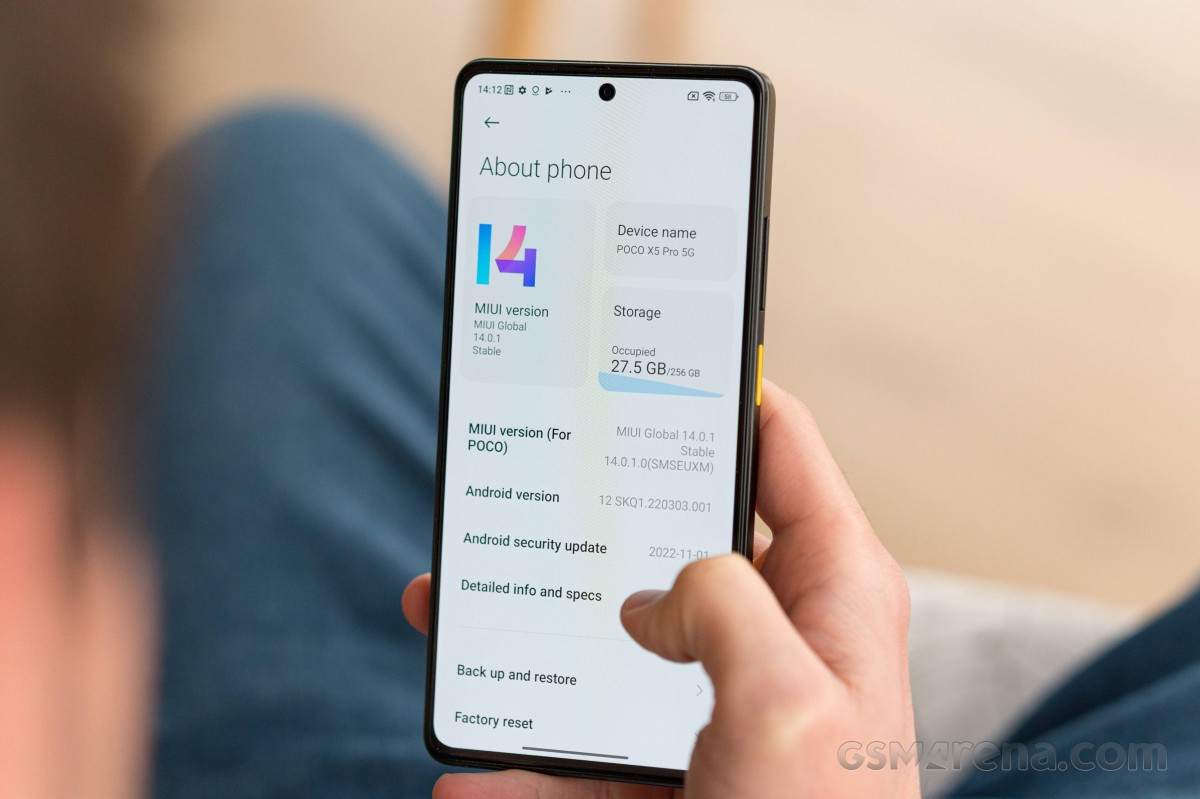


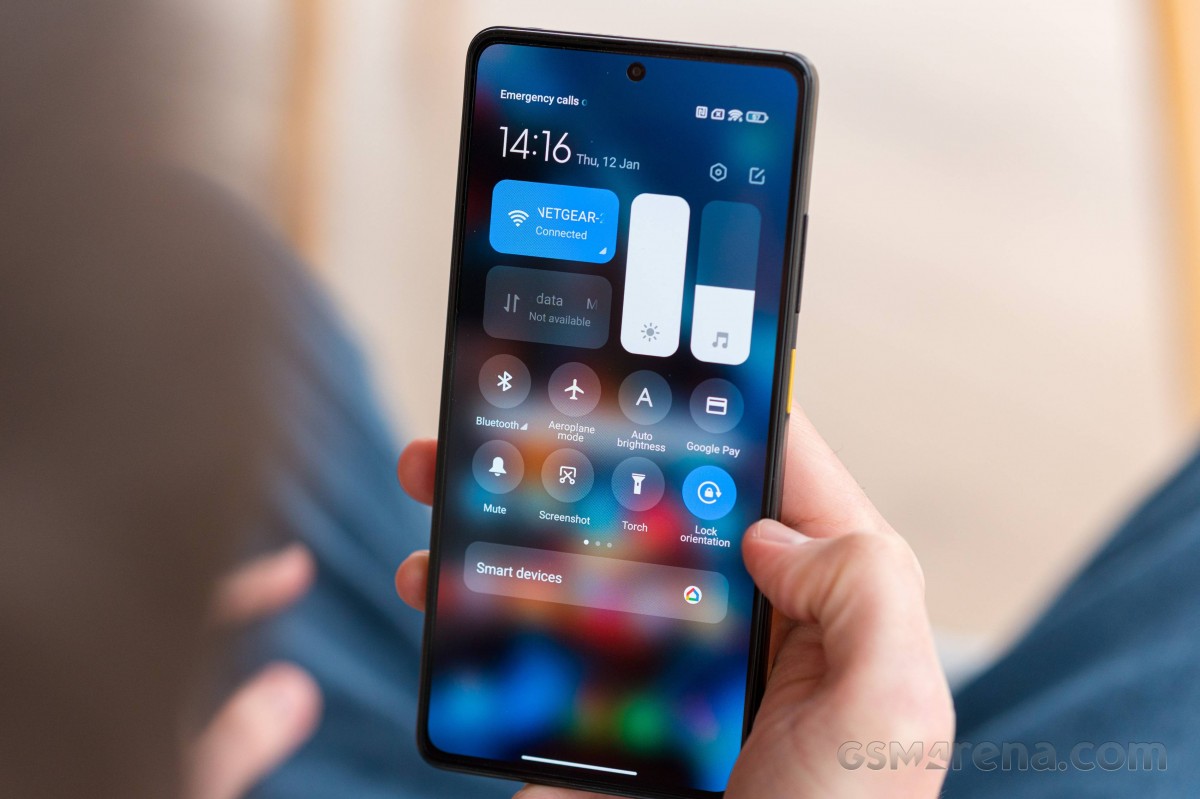

If you’ve ever used a Xiaomi, the task switcher is also familiar. It shows all your recent apps in two columns.
Split screen as well as floating window are supported. You can minimize some system apps like the calculator to a floating window – when you tap and hold on the app card, you can see if this option is available. Or you can pull down notifications to launch compatible apps in a popup view from within Notification Center.
The regular task switching option with side scrollable cards is not available in Poco Launcher.
MIUI also offers a security app. It can scan your phone for malware, manage your blacklist, manage or limit your data usage, configure battery behavior and free up some RAM. It can also manage the permissions of your installed apps, define the battery behavior of selected apps, and apply restrictions to specific apps only.
And speaking of memory, MIUI 14 offers Memory Extension option which is enabled by default (you can disable it if you want). In our review unit, we can choose between 2GB, 3GB and 5GB of internal memory reserved as RAM expansion. Less important memory blocks should go here.
The sidebar itself is not available. However, its video toolkit is available, and basically includes the entire sidebar functionality, but you have to manually make it available in a set of apps. When enabled, a small icon is visible at the edge of the screen that expands into a menu whenever you swipe on it. From here you run programs in pop-up windows.
Recommended for multimedia applications (such as YouTube, Mi Video, Gallery, etc.). In addition to options for floating windows, it contains shortcuts for Screenshot, Record screen, Cast and Play Video with the screen off that work on YouTube, without the need for a Premium subscription. But, as we mentioned, you need to whitelist the apps beforehand where you want this feature to be enabled.
Checking the performance and benchmarks of the Xiaomi Poco X5 Pro phone
The Poco X5 Pro uses the Snapdragon 778G 5G chipset – a huge upgrade over the Snapdragon 695 5G chipset in the Poco X4 Pro. It is a good 6nm chipset manufactured at TSMC foundries, which has an octa-core processor with four Kryo 670 cores @2.4GHz (based on Cortex-A78) and four Kryo 670 Silver cores @1.8GHz (based on Cortex-A55).
There is an advanced Adreno 642L GPU and an X53 5G modem (up to 3.3 Gbps download speed).
The base configuration of the Poco X5 Pro is now 6GB of LPDDR4X RAM and 128GB of UFS 2.2 storage. You can also opt for 8GB of RAM with 256GB of storage, and this is our review unit. Note that there is no microSD slot.
We’ve already seen a few phones with this chipset and we know it’s pretty good for this class, if not one of the most preferred. And if it weren’t for economic and logistical hurdles until 2022, the SD778G would probably become a widespread SoC in this class.


Anyway, let’s see some benchmarks.
The Poco X5 Pro has one of the fastest processors in the mid-range segment and we really can’t hope for more.


Xiaomi Poco X5 Pro camera review


Camera app
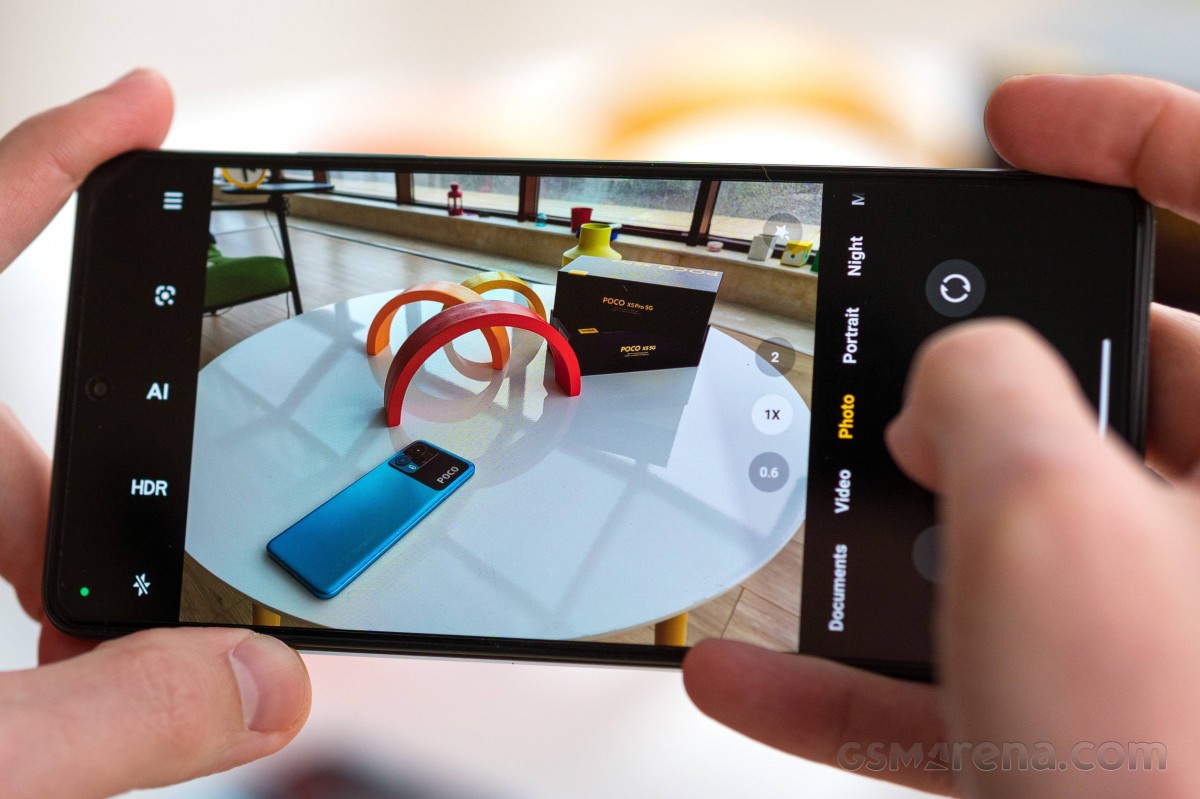

There is a well-featured professional mode where you can change the shooting parameters yourself. Here you can use primary and ultra-wide cameras. You can choose from 4 white balance presets or dial in the light temperature with a slider, a manual focus slider and shutter speed (1/4000s to 30s/0.8s for prime/ultra wide ) and there is ISO control with a range depending on it.
As expected, there are additional modes, including Long Exposure with a selection of different presets – moving crowd, neon trails, oil painting, light painting, starry sky and star trails.
Night mode is available on the main and ultra-wide cameras. Also, Auto Night mode is enabled by default in the settings.
The quality of photos taken during the day
There is an HDR switch on the viewfinder, which has two positions, auto off and on. If left on auto, HDR will turn yellow when the camera app decides to use HDR. This is extremely rare and the difference is a slight dynamic boost in the sky.
The main camera saves 12MP photos by default, and the photos are good, though not great. But let’s not forget that this is a mid-range phone.
Images offer excellent contrast, true-to-life colors, lovely dynamic range, and are clean of noise. Resolved detail is slightly above average, but far from ideal. Complex details (such as foliage) are often smeared (background) or over-sharpened (foreground).
We found those photos to be pretty good for this class – they look great when zoomed in, but at 100% zoom you might find them rather mediocre, as they’re over-processed and look a little artificial.
The quality of photos taken in low light
Poco X5 Pro supports automatic night mode – enabled by default in advanced settings. In theory it should work on both main and ultra-wide cameras, and the camera app should decide when and where to use night mode and exposure time.
Not exactly like other MIUI phones. The main camera used night mode for most of the scenes we shot, although it seemed to occasionally choose a lower exposure than manual in night mode afterwards. Unfortunately, it did nothing for the ultrawide camera.
Photos with the default auto night mode option are easy to love – they’re all well-exposed with great contrast and dynamic range, and color saturation is commendable. Resolved detail is high and noise, even if visible, is not a hindrance.
Sometimes the “Auto Night Mode” gives the wrong indication that it’s doing it or that the exposure time wasn’t long enough – and it messes up the photos and we get a little blurry. That’s why we recommend that you stand still for a second after you’ve finished shooting, and maybe take more than one shot.
Video quality
Review of competitors of Xiaomi Poco X5 Pro


Summary
Indeed, the yellow Poco X5 Pro is eye-catching, but not as attractive as its predecessors. It offers a great OLED with a fast refresh rate of 120 Hz, brightness up to 900 nits and HDR10 and Dolby Vision certifications.
Then comes the excellent Dolby Atmos speakers which are a nice complement to the Dolby display. And we appreciated the long battery life and fast charging.
Of course, the most popular upgrade is the new chipset. The Snapdragon 778G is one of the reasons why the Galaxy A52s is so popular in our conclusion, and we suspect the Poco X5 Pro will follow suit. If only Pocos were IP67 rated like the Galaxy, but we’d guess they’d still do just fine with the unofficial IP53 rating.
The camera department remains the same as the Poco X4 Pro and so is the photo quality. But the new chipset allows for 4K video recording, and it’s pretty awesome. Here is another good news.


Finally, MIUI 14 on top of Android 12 looks exactly like MIUI 13, with none of the obvious new features here. Maybe the underlying optimizations did it, maybe not. But once again most of the new MIUI stuff seems to be reserved for the Chinese MIUI ROM.
The Poco X5 Pro 5G is a decent sequel with some minor flaws, which is why it gets our recommendation. It is one of the best phones in its price range and its specs and solid real-life performance will easily impress most potential buyers.
Why should we buy Poco X5 Pro?
- Nice no-nonsense design, just sticky enough.
- Dolby Vision OLED Excellent, bright, 120Hz refresh rate.
- Great battery life, fast charging.
- Powerful stereo speakers, great sound.
- Great performance, compatible with games, 5G.
- All-round photo and video quality is very good.
- Two 5G SIM cards, Wi-Fi 6, NFC, 3.5 mm jack, IR port. MIUI 14 right out of the box.
Why should we avoid buying Poco X5 Pro?
- The microSD slot is gone, as is the FM radio.
- The quality of the macro camera is poor.
- Quad-Bayer selfie camera.
Source: GSMARENA.COM


You may like
Technology
Unveiling of OpenAI new artificial intelligence capabilities
Published
2 days agoon
14/05/2024

OpenAI claims that its free GPT-4o model can talk, laugh, sing, and see like a human. The company is also releasing a desktop version of ChatGPT’s large language model.
Unveiling of OpenAI new artificial intelligence capabilities


Natural human-computer interaction
What exactly does the introduction of this model mean for users?
Strong market for generative artificial intelligence



Samsung S95B OLED TV review
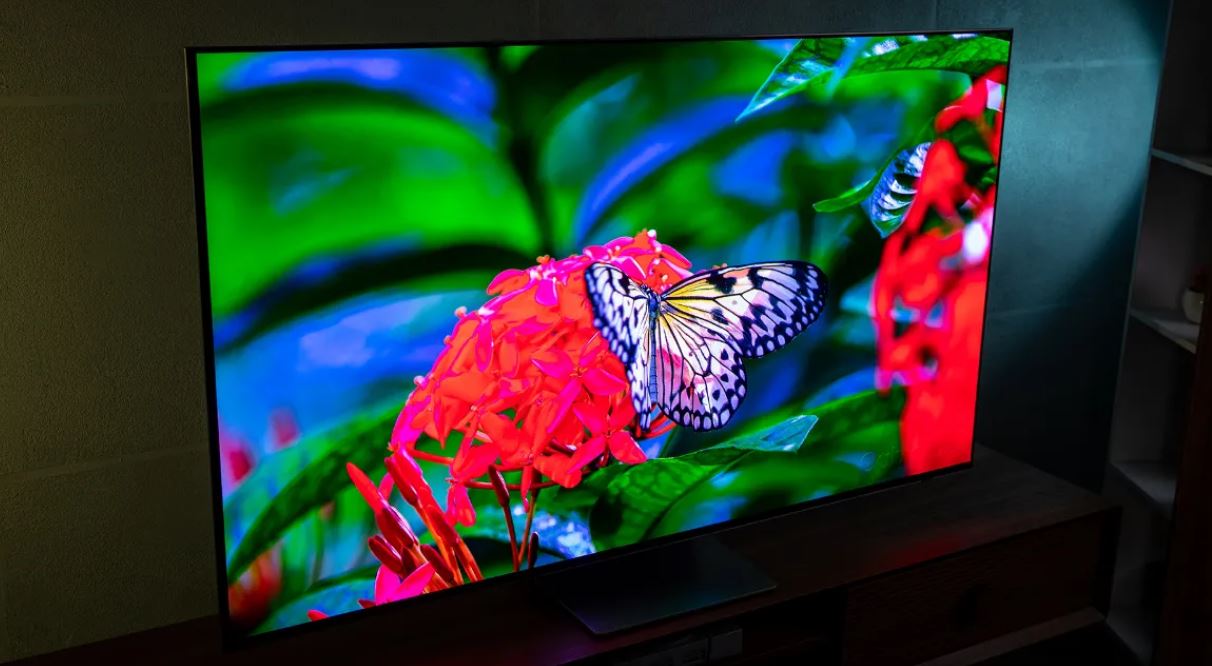
What can be placed in a container with a depth of 4 mm? For example, 40 sheets of paper or 5 bank cards; But to think that Samsung has successfully packed a large 4K OLED panel into a depth of less than 4mm that can produce more than 2000 nits of brightness is amazing. Join me as I review the Samsung S95B TV.
Samsung has a very active presence in the smartphone OLED display market, and by the way, it also has some of the best and most stunning small OLED panels in its repertoire; But surprisingly, it has been a little more than a year since he seriously entered the OLED TV market; Of course, Samsung launched its first OLED TV in 2013 and quickly withdrew from the large-size OLED market and left the field to its traditional and long-standing rival, LG.
In the years after withdrawing from the OLED TV market, Samsung focused on the evolution of LCD TVs with technologies such as Quantum Dot and MiniLED; But after almost 10 years, Samsung decided to once again try its luck in the world of OLEDs, and thus, in 2022, it launched the S95B TV in two 55-inch and 65-inch models.
In 2023, Samsung introduced the S95C TV as a successor to the S95B and unveiled the S95D model at CES 2024; While Samsung’s 2024 TV has just been launched in international markets a few months after its launch, it is still hard to find its 2023 model in the Iranian market. Accordingly, we have prepared the 65-inch S95B model from 2022 for review. It is more numerous than the 2023 model in the market of the country.
Slim design… super slim
What draws attention to Samsung TV at first sight is not its eye-catching image and ear-pleasing sound, but its infinite slimness. The S95B was so slim that when I unboxed and installed it, I experienced the same level of anxiety I had on exam night! Samsung OLED TV is only 3.89 mm thick; For this reason, despite all the company’s efforts in strengthening the body, it still simply shakes and sways.

Samsung calls the ultra-slim design of its TV LaserSlim; Because the laser beam is narrow and sharp; So you should be very careful when installing the TV. I wish we knew what is the logic behind the childish efforts of companies to make the world’s thinnest TV. To some extent, the narrowness of the TV helps to make it more modern and better installed on the wall; But the strength of the TV should not be sacrificed to make it thinner.

Samsung designers have not spared even the edges of the TV! The width of the edges around the panel does not exceed 8 mm. The narrowness of the edges helps the user to immerse well in the depth of black and the extraordinary contrast of the OLED TV panel and enjoy the content to the fullest.

The S95B TV has a high-quality and well-made body, the frame of the device is metal, and like most OLED TVs in the market, there is a wide plastic protrusion in the lower half of which parts such as the board, speakers, and power supply are placed. Due to this protrusion, the thickness of the body reaches 4.1 cm in the maximum state.


Unfortunately, just like LG’s OLED TVs, the base of the S95B is also located in the middle of the device; Although the base itself is metal and relatively wide; the large dimensions of the TV and its very small thickness make it not to be firmly and firmly placed on the table and not to wobble; Of course, you can install the TV on the wall with a 300×200 mm VESA mount.


All the ports of the S95B TV, including HDMI and USB, are included in the plastic protrusion on the back of the device. These ports are covered with a plastic screen to integrate and beautify the back of the device. After installing it, surprisingly, you won’t be able to access the ports! Samsung TV ports are as follows:
- Four HDMI 2.1 ports with the ability to transfer 4K120 image signal; Two ports facing down and two ports on the side of the frame
- Two USB 2.0 ports on the side of the frame
- A network port
- Internal and external receiver input
- An optical audio output
One of the HDMI ports (number 3) has eARC capability and can be used to connect the device to the soundbar. USB ports are also different in terms of current and voltage; One of the ports is limited to 0.5 amps and 5 volts and the other is limited to 1.0 amps and 5 volts; Therefore, it is considered a more reasonable option for connecting an external hard drive.
Stunning brightness and disappointing color accuracy
I mentioned earlier that we had the 65-inch S95B model available for review. With such dimensions, you can enjoy the 4K resolution of the panel the most if you sit at a distance of about 2 meters from the TV; At closer distances, pixels can be separated, and at distances greater than 2 meters, your brain’s perception of a 4K image will be no different from a 1080p image.

The Samsung S95B TV uses a 10-bit OLED panel with a resolution of 4K or 2160 x 3840 pixels and can display more than a billion colors. Supporting this number of colors is essential to provide an optimal experience of HDR content playback. In the following, I will explain more about the compatibility of Samsung TVs with HDR standards and the quality of color display.
Unlike LCD panels, where the light needed by the pixels is provided by a number of LED lights on the edge or back of the panel, in OLED panels, each pixel provides its own light; As if instead of a limited number of exposure areas, for example 500-600 in MiniLED TVs, we have more than 8 million exposure areas; Thus, to display the color black, the pixels are turned off, so that instead of a spectrum of gray color, we see a deep black and experience an extremely high contrast.
 The absence of any Blooming thanks to the precise control of light in the TV’s OLED panel
The great advantage of self-lit pixels (pixels that provide their own light) in displaying deep black and preventing the Blooming phenomenon (creating a halo around bright subjects in a dark background) thanks to the very precise control of the light distribution, also has some weaknesses; The greater vulnerability to burn-in phenomenon during long-term static image display and the lower level of OLED panel brightness compared to MiniLED samples are among these weaknesses.
Like other OLED TVs, the S95B TV is not immune to the risk of burn-in. In order to reduce the possibility of this phenomenon, the Koreans have considered solutions such as moving the image slightly in different time periods. Unfortunately, we do not have the possibility to examine the TVs for a long time to evaluate their performance in preventing the risk of burn-in; But at least based on RTINGS’ long-term and unrealistic test, the S95B seems to be more vulnerable compared to its competitors; However, in real use, it is unlikely that a user would want to watch TV with such intensity.
To overcome the inherent weakness of OLED panels in achieving higher levels of brightness, Samsung engineers have combined quantum dot technology with OLED panels. Quantum dots are very small crystal particles that are layered in the heart of the display panel. With the help of the quantum dot layer, the panels achieve higher brightness and produce more vivid colors. Samsung calls its combined panel QD-OLED and claims that with the help of the Neural Quantum processor in the heart of the S95B TV, this panel can raise the brightness to a higher level than its competitors.
|
Samsung S95B 65-inch TV brightness with default settings |
||||
|---|---|---|---|---|
|
Image modes/pattern white percentage |
10 percent |
50 percent |
100 percent |
|
|
SDR |
Dynamic |
1065 |
633 |
364 |
|
Standard |
740 |
487 |
281 |
|
|
Movie |
430 |
399 |
229 |
|
|
HDR |
Dynamic |
2094 |
— |
— |
|
Standard |
2179 |
— |
— |
|
|
Movie |
2179 |
— |
— |
|
|
FILMMAKER Mode |
2175 |
— |
— |
|
In my measurements, when only 10% of the screen was lit and the device was playing a normal SDR image, the brightness of the S95B panel reached 1100 nits in the highest mode, which is a very good number and better than the brightness of the C2 and C3 TVs in the same conditions, respectively. It is about 300 and 100 nits more.
Aside from the S95B’s excellent performance in SDR image brightness, the real magic happens when the device is playing HDR video. In this situation, when 10% of the screen is lit, the brightness reaches a stunning number of about 2200 nits, which is 700 nits more than the HDR brightness of the C2 and C3 TVs. Achieving such a level of brightness helps the TV to deliver a stunning HDR movie viewing experience.
|
Comparison of brightness and contrast of S95B with other TVs |
||
|---|---|---|
|
TV/parameter (the brightest profile) |
Brightness (50% pattern) |
contrast |
|
Samsung S95B |
633 |
∞ |
|
LG C3 |
603 |
∞ |
|
LG QNED80 |
580 |
116 |
|
LG NANO84 |
295 |
149 |
|
LG C2 |
525 |
∞ |
|
LG QNED96 |
470 |
— |
Note that the stunning numbers of 1100 and 2200 nits are obtained when a small part of the screen is bright, which is often the case in movies and series, and the entire image is not full of bright colors; But when the whole screen is lit; For example, consider a scene from The Lord of the Rings where we see Galadriel in the land of the elves, in such a situation, the maximum brightness of the whole screen is about 370 nits, which is still 40 nits higher than the LG TV.

Thanks to the panel’s excellent brightness and the deep blacks produced by the muted pixels, it’s no surprise that the Samsung TV’s image contrast is superb; Especially since there is an anti-reflective coating on the panel so that you can enjoy the image even in bright environments; Note that unlike what comes from the corners of the panel, you should not remove this anti-reflective layer from the panel; Otherwise, you will face problems like us!
If you think that the S95B is the best TV on the market so far, I must say that not everything about the S95B is rosy.
The S95B TV provides the user with the following four color profiles, all of which tend to be very cold by default and do not produce very accurate colors.
- Dynamic
- Movie
- Standard
- FILMMAKER Mode
Like most OLED TVs on the market, the S95B TV also covers a wide range of colors. In my tests, the Samsung TV managed to cover about 148% of the sRGB color space, nearly 100% of the DCI P3 wide space, and 75% of the Rec 2020 ultra-wide space. These numbers are great, But the disappointing thing is the very low accuracy of the device in producing the mentioned colors with factory settings.
|
Samsung S95B 65-inch TV performance in covering color spaces with default settings |
||||||
|---|---|---|---|---|---|---|
|
Image mode/color space |
sRGB |
DCI-P3 |
Rec. 2020 |
|||
|
cover |
mean error |
cover |
mean error |
cover |
mean error |
|
|
Dynamic |
146 |
— |
98.6 |
13.7 |
77.9 |
— |
|
Standard |
147.7 |
— |
99.7 |
12.1 |
78.7 |
— |
|
Movie |
125.4 |
— |
89.5 |
4.6 |
65.5 |
— |
|
FILMMAKER Mode |
121.9 |
— |
89.5 |
4.1 |
64.6 |
— |
Note that the FILMMAKER mode belongs to the UHD union and most big companies like Samsung, LG and Hisense use it in their TVs. On paper, with FILMMAKER mode, we should see movies as the director intended.
|
Comparison of Samsung S95B color accuracy with other TVs (default settings) |
||
|---|---|---|
|
TV/parameter (the most accurate profile) |
DCI P3 |
|
|
Covering |
Color accuracy |
|
|
Samsung S95B |
89.5 |
4.1 |
|
LG C3 |
96.8 |
3.0 |
|
LG QNED80 |
90.7 |
2.7 |
|
LG NANO84 |
82.9 |
— |
|
LG C2 |
98.7 |
2.1 |
|
LG QNED96 |
90.8 |
3.9 |
The most accurate colors of the S95B TV are depicted by the FILMMAKER Mode profile with an error of 4.1, in which the TV covers about 90% of the DCI P3 color space; As a comparison, in the review of the C3 TV, the color display error in the same FILMMAKER mode was 3.6 and in the most accurate color profile it was 3.0; Therefore, Samsung TV does not have an interesting performance in terms of factory calibration of colors.
We were so surprised by the results that we returned the TV and got another S95B to review, But the results did not change.
Fortunately, Samsung TV provides you with various settings to change parameters such as gamma, color temperature, color hue, and brightness limiter (ABL) so that you can achieve your desired style and style for displaying colors; For example, I was able to reduce the color display error in the Standard profile from a terrible number of 12.1 to a very good number of 3.0 by making the following changes.
|
Color accuracy of S95B TV after minor changes in panel settings |
|||
|---|---|---|---|
|
Image mode/color space |
DCI-P3 |
||
|
Settings |
Average error (recommended: less than 3) |
Color temperature (neutral: 6500 K) |
|
|
Standard |
default settings |
12.1 |
14236 |
|
ABL: Off Contrast Enhancer: Low Gamma: 2.2 |
3.0 |
8180 |
|
Another weakness of Samsung S95B TV compared to LG OLEDs is that it does not support HDR videos with Dolby Vision standard; The iPhone, for example, records HDR video using the same standard. Samsung TV supports HDR10, HDR10+, and HLG standards.

Like other OLED TVs, the Samsung S95B TV has wide viewing angles, and even from the corners, it displays colors with the least drop in freshness; So if you use wide furniture at home, you can safely go to S95B.
Samsung has focused a lot on the gaming capabilities of its TV; The device uses a 120 Hz panel with support for FreeSync Premium and G-Sync technologies, and the TV itself provides the user with Game Mode, which, by activating it, significantly reduces Input Lag, makes available a variable refresh rate, and The frames of the games can also be seen.

Samsung compensates for the visual weaknesses of the S95B TV with the amazing listening experience of its powerful speakers; While a TV like the LG C3 uses 40-watt speakers, Samsung engineers have used 60-watt speakers with a 2.2.2 channel combination in the S95B’s slim body; In the sense that two speakers throw the sound down, two speakers throw the sound up, and two woofers are responsible for producing low frequencies.
The S95B TV supports Dolby Atmos surround sound and its sound output is considered excellent for a TV; The volume is high, you can hear the pounding bass, and at high volumes, the distortion is controlled at a reasonable level.
Tizen; The user interface is more limited and different from competitors
Finally, we must avoid the TV user interface; Samsung’s OLED TV, like the rest of the company’s TVs, uses the Tizen operating system. The user interface of the device is smooth and smooth, moving between different menus of the user interface is done without problems, although sometimes with a little slowness; But the device can play most of the video formats.


A number of functions are also available, which doubles the enjoyment of the TV experience, provided that the user uses a Samsung phone; For example, you can run the Samsung phone’s desktop mode or Dex on the TV and use the phone’s screen as a trackpad. The phone can even be used as a webcam to make video calls with Google Mate on the TV.
If you want to write a text, you can call Microsoft365 from the Workspace section of the user interface by connecting a Bluetooth mouse and keyboard to the Samsung TV and start writing in Microsoft Word software.

Samsung Internet Browser is available in the S95B TV user interface; But the Samsung remote control, despite its compact design and the possibility of being charged with a solar panel or USB-C port, does not have the ability to use a mouse; So you have to browse the web with the arrow keys of the remote control; In my opinion, this is one of the main weaknesses of Samsung TV compared to LG TV with its practical magic remote.


As another weakness, we should mention Samsung’s not very rich store; For example, you can’t find some useful apps like Spotify or native apps like Filmo in the Samsung TV store.
Read more: How to connect to the TV with a Samsung phone?
Without a doubt, the S95B is one of the most stunning TVs we’ve ever reviewed on Zoomit; An attractive and extremely slim device that will amaze you with its stunning brightness and contrast, impressive gaming capabilities, and very powerful speakers.
In terms of factory color calibration, the S95B appears below expectations and a bit disappointing; So, if you are not very fond of the image and do not know much about color parameters, you will have to start with inaccurate and very cold colors; But if you are aware of the color parameters, you can change them and enjoy the attractive picture of the TV to the fullest.

The S95B TV is one of Samsung’s 2022 flagships, and now its 65-inch model is sold in the price range of 105 million Tomans; In this range, go for the more updated LG C3 TV with more accurate colors, or for a little more money, choose the Sony A80L TV for 2023, which is powered by a more practical Android operating system; In addition, C2 TV is also available at a price of 10 million less than in 2022.
what is your opinion? Do you think the S95B is a reasonable choice or do you prefer other models from LG or Sony?
Pros
- Very high brightness
- 6 powerful speakers
- Very modern and attractive design
- Deep black and excellent contrast
Cons
- Low color accuracy with default settings
- Too thin and vulnerable body
Technology
MacBook Air M3 review; Lovely, powerful and economical
Published
1 week agoon
06/05/2024

MacBook Air M3 review; Lovely, powerful and economical
If you are looking for a compact, well-made and high-quality laptop that can be used in daily and light use, the MacBook Air M3 review is not for you; So close the preceding article, visit the Zomit products section and choose one of the stores to buy MacBook Air M1 ; But if you, like me, are excited to read about the developments in the world of hardware and are curious to know about the performance of the M3 chip in the Dell MacBook Air 2024 , then stay with Zoomit.
The design is a copy of the original from the last generation
Almost two years have passed since Apple said goodbye to the familiar and wedge-shaped MacBook Air design; A different design that accompanied this ultrabook from the first day of its birth in 2008; But finally in 2022, with the aim of harmonizing the design language of the Apple laptop family, it was abandoned so that the MacBook Air 2022 will have a similar appearance to the 14-inch and 16-inch MacBook Pro.
The new MacBook Air is uniform in thickness; But it was slimmer, the screen was bigger, the edges were narrower and the corners were rounded, and a relatively large notch was added to it, whose only existence was to host the device’s 1080p webcam. MacBook Air 2022 also marked the return of the MagSafe magnetic charging port to Apple’s popular Ultrabook.
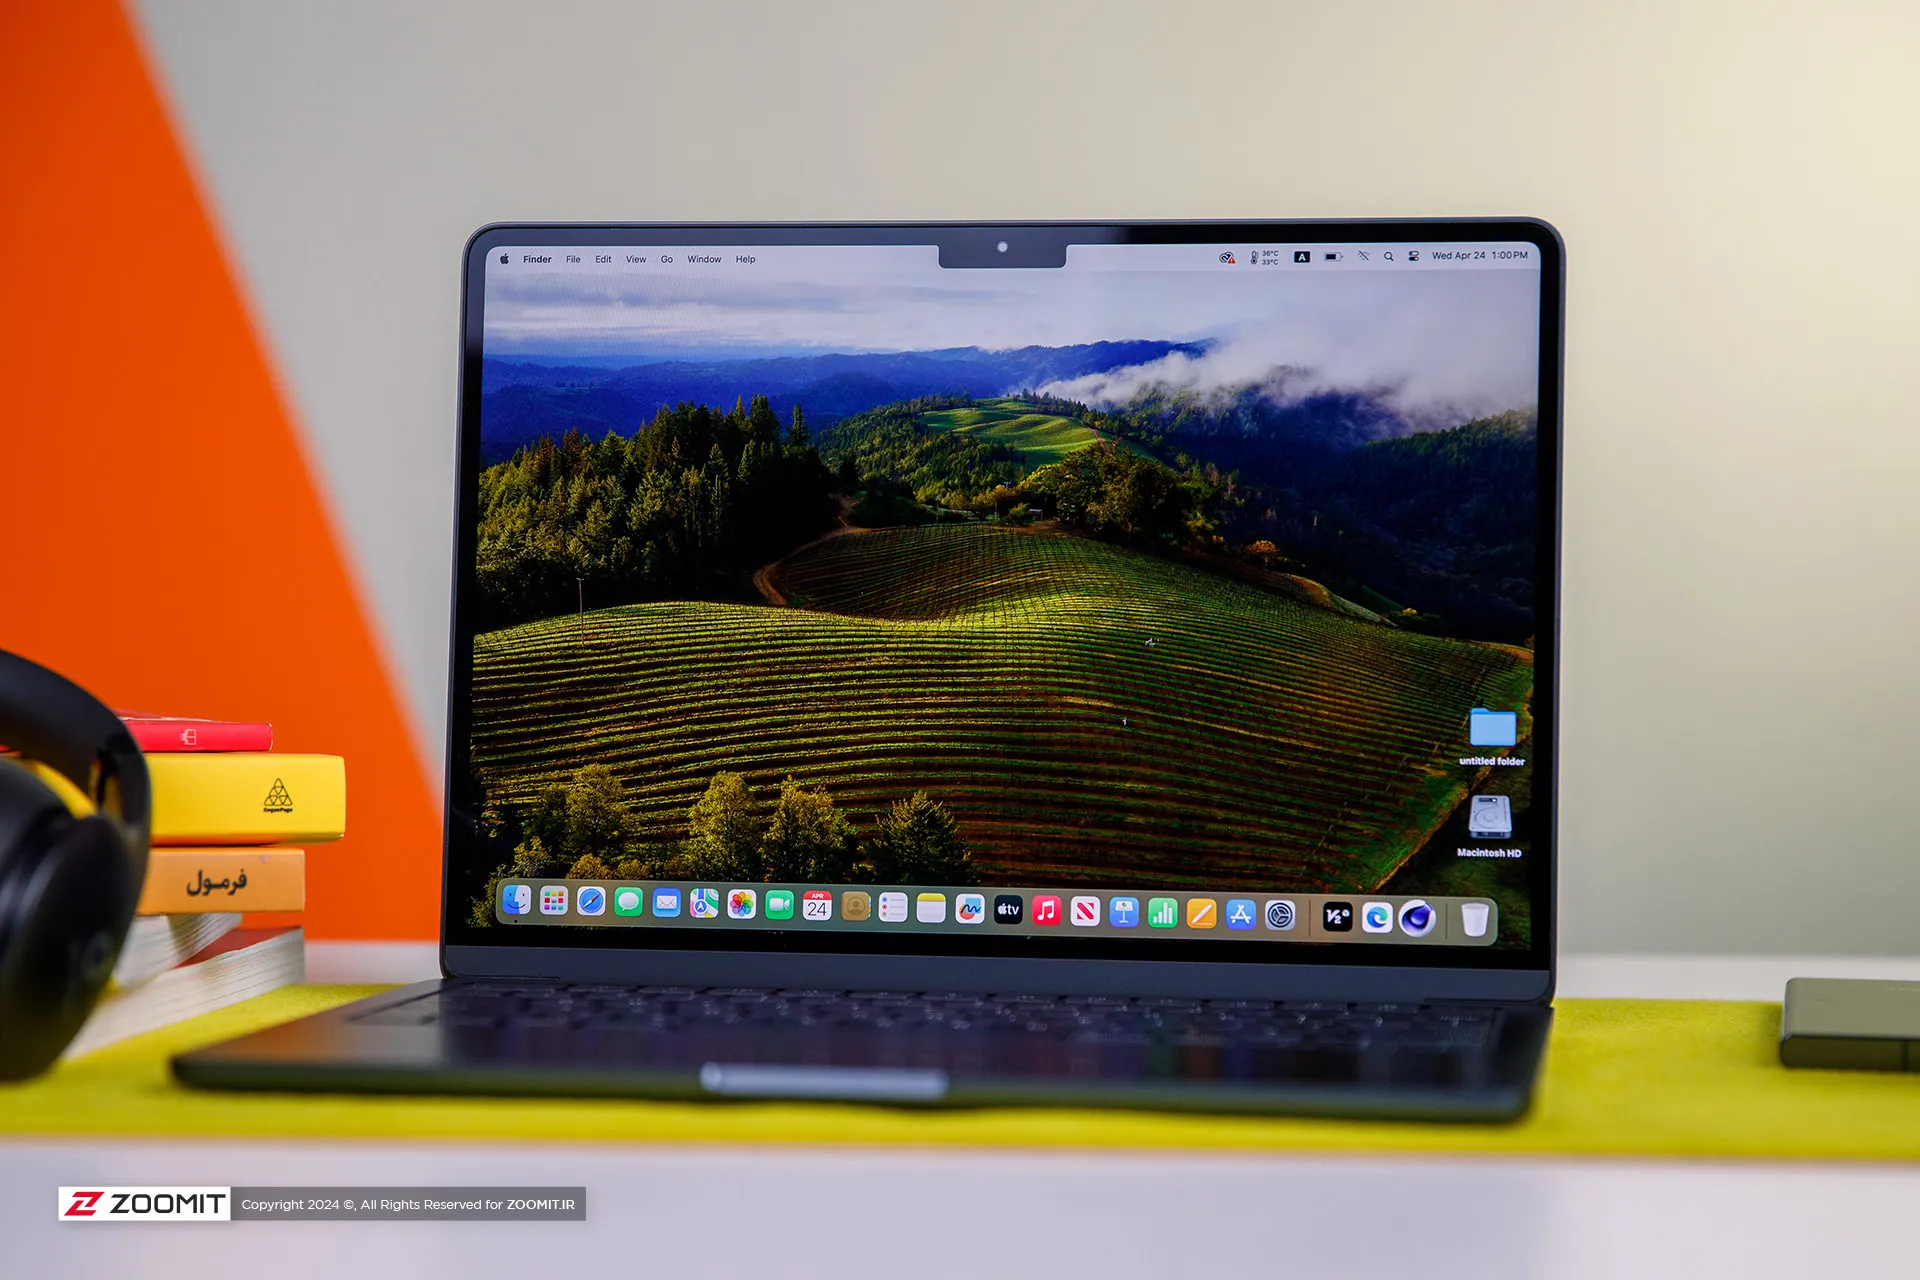
Previously, in the review of the MacBook Air 2022 with the M2 chip, we have talked comprehensively and deeply about its design and its positive and negative points. I suggest that if you haven’t read the article, you must visit it; Because the MacBook Air M3 is no different from the MacBook Air M2 in terms of appearance, display, or ports.
We also see the same incredibly well-made and metal body of MacBook Air 2022 in the new generation of Apple Ultrabooks; A body that, like the rest of Apple laptops, is carved from an aluminum block instead of the usual method of using aluminum sheets, and for this reason, it has a strong and dense structure so that we do not see the body sinking when pressing the keyboard area or the screen frame swinging.
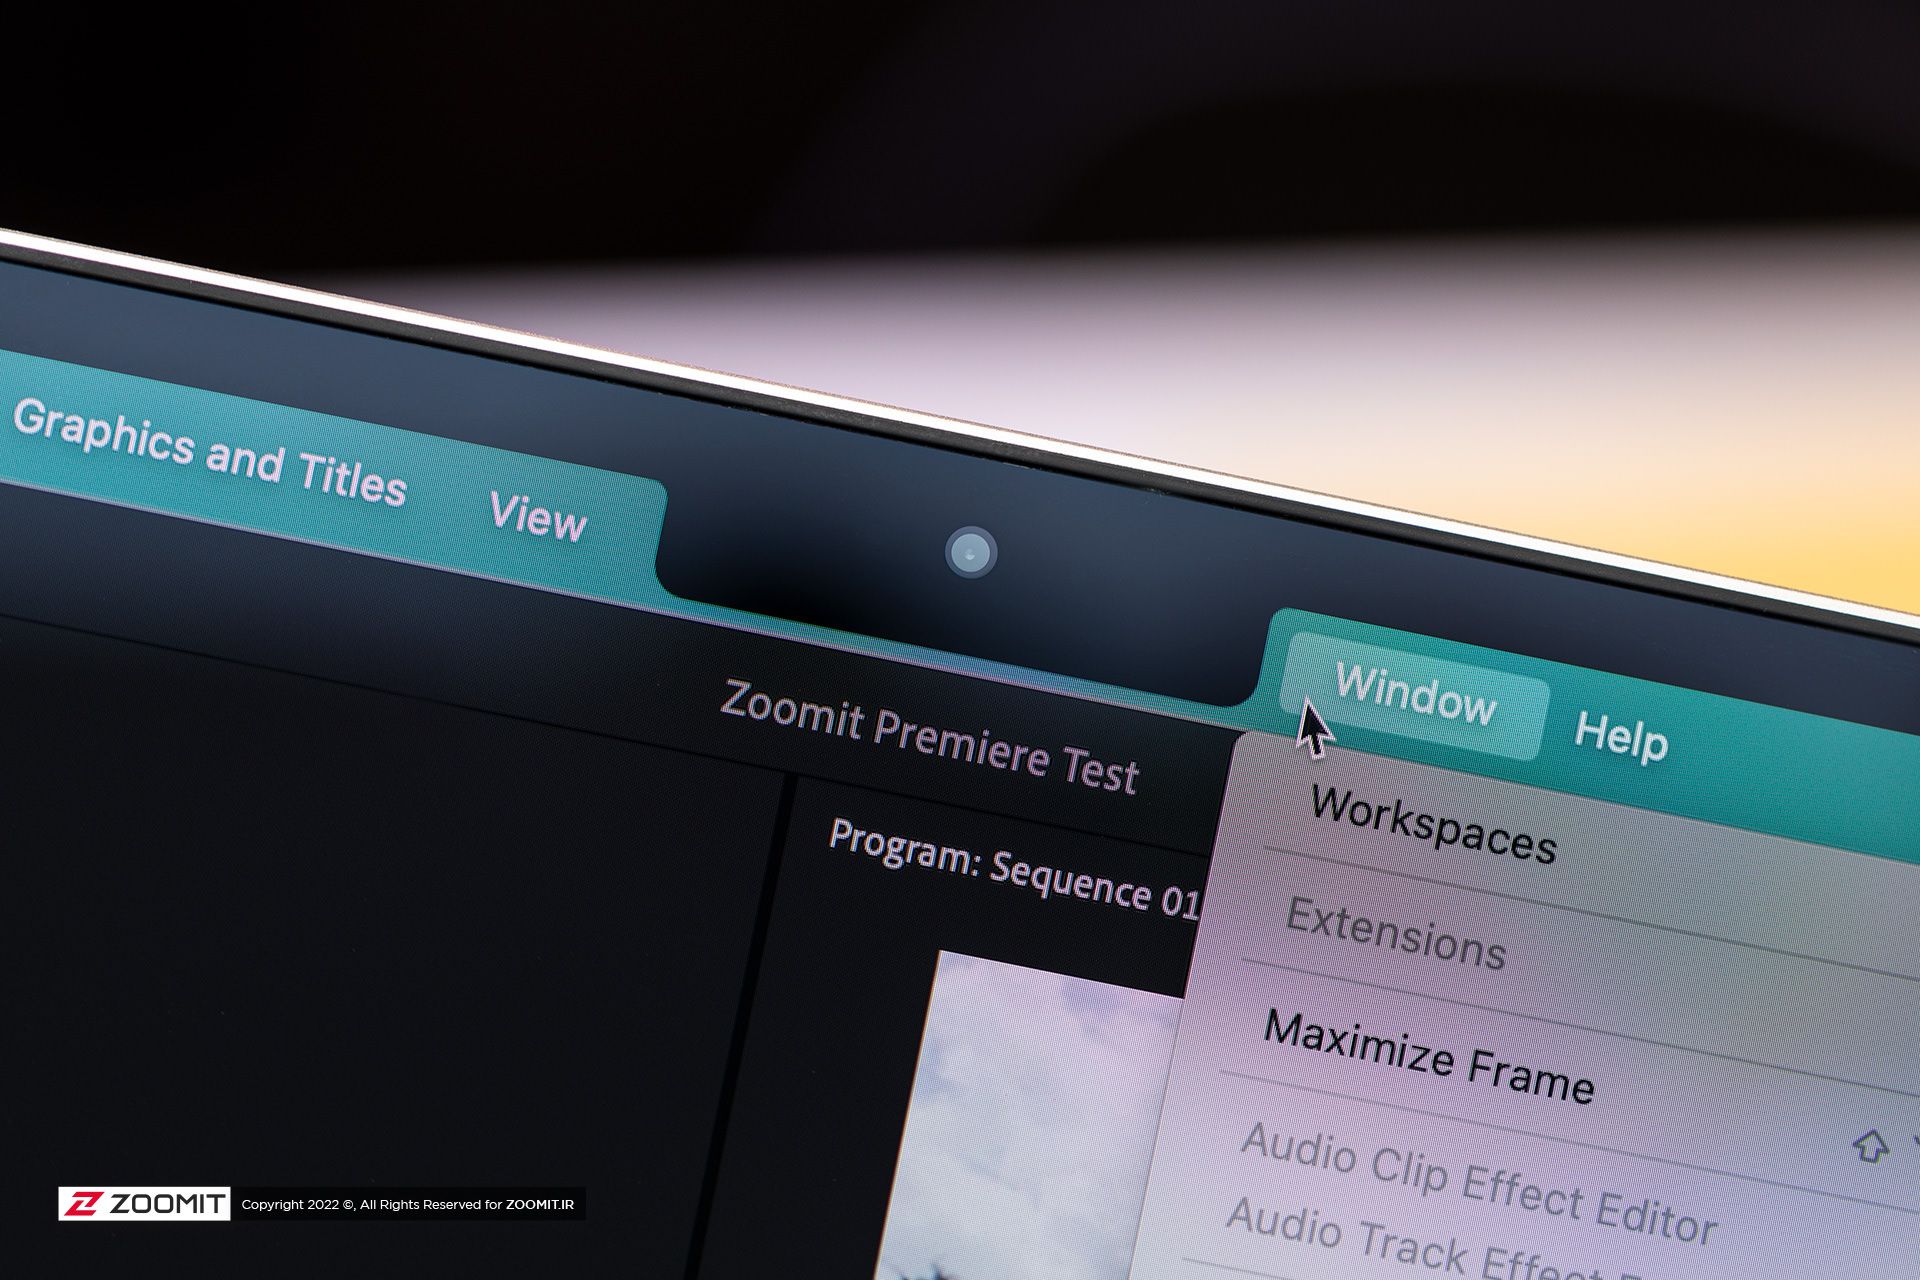
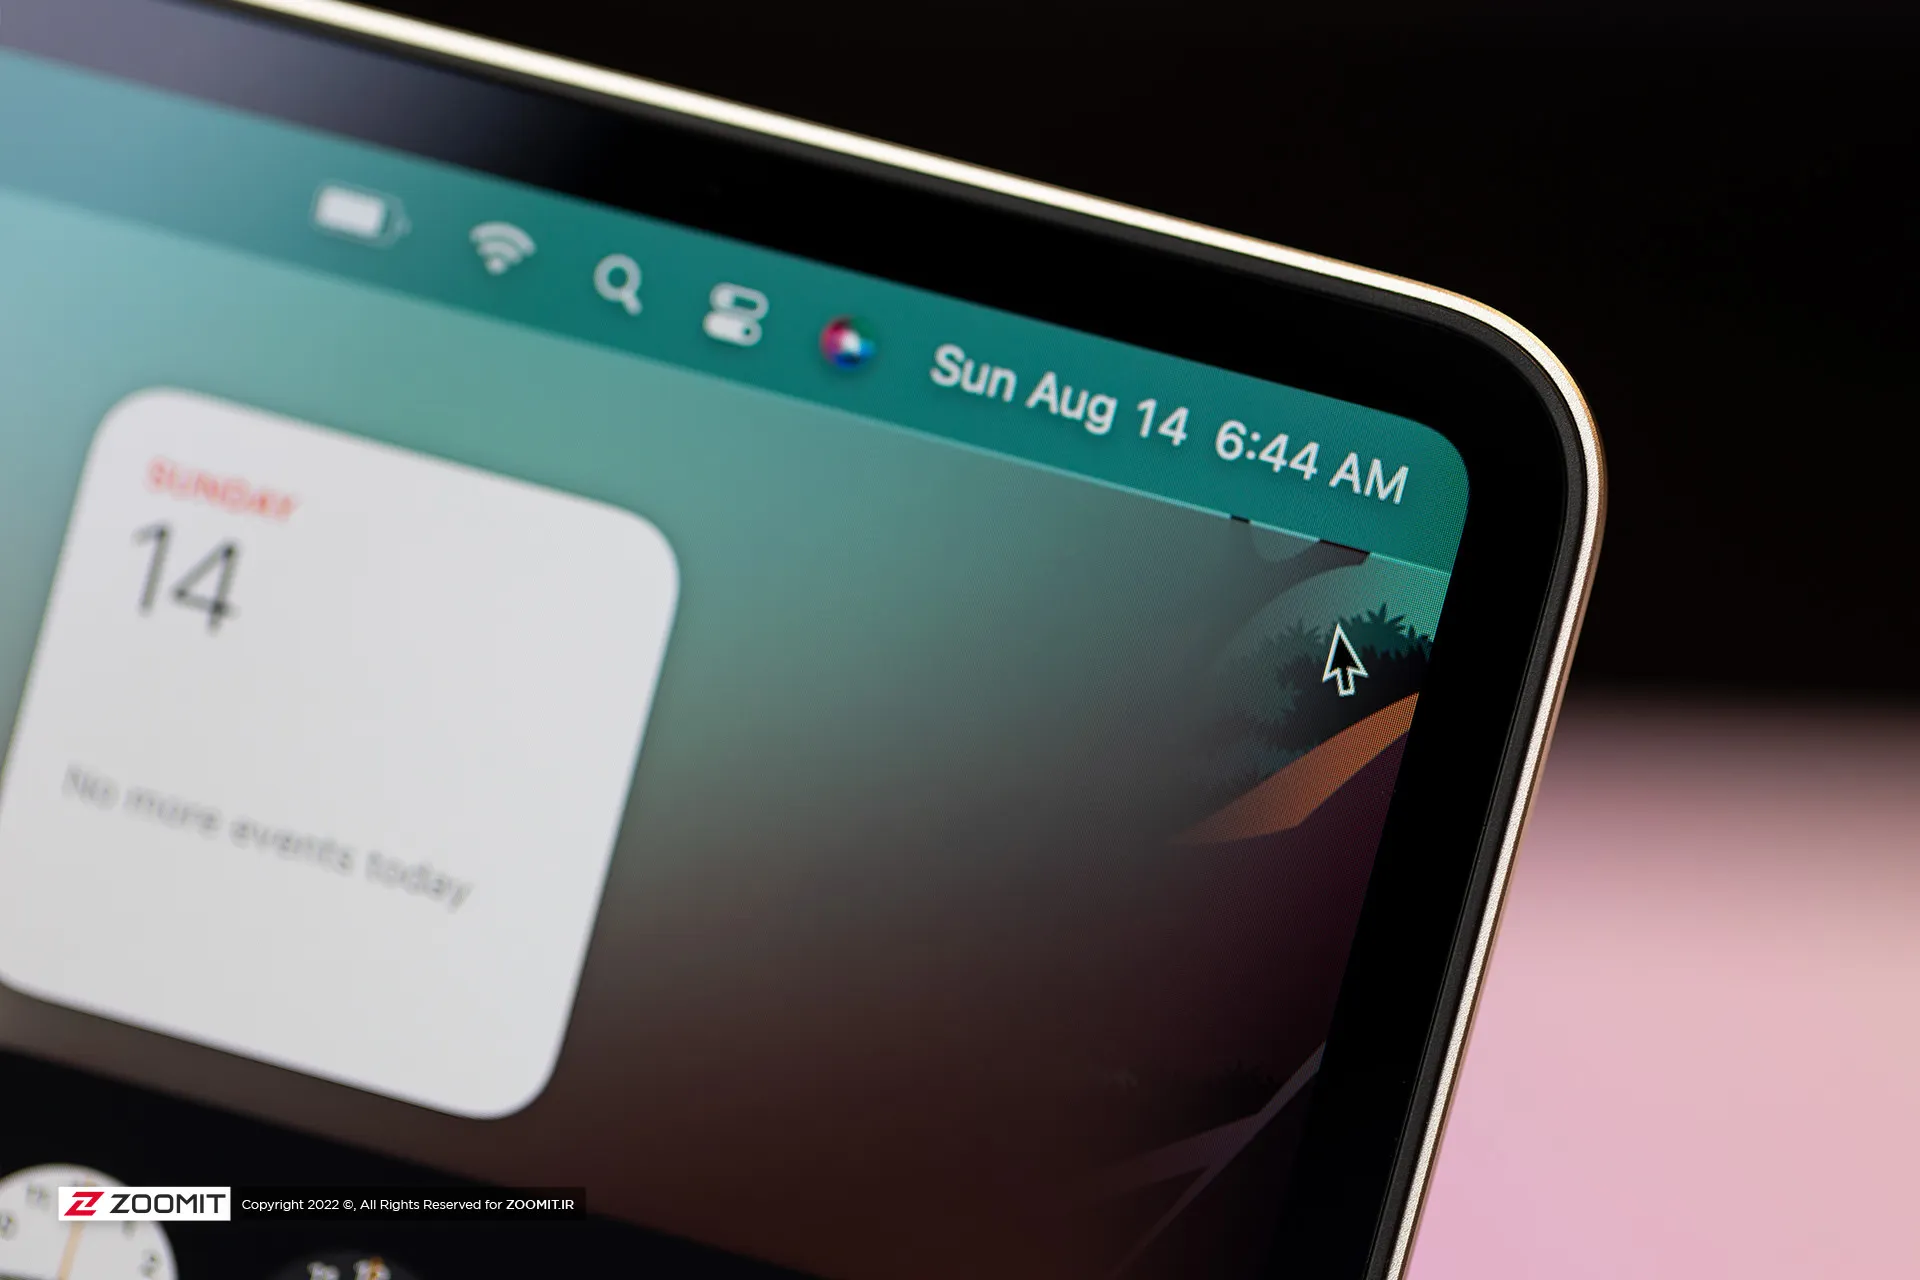
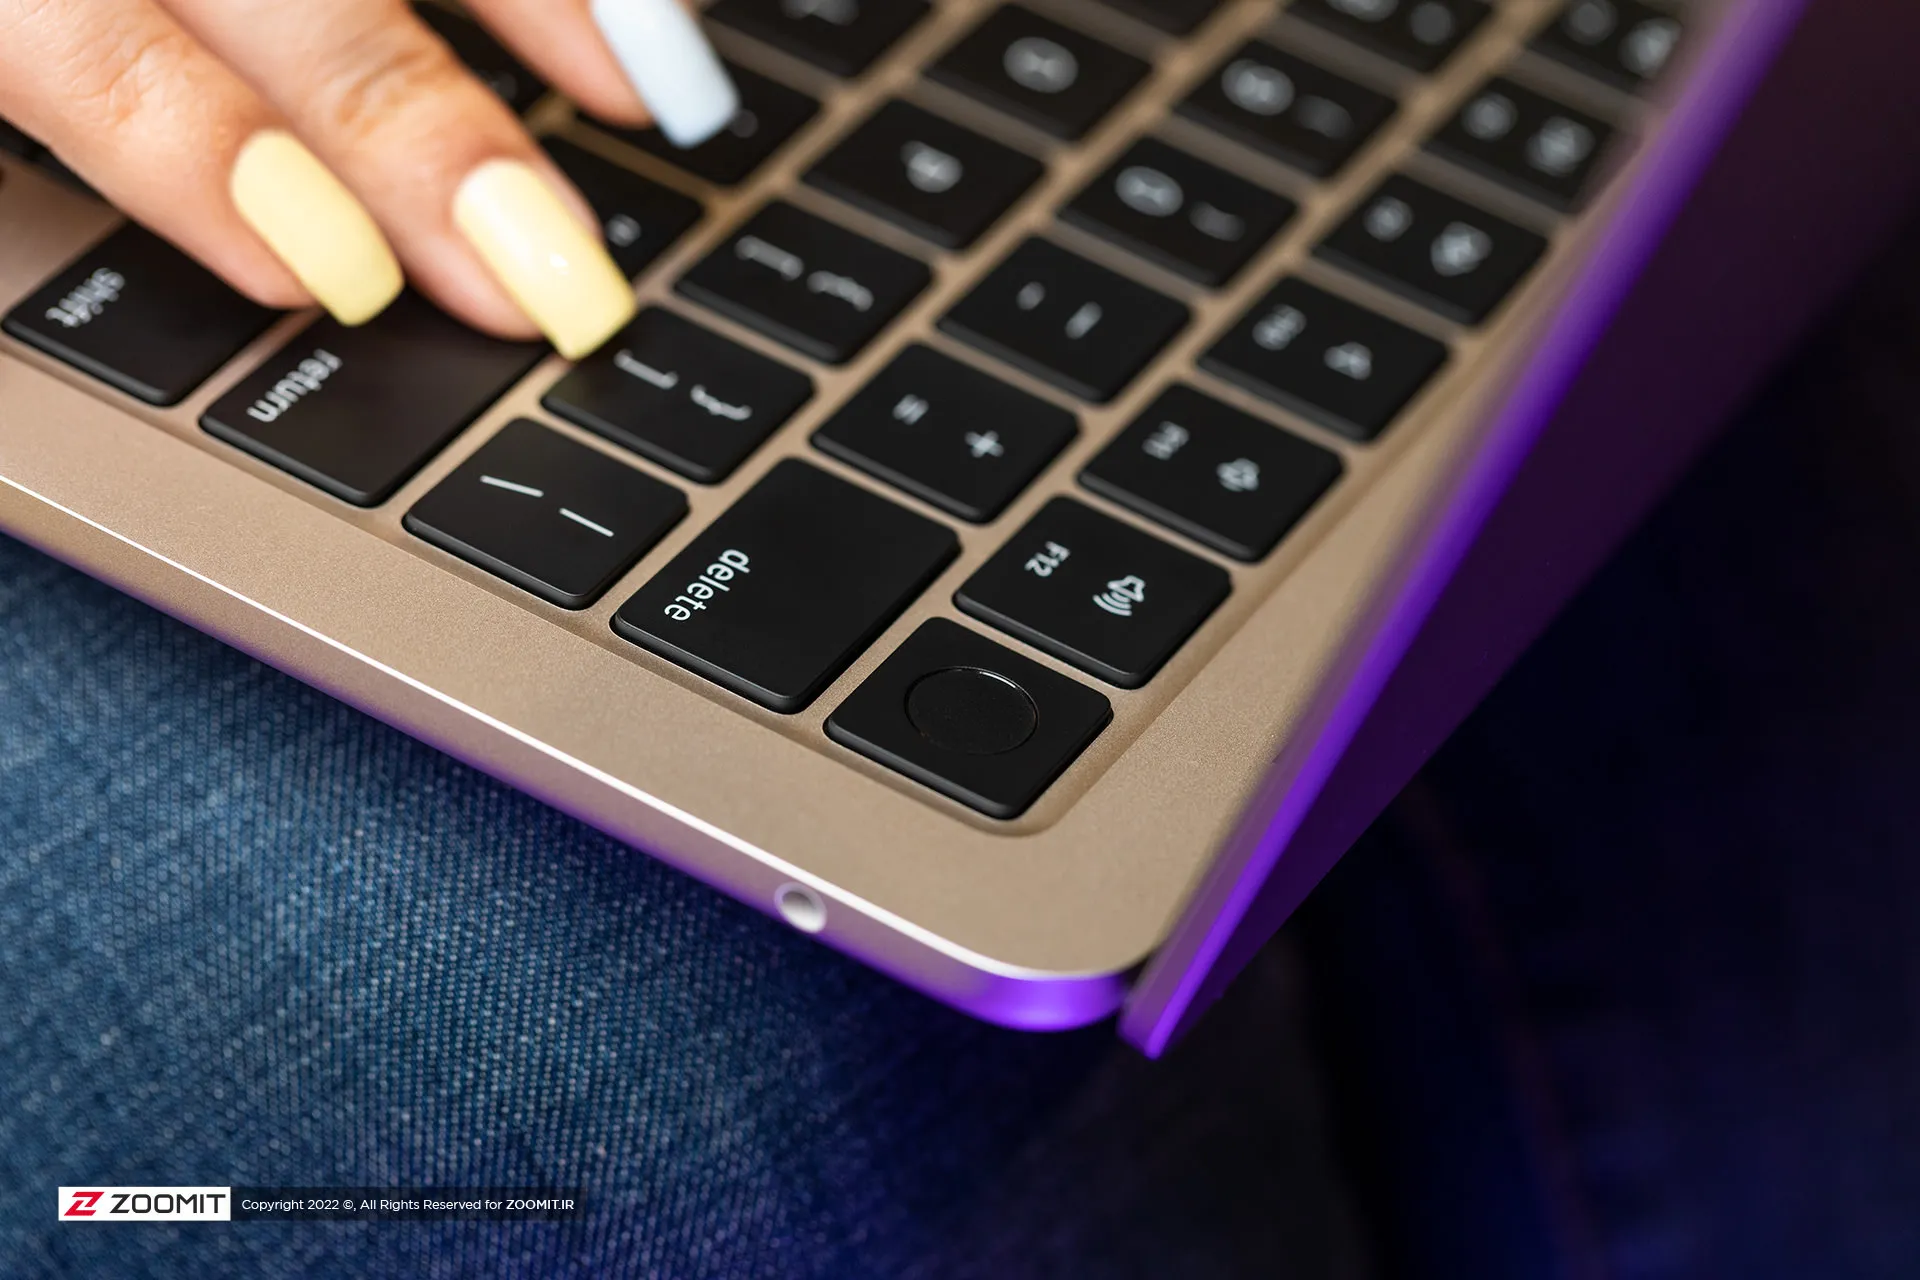
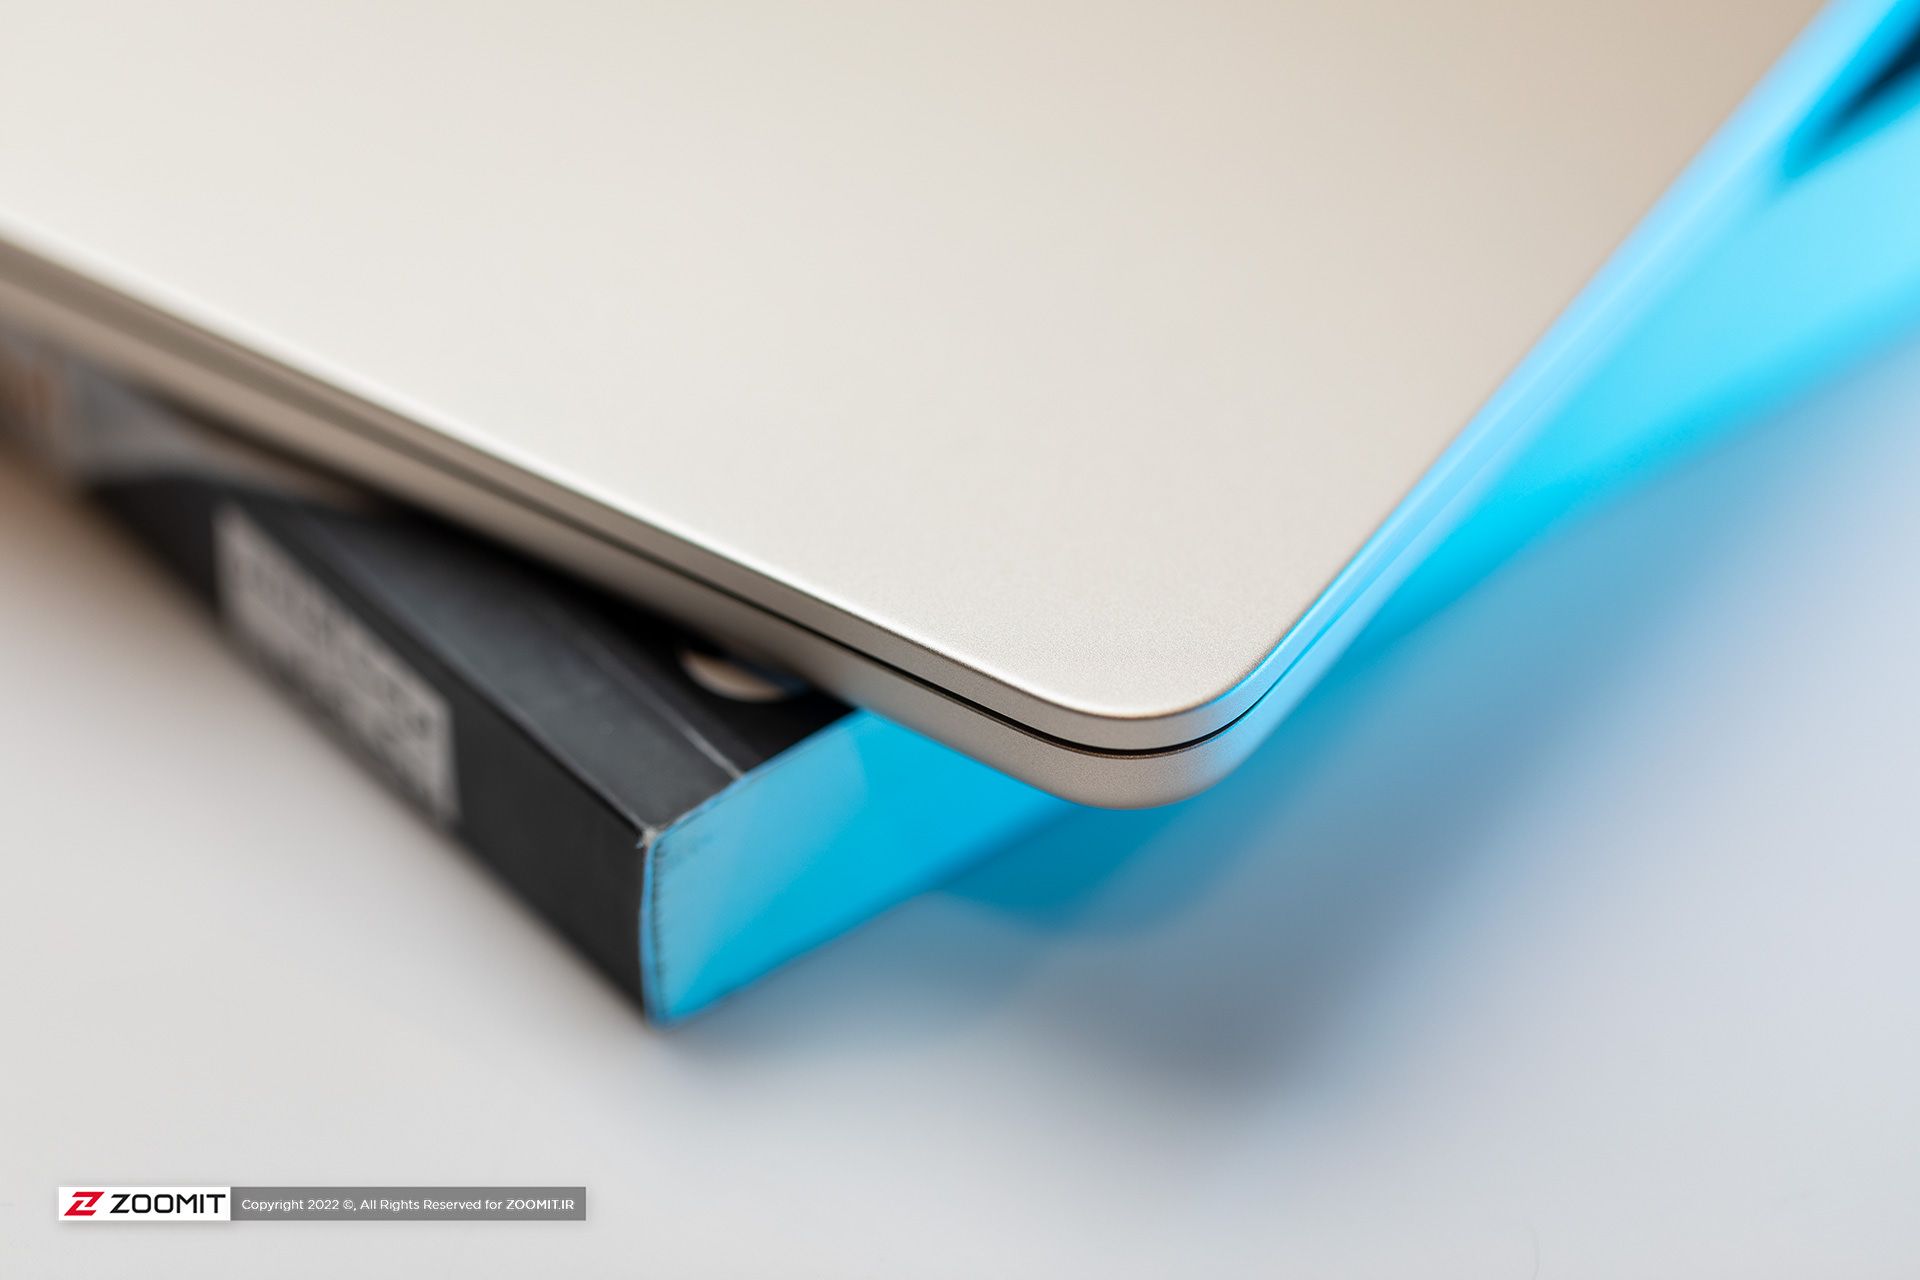
All the parts of the MacBook Air 2024 are assembled with the utmost care; So that there is no gap between them. As expected, the hinge of the laptop is also well-adjusted so that you don’t need to use two hands to open the laptop door. All in all, the combination of the quality of components and Apple’s exemplary engineering precision, brings an extremely enjoyable and unique feeling to the user while using the MacBook Air.
Just like the previous generation, the new MacBook Air is sold in four colors: gray, silver, dark blue, and cream. One of the flaws that could be found in the design of the MacBook Air 2022 was that fingerprints and grease remained on the body; The item that was more noticeable in dark blue color. Apple says this year it has used a new coating that reduces the severity of this problem. We did not have the 2022 model available for comparison at the time of writing the following review, But traces of fat and finger still remain on the body of the MacBook Air 2024.
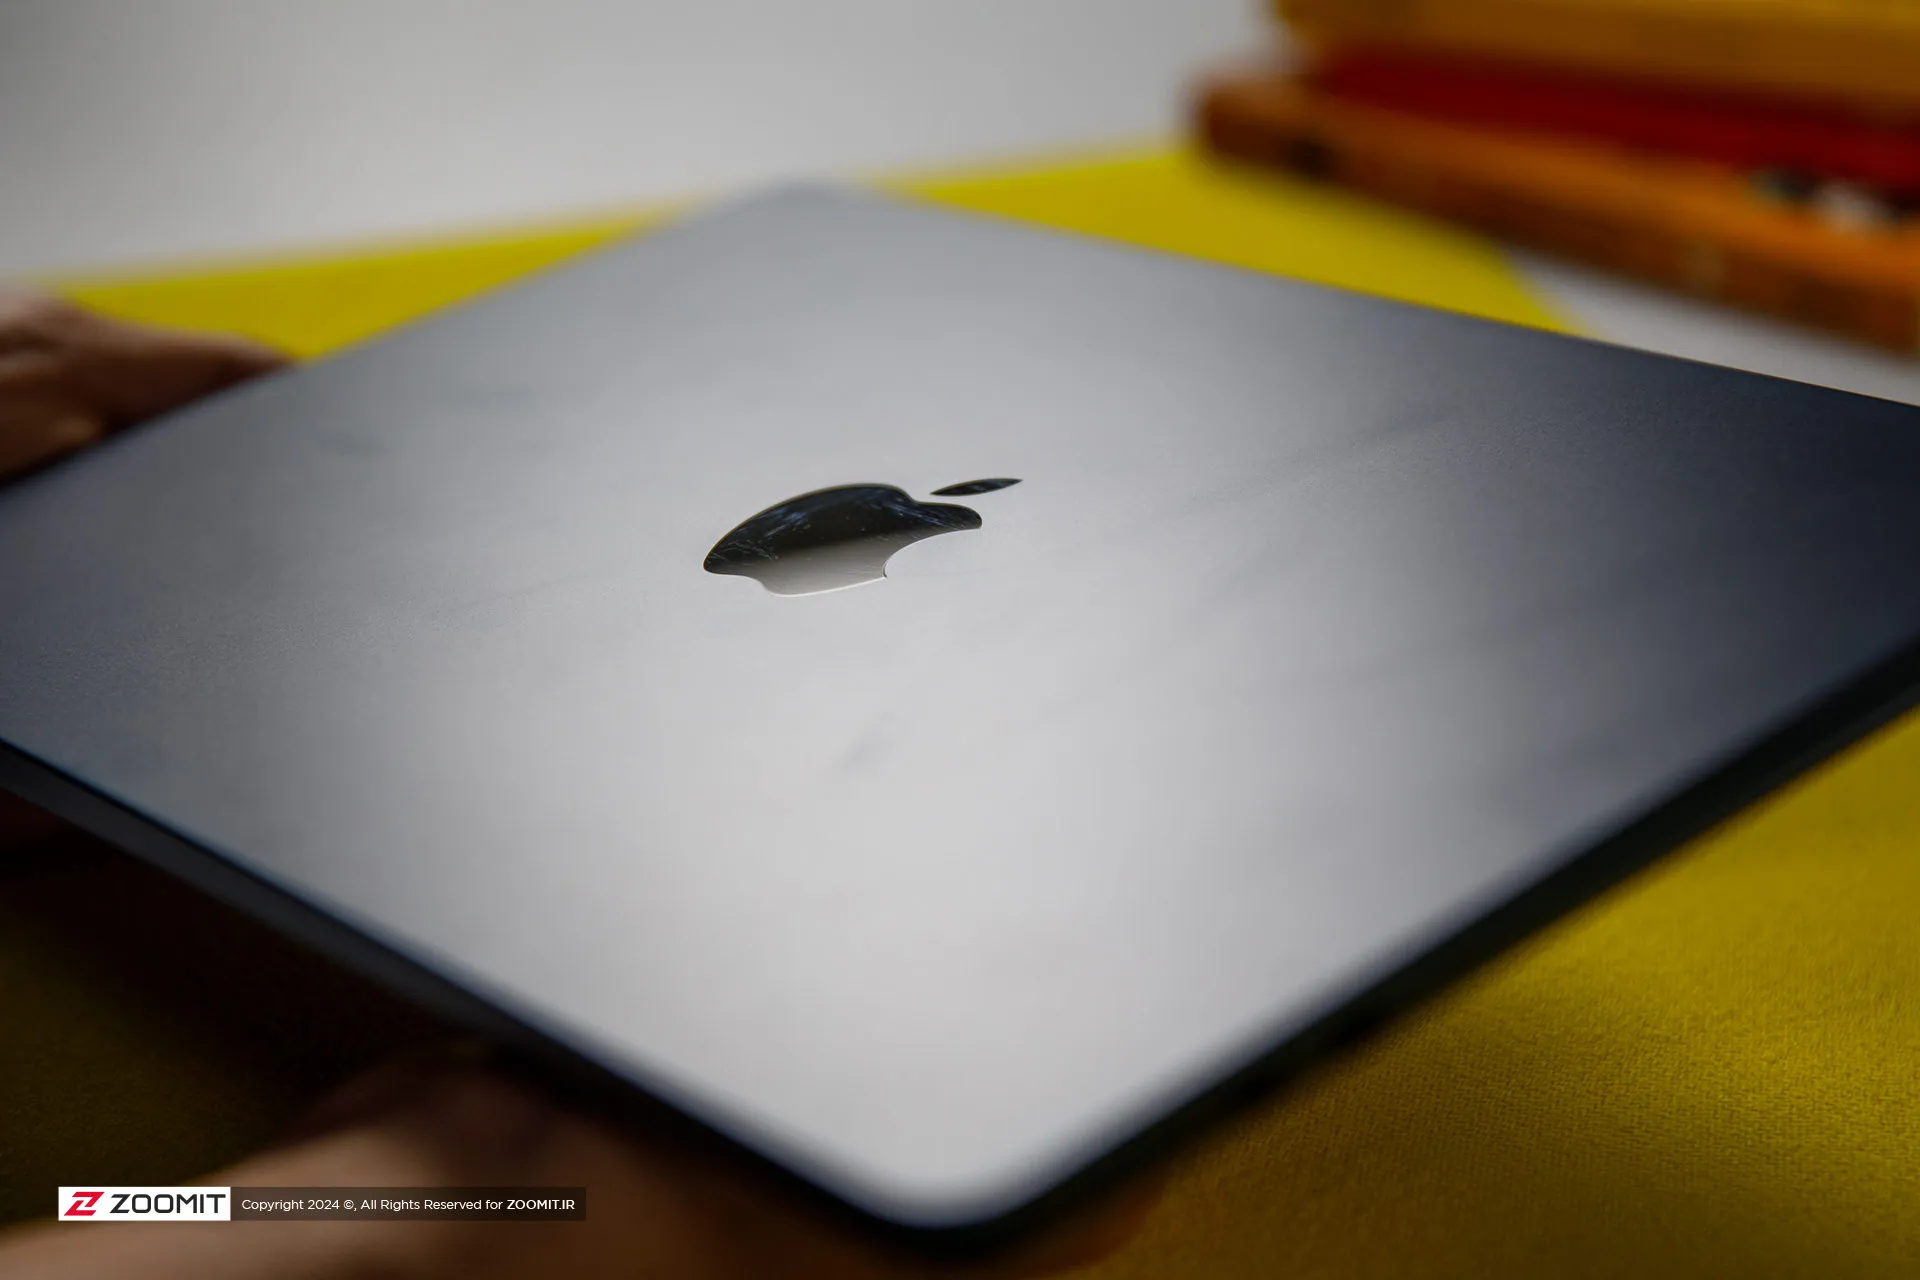 Grease and fingerprints on the laptop body
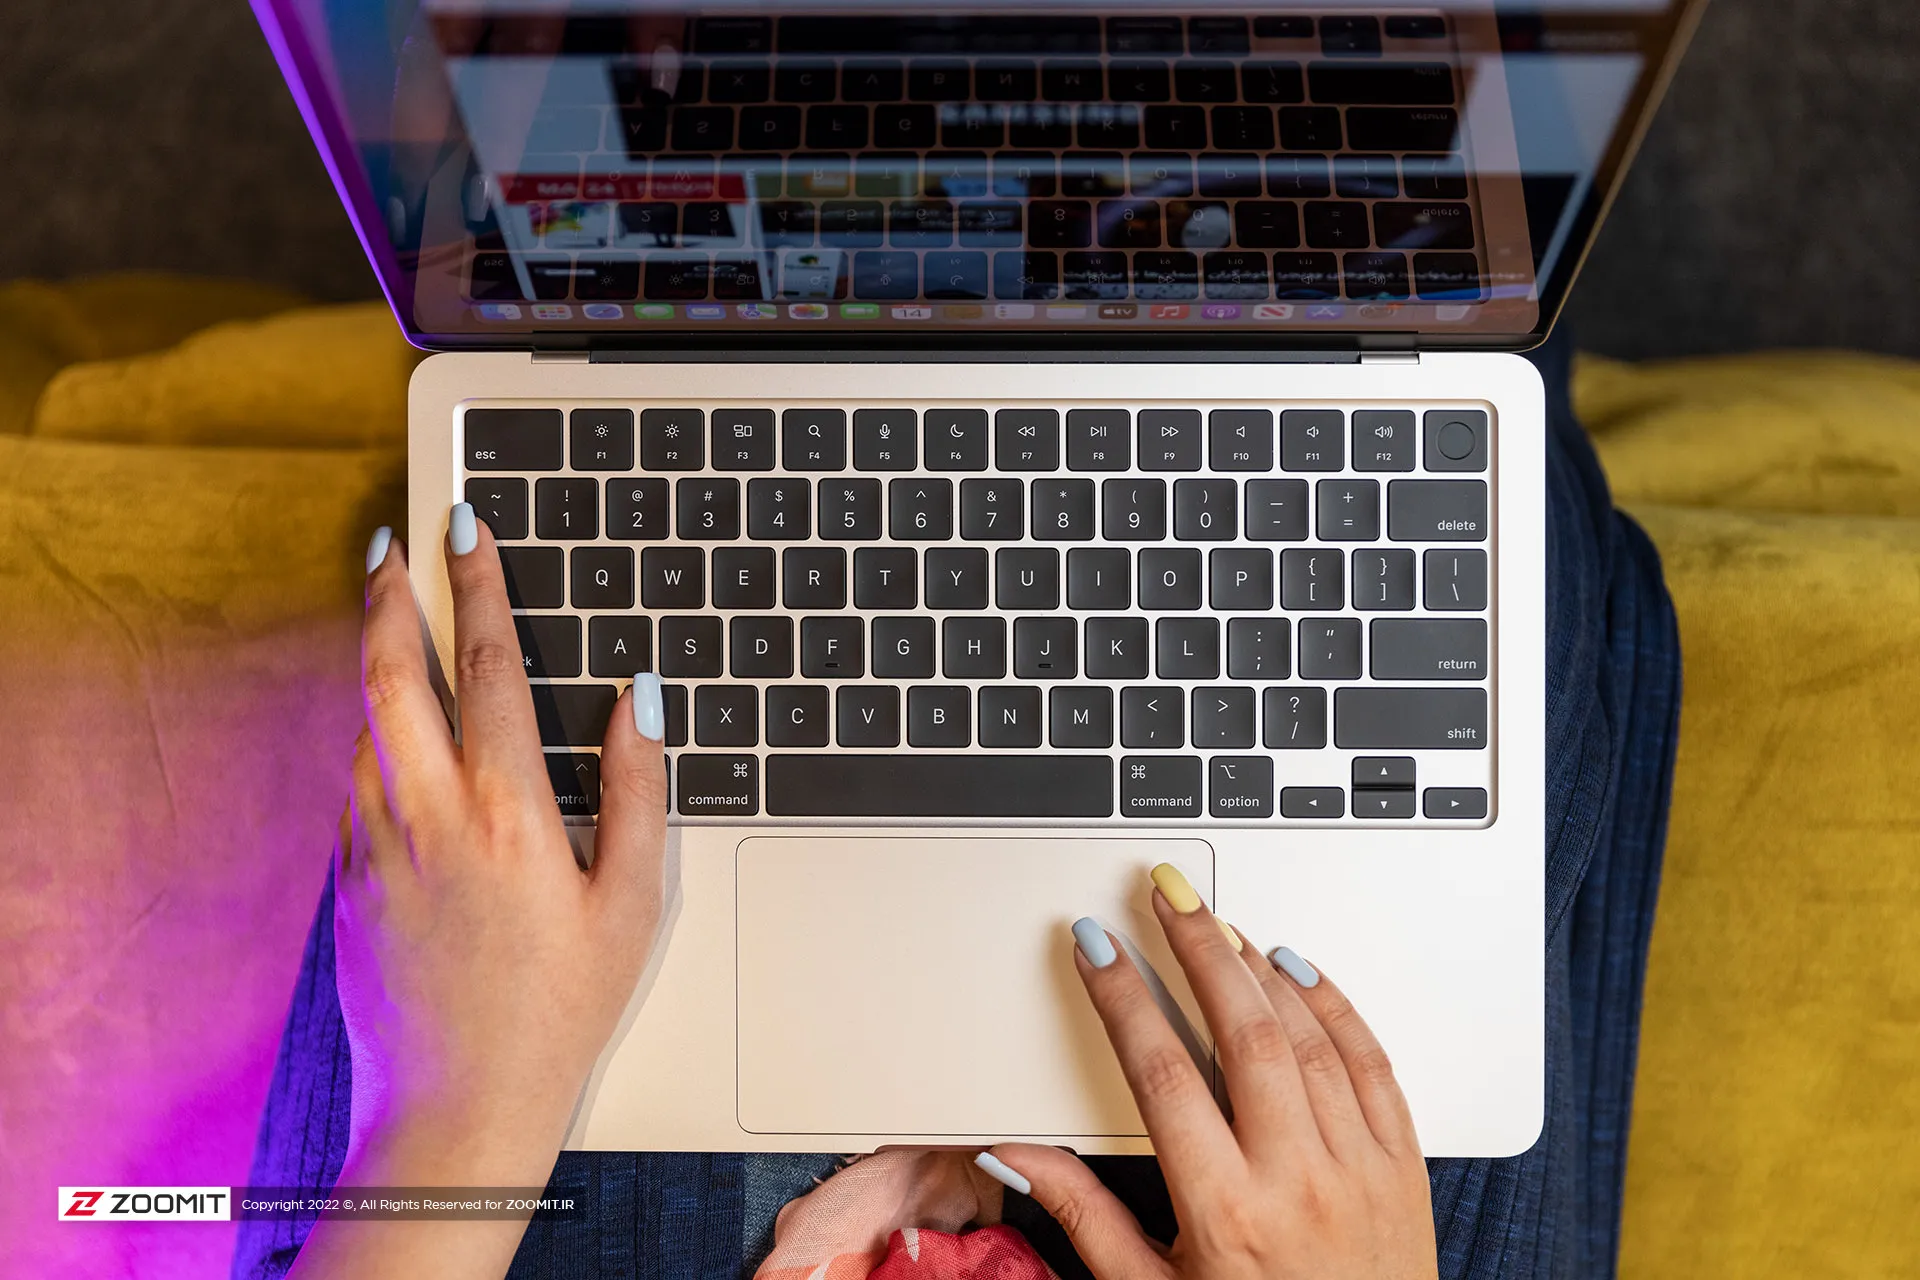
MacBook Air keyboard is among the best examples in the market in terms of arrangement and dimensions, feedback, and key stability; But the matte coating on the keys absorbs the fat of the fingers very quickly, and on the other hand, like other MacBooks, there is a possibility that the matte coating will disappear and the keys will become shiny. Depending on your usage, this can happen very quickly or over time; For example, for me, who is constantly writing, the keys on my MacBook Pro M1 burned out in less than a year.
Apparently, the buyers of used laptops are very sensitive about the keys being electrocuted; Therefore, if you plan to replace your Macbook with another laptop after one or two years, be sure to keep this in mind and use an external keyboard for long typing.
As always, the trackpad is one of the main strengths of any MacBook, and the MacBook Air M3 follows the same rule. The glass trackpad of the device is large in size and has little friction on its surface, it offers flawless, accurate, and smooth performance, and its Fortouch mechanism, which makes it possible to click on the entire surface of the trackpad, is so efficient that after the MacBook, it is impossible to work with the trackpad of any laptop. Another enjoyed.
 MacBook Air 2022
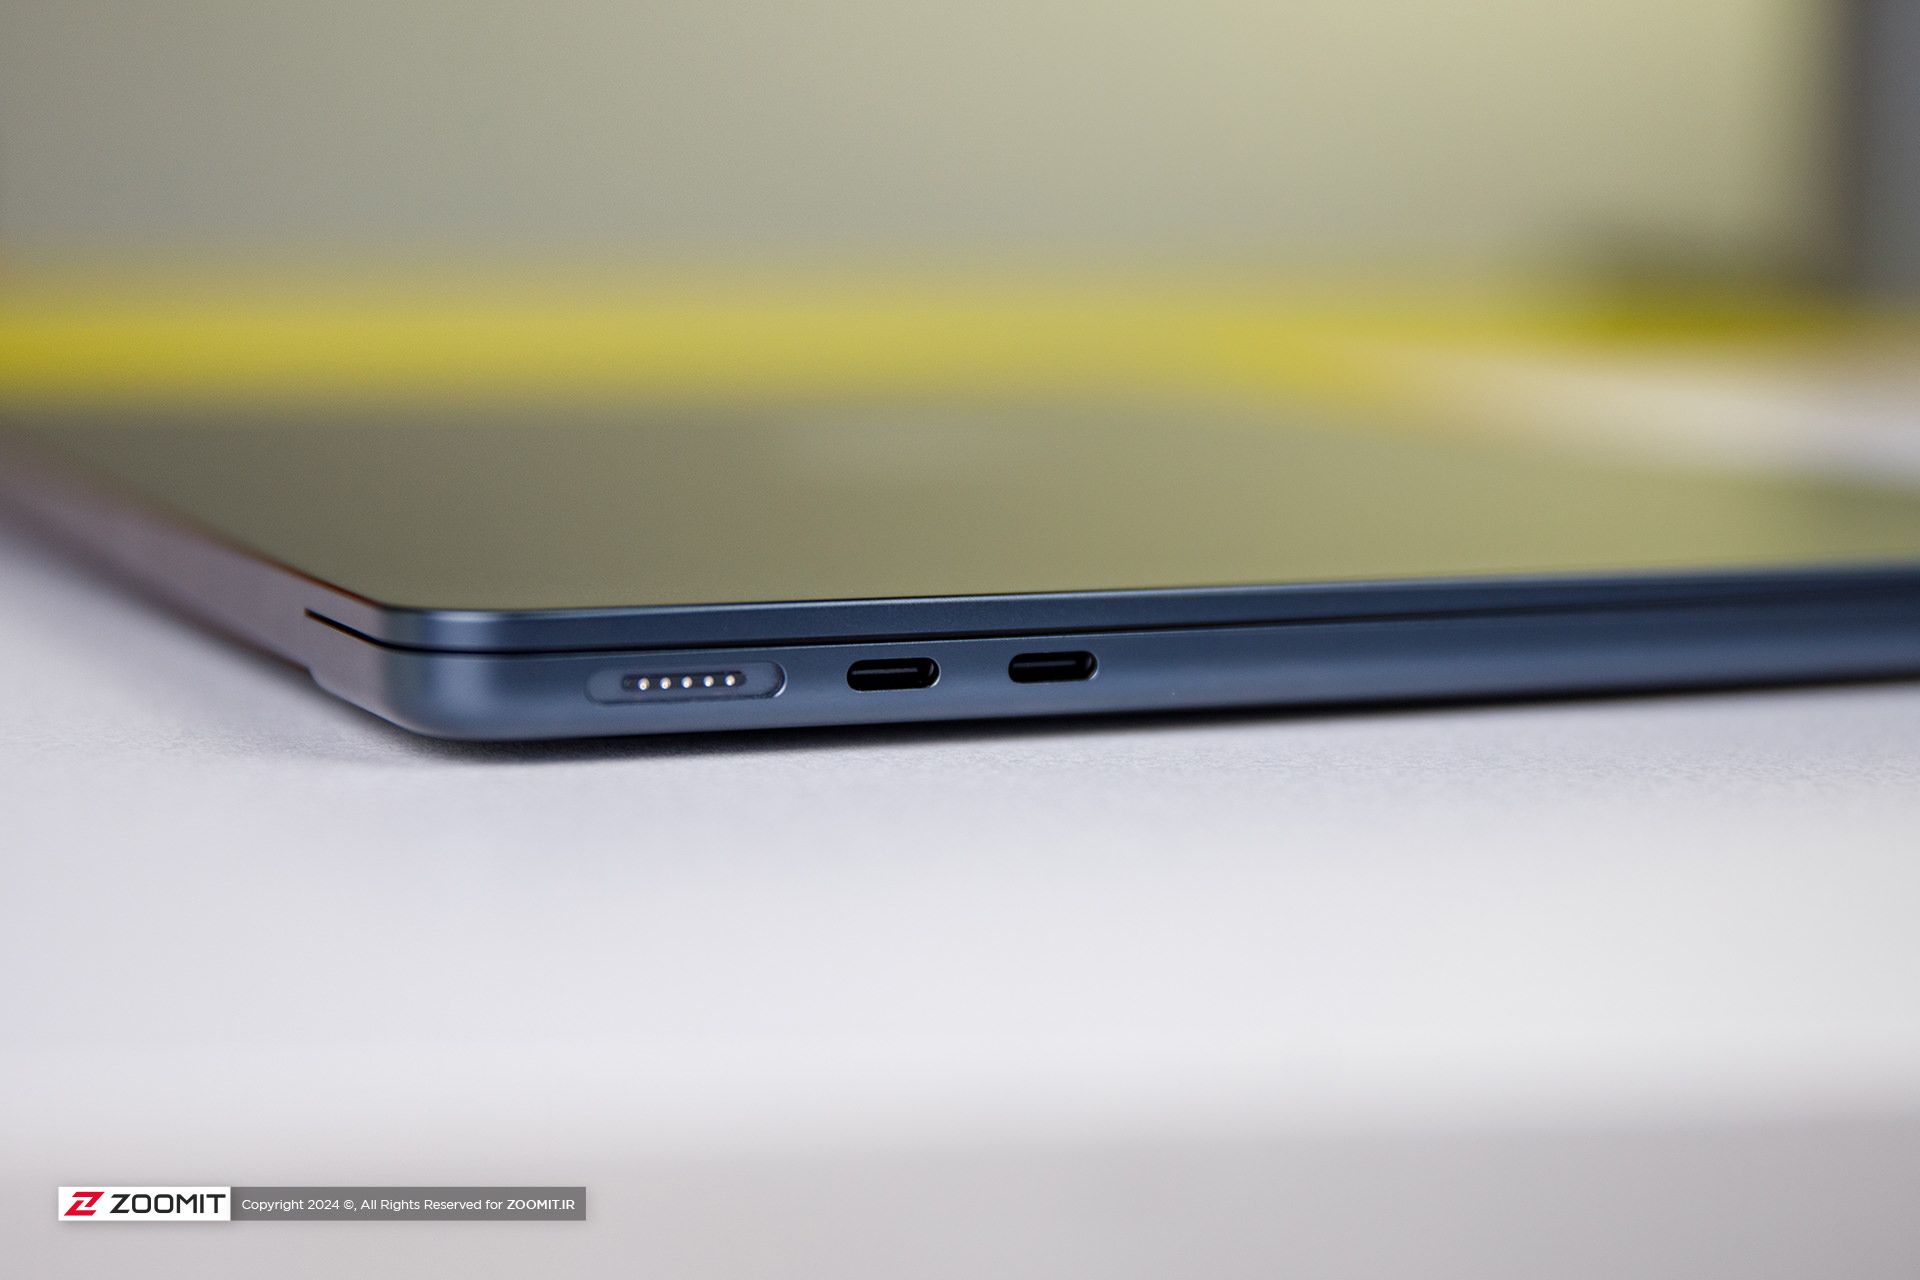
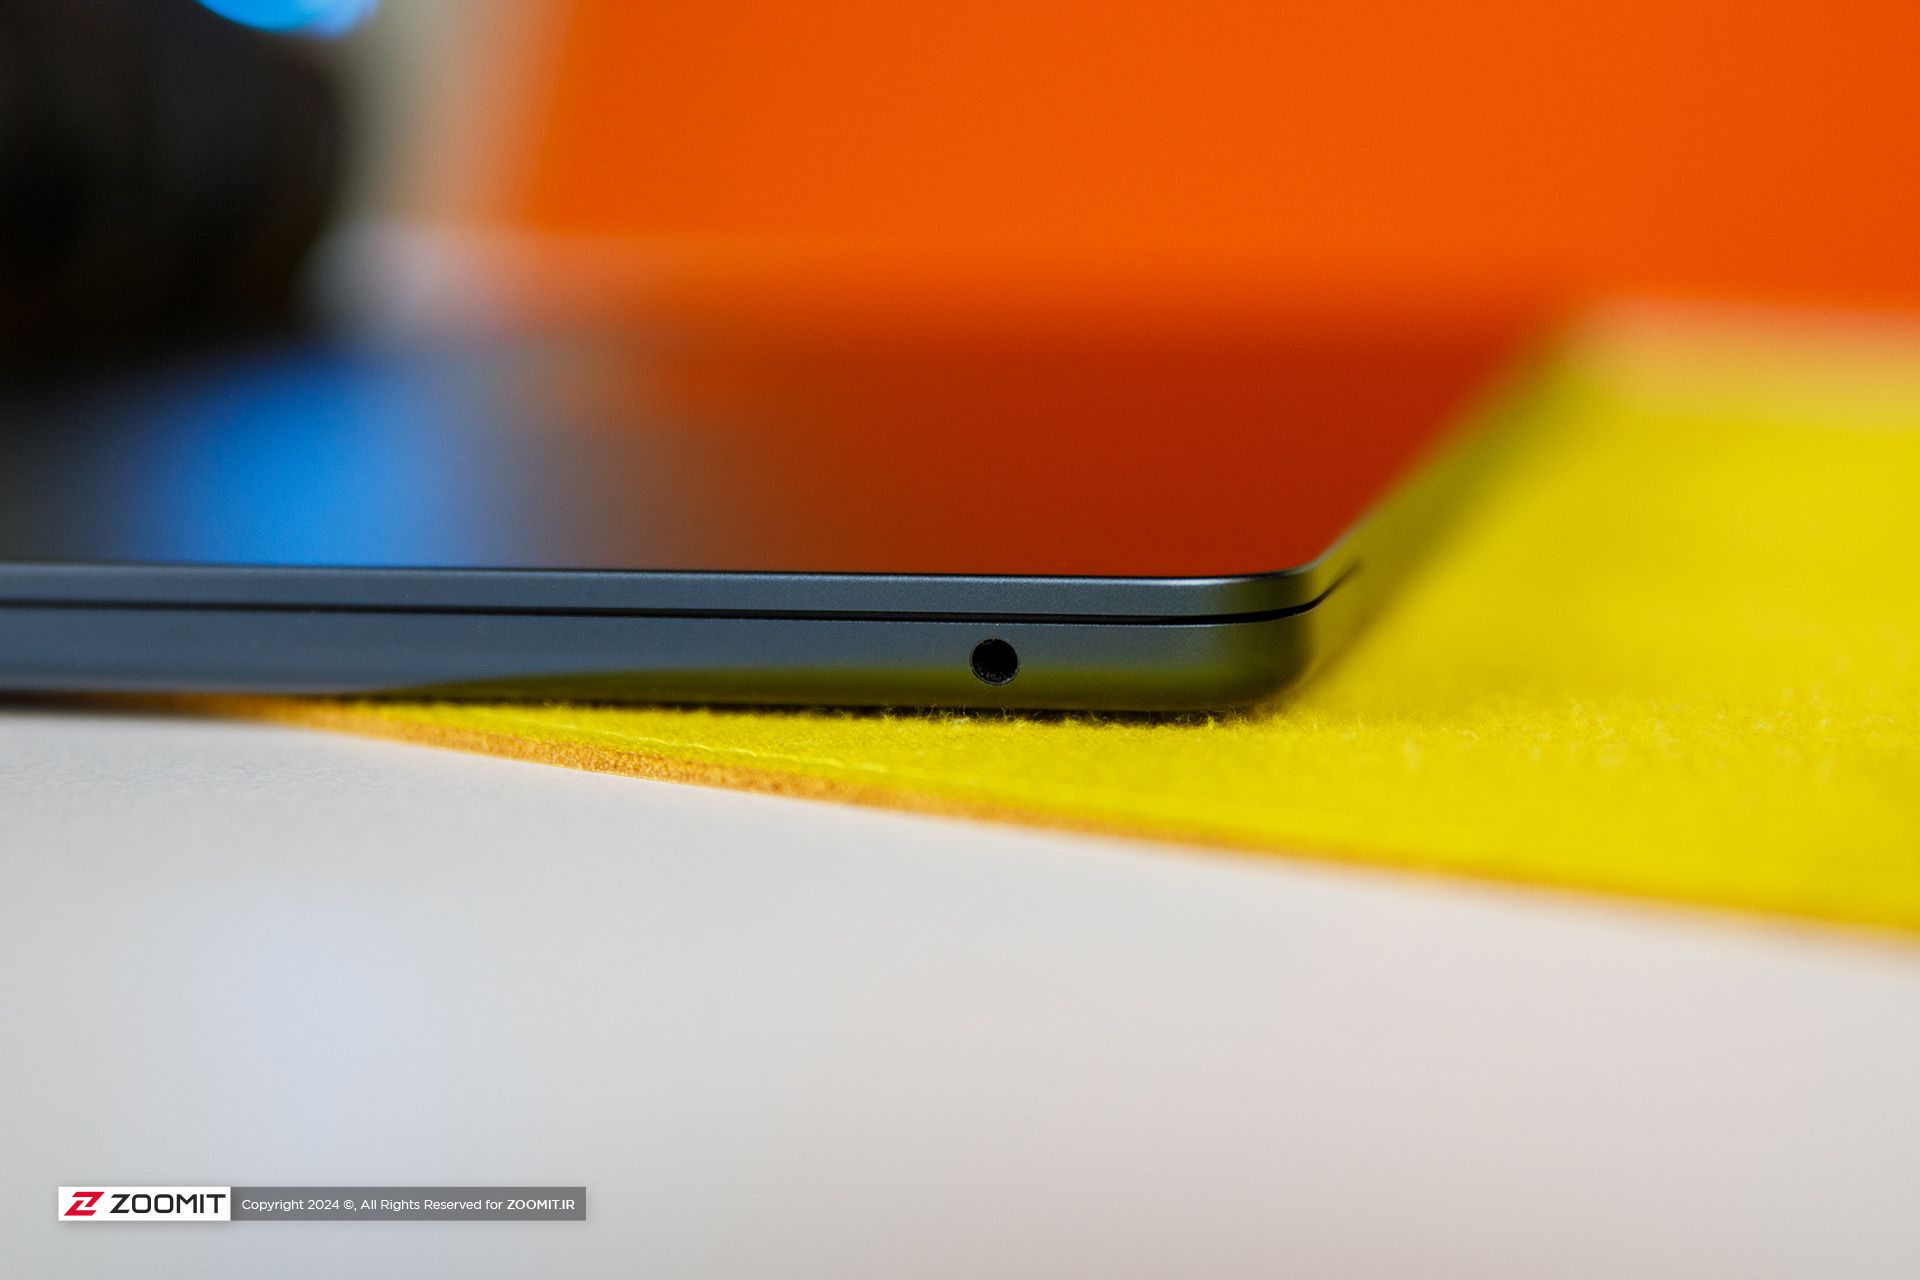
The set of MacBook Air 2024 ports is limited and has not changed; On the right side of the device, there is a headphone jack, and the left side of the device hosts two USB4 ports and a MagSafe magnetic charging port. Along with the basic model, Apple provides a relatively small 30-watt adapter with a cloth cable of the same color as the device’s body; But you can also get the laptop with a more powerful 35 or 70-watt adapter, which charges the battery up to 50% within half an hour.
USB4 ports support Thunderbolt 3 standard with a bandwidth of 40 Gbps, But it is not possible to connect external graphics. Both ports also transmit the image signal with the DisplayPort standard. In the new MacBook, if you close the laptop door, you can connect a 6K monitor and a 5K monitor (both 60Hz) to the device at the same time; But with the laptop’s screen on, just like the MacBook Air M2, the image output is limited to a 6K monitor; It is interesting that the Intel version of MacBook Air could output images to two 4K monitors at the same time as its own screen is on!
As in the previous generation, Apple uses Bluetooth version 5.3 in its Ultrabook; But the Wi-Fi module has upgraded the device from Wi-Fi 6 to Wi-Fi 6E, which incompatible networks can increase the communication bandwidth of MacBook Air 2024 with the router and the rest of the devices in the network from 1.2 to 2.4 Gbps.
Attractive display with more attractive competitors
Like most parts of the device, the screen of the new MacBook Air does not change; Of course, in this field, you can’t criticize Apple much, since 2018, when the MacBook Air screen became Retina, it has always been among the best; However, today, with OLED competitors with stunning colors and infinite contrast, Apple’s Retina display no longer has its former glory.
MacBook Air M3 can be purchased just like the previous generation in two 13.6-inch and 15.3-inch models. The pixel density of both versions is a very good number of 224 pixels. With this density, the MacBook Air screen produces a very clear image. So that it is difficult to distinguish the pixels from each other. We have the 13.6-inch MacBook Air M3 with a resolution of 2560 x 1664 pixels available for review.
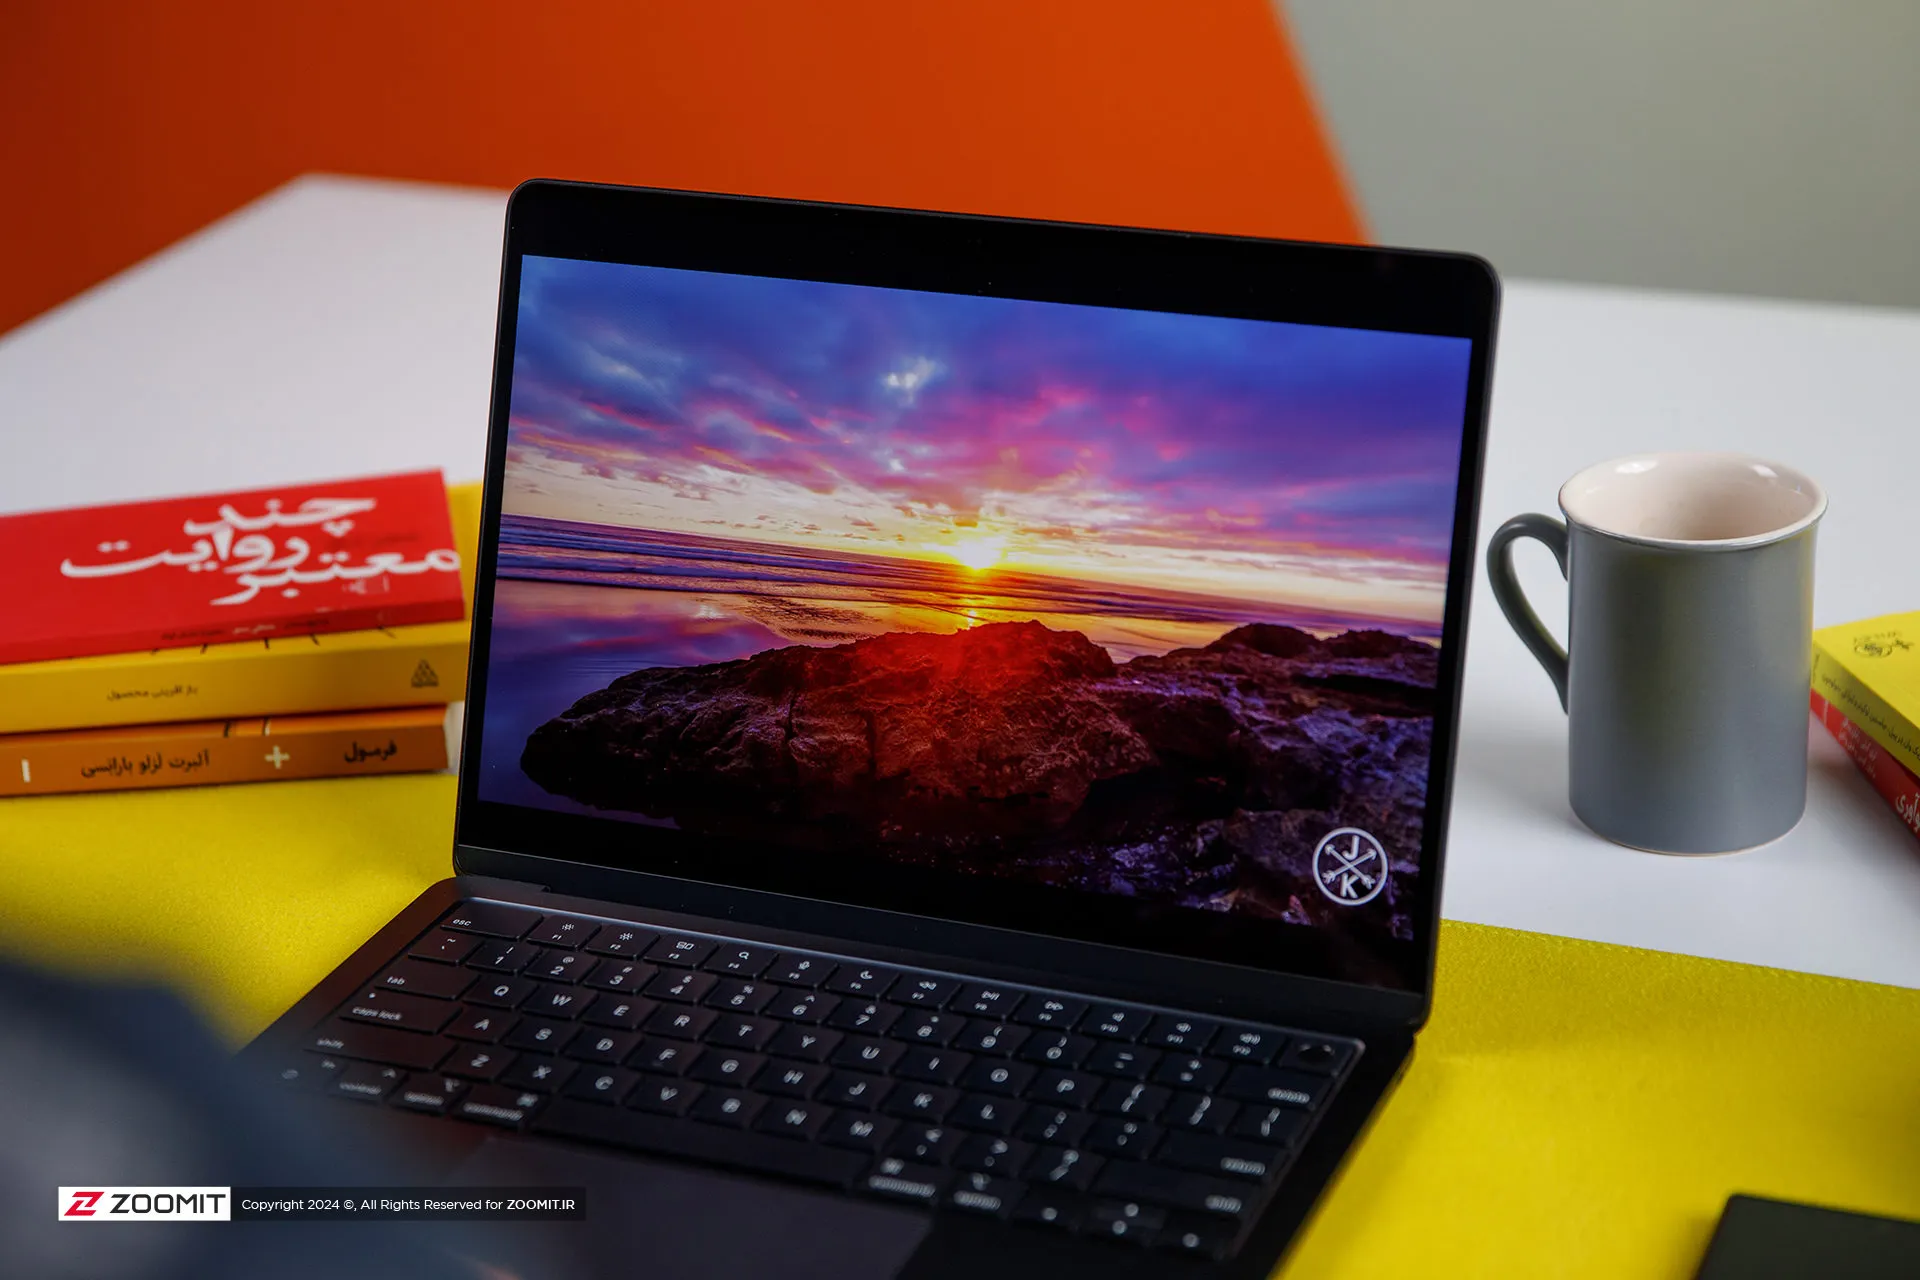
Unfortunately, unlike the expensive models of MacBook Pro or even Windows Ultrabooks with the same price as Zenbook, the panel of the MacBook Air is 60 Hz and it does not have amazing technologies such as OLED and MiniLED to produce 1000 nits of brightness and extraordinary colors. MacBook Air uses an 8-bit IPS LCD panel with back exposure, which, by using FRC technology, can give the user the feeling of 10-bit panels with a billion colors.
MacBook Air covers the wide DCI P3 color space with high accuracy. The Apple Ultrabook covers 98.4% of this space with an error of 1.9 (an error of less than 3 is ideal), perhaps the only color weakness of the panel can be considered a slight tendency to be cold; However, thanks to the True Tone feature, the device evaluates the ambient light temperature with high accuracy and adjusts the color temperature accordingly to give you a satisfying visual experience.
In our measurements, with a 50% raster standard, we reached a maximum brightness of 443 nits, which in itself is a very good number, and thanks to the anti-reflective coating on the panel surface, in environments with different light conditions, it brings a satisfactory experience of working with a laptop. Without the appearance of the shadow of the environment on the panel, the user will not be bothered.
|
MacBook Air 2024 screen performance against other laptops |
||||||||||
|---|---|---|---|---|---|---|---|---|---|---|
|
Laptop / test |
White image |
Black image |
contrast ratio |
AdobeRGB |
sRGB |
DCI-P3 |
||||
|
Maximum brightness |
Minimum brightness |
Average brightness |
Native |
cover |
Average error |
cover |
Average error |
cover |
Average error |
|
|
MacBook Air 2024 |
443 intentions |
0.00 nits |
0.67 nits |
661 |
87.9 |
— |
100 |
2.4 |
98.4 |
1.9 |
|
Zenbook 14 |
512 intention (788 nits HDR) |
0.27 nits |
0 intentions |
∞ |
89.6 |
2.6 |
100 |
0.6 |
99.7 |
1.3 |
|
MacBook Pro 2022 |
437 intentions |
0.00 nits |
0.5 nits |
874 |
86.3 |
— |
99.8 |
2.7 |
97.5 |
— |
|
MacBook Air 2022 |
447 intentions |
0.1 nit |
0.65 nits |
693 |
87.5 |
— |
100 |
2.5 |
98.1 |
— |
|
Galaxy Book 3 Ultra |
441 intentions |
4 intentions |
0 intentions |
∞ |
97.3 |
3.7 |
99.6 |
1.9 |
99.8 |
2.3 |
|
MacBook Pro M1 Max |
455 intentions (1497 nits HDR) |
0 intentions |
0 intentions |
∞ |
85 |
— |
121.6 |
— |
97.3 |
2.5 |
In addition to the reasonable maximum brightness of 442 nits in bright images, unlike most laptops with IPS LCD screens, the black color brightness is also very low in the MacBook Air display; So that the device achieves a very high contrast. On the other hand, the minimum brightness of the display was 0 nits even with the 0.01 nits accuracy of the Zoomit luminance meter; In the sense that while using the laptop, there will be a little pressure on your eyes.
The attractive screen of the MacBook Air is completed by a set of 4 speakers; Speakers that have a very large sound volume compared to the size of a laptop, produce clear sound, and at high volumes, they are confused and distorted. MacBook Air speakers support Dolby Atmos and are easily ahead of most Windows laptops.
M3 chip and championship called TSMC
The main changes of MacBook Air 2024 have happened in its heart; Where it hosts the M3 chip as the beating heart of the device. Next, before we put the performance of the M3 under the microscope, we take a look at the details of the technical specifications of this chip.
The M3 chip is manufactured using TSMC’s 3nm-based manufacturing process known as N3B, hosts 25 billion transistors on its surface, and uses the same layout and configuration as the M2 for the CPU and GPU cores. Apple says the processor and graphics used in the M3 are about 35 and 65 percent faster than the M1, respectively.
|
Technical specifications of M3 against M2 and M1 |
|||
|---|---|---|---|
|
parameters/chip |
Apple M3 |
Apple M2 |
Apple M1 |
|
manufacturing process |
3 nanometer N3B TSMC |
TSMC’s second-generation 5nm |
5 nm N5 TSMC |
|
CPU |
4 powerful cores with a maximum frequency of 4.05 GHz 4 low-power cores with a maximum frequency of 2.75 GHz |
4 Avalanche cores with a maximum frequency of 3.5 GHz 4 Blizzard cores with a maximum frequency of 2.4 GHz |
4 Firestorm cores with a maximum frequency of 3.2 GHz 4 Icestorm cores with a maximum frequency of 2.0 GHz |
|
cache memory |
16 MB shared L2 cache and 320 KB L1 cache for each of the powerful cores 4 megabytes of shared L2 cache and 192 kilobytes of L1 cache for each low-power core 8 MB system cache for the entire chip |
16 MB shared L2 cache and 320 KB L1 cache for each of the powerful cores 4 megabytes of shared L2 cache and 192 kilobytes of L1 cache for each low-power core 8 MB system cache for the entire chip |
12MB shared L2 cache and 320KB L1 cache for each Firestorm core 4 MB shared L2 cache and 192 KB L1 cache for each Icestorm core 8 MB system cache for the entire chip |
|
memory bass |
128 bits |
128 bits |
128 bits |
|
DRAM |
8 to 24 GB LPDDR5-6400 |
8 to 24 GB LPDDR5-6400 |
8 or 16 GB LPDDR4x-4266 |
|
Memory bandwidth |
100 GB per second |
100 GB per second |
68.2 gigabytes per second |
|
GPU |
8 or 10 cores with hardware support of ray tracing |
8 or 10 cores |
7 or 8 cores |
Like the last two generations, the M3 chip uses a combination of 4 high-power cores and 4 low-power cores, respectively, with maximum frequencies of 4.05 and 2.75 GHz as CPU. Apple has made minor changes in the architecture of the cores, and the main difference of the cores is the 15% increase in frequency compared to the M2 cores.
Apple has not even changed the amount of cache memory of the M3 chip compared to the M2; Each of the high-power and low-power cores have access to 320 and 192 KB of ultra-fast L1 cache, respectively, the set of four high-power and low-power cores also have access to 16 and 4 MB of L2 cache, respectively, while the system cache is 8 MB for the set of chip processing blocks. GPU and CPU are included.
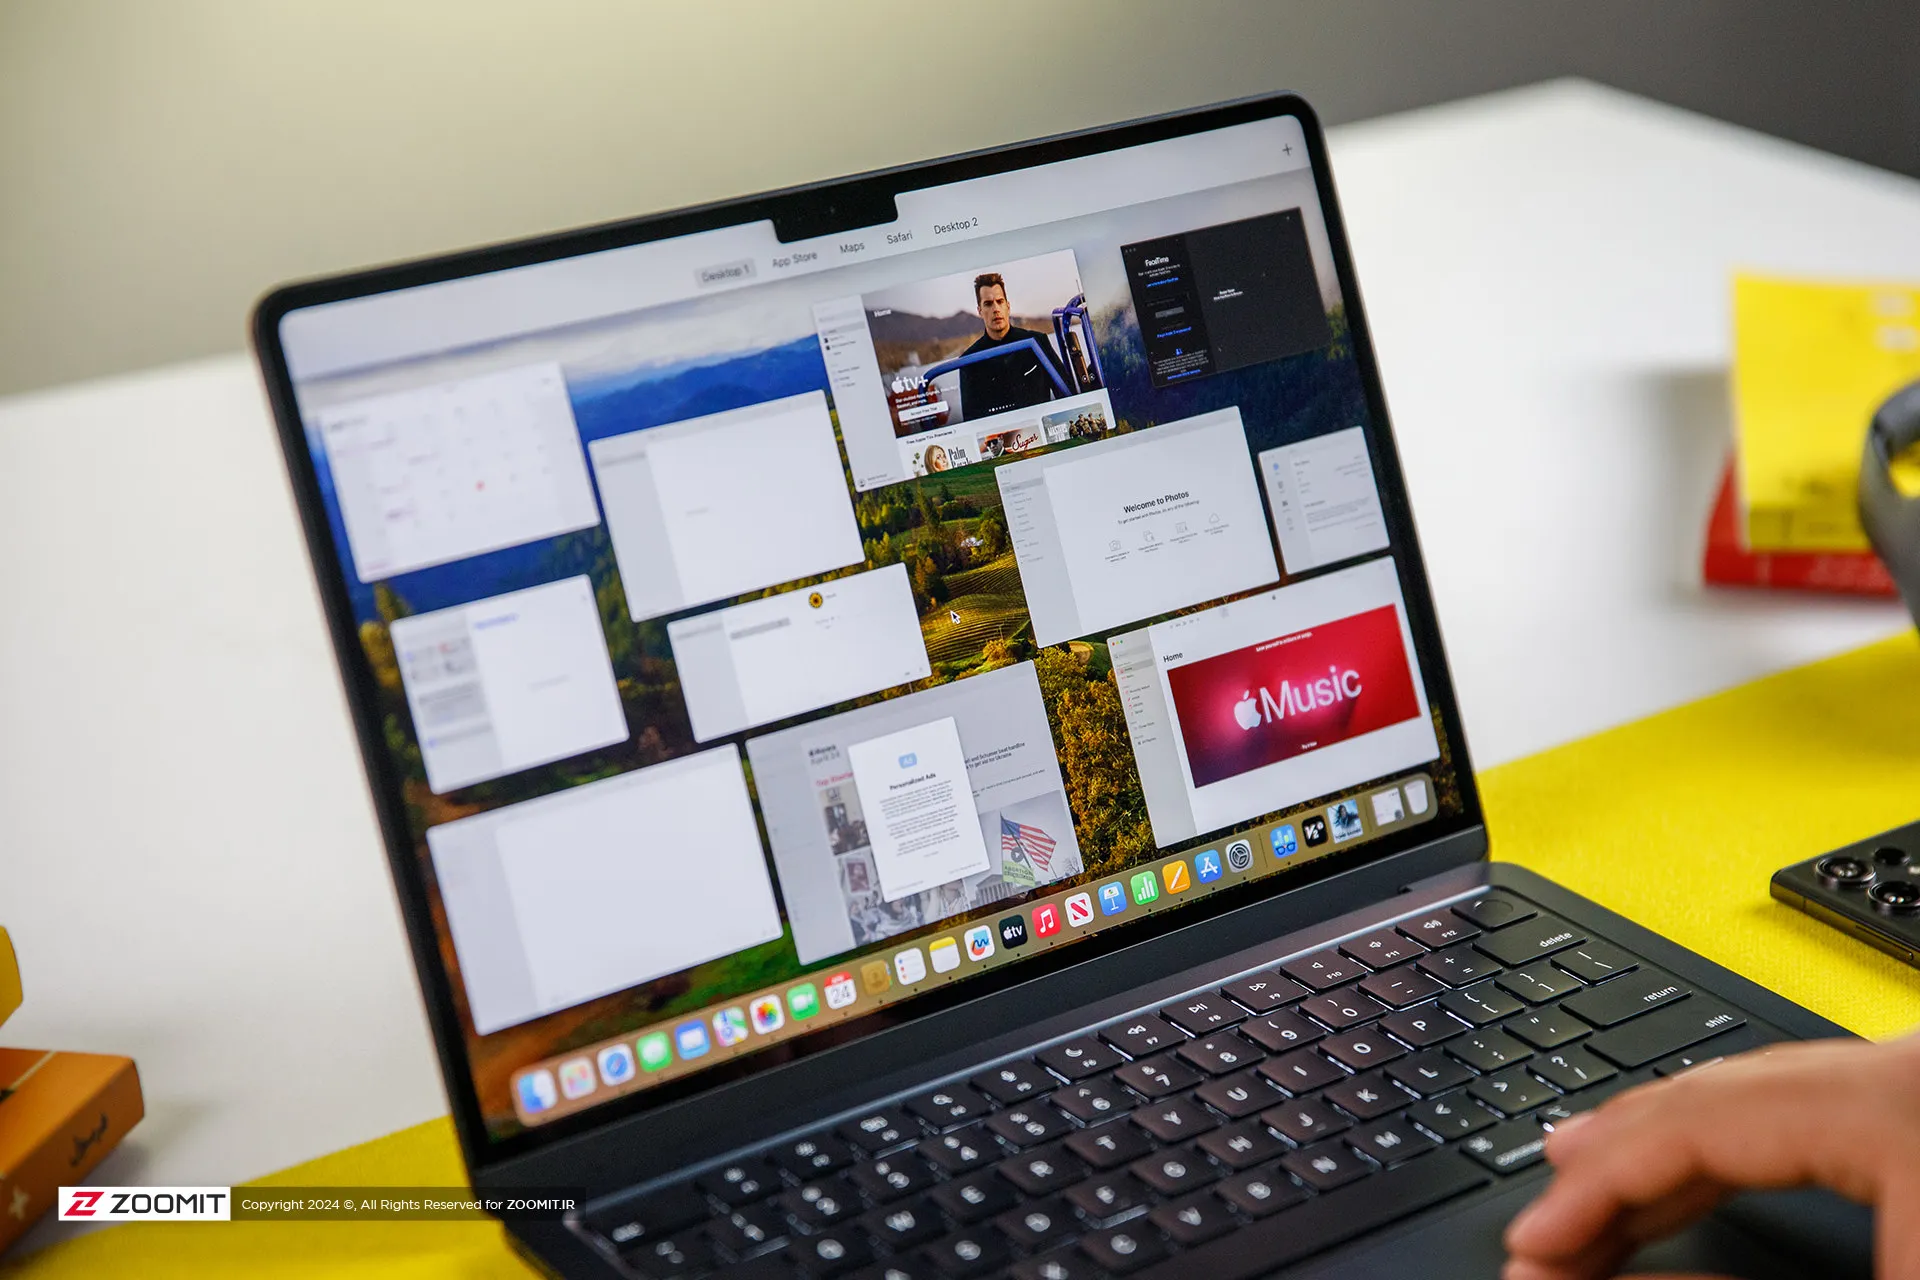
The M3 chip is used in Apple laptops in two versions with 8- and 10-core graphics processors. We had the MacBook Air with 8-core graphics available for review, which in total, just like the last generation, has 128 execution units with 1024 calculation and logic units in its heart, which operate at an almost identical frequency of 1.38 GHz.
The main difference between the M3 graphics compared to the previous generation is the addition of the Ray Tracing hardware accelerator, Mesh shading, and Dynamic Caching technology, the latter of which allows the chip to provide the memory required by the GPU in real-time and based on the type of processing. Thus, it optimizes the amount of memory consumption.
The M3 chip uses a 16-core neural processing unit (NPU) with a computing power of 18 trillion operations per second, and in addition to ProRes and ProRes Raw videos, it now has a separate engine for AV1 video codec decoding. Due to its two 64-bit channels and support for LPDDR5X-6400 RAM, this chip can achieve a bandwidth of 102 GB/s for data exchange with its integrated RAM.
|
Performance of the MacBook Air M3 in benchmarks while plugged in |
||||||
|---|---|---|---|---|---|---|
|
Laptop/benchmark |
Technical Specifications |
Web browsing |
Performance in graphics |
CPU performance in rendering |
CPU computing power |
GPU computing power |
|
3 Dark |
CineBench R23 |
GeekBench 6 |
GeekBench 6 |
|||
|
Speedometer 2.1 |
TimeSpy |
Single Multi |
Single Multi |
OpenCL Metal/Vulkan |
||
|
DirectX 12 |
||||||
|
MacBook Air 2024 |
Apple M3 8 core GPU |
680 |
— |
1897 9872 |
3143 2008 |
25845 41671 |
|
Zenbook 14 |
Core Ultra 7 155H Intel Arc GPU |
396 |
3453 |
1637 13367 |
2290 12256 |
34889 38268 |
|
MacBook Pro 2022 |
Apple M2 10-core GPU |
407 |
— |
1579 8730 |
2581 9641 |
28852 42673 |
|
MacBook Air 2022 |
Apple M2 8 core GPU |
405 |
— |
1577 8476 |
2578 9655 |
27846 39735 |
|
MacBook Pro 2020 |
Apple M1 8 core GPU |
209 |
— |
1512 7778 |
2335 8315 |
21646 32743 |
|
MacBook Pro 14-inch 2021 |
M1 Max 24Core GPU |
300 |
— |
1549 12508 |
2378 12239 |
65432 101045 |
MacBook M3 appears about 20-25% faster than M2 in single-core and multi-core benchmarks, and in comparison with M1, it increases its superiority to about 35-45%; Therefore, considering the 15% increase in frequency and the improvement of TSMC’s manufacturing process, it seems that Apple has not changed much in the architecture; But in any case, CPU performance on par with the M1 Pro is a surprising result for the M3.
Compared to the new Asus ultrabook with the Core Ultra 7 155H chip, MacBook Air M3 leads by 15-35% in single-core benchmarks; But in multi-core benchmarks, it loses the field to the competitor with a single-digit difference of up to 25%. We will talk more about the difference between the two chips in productivity and power consumption.
Apple laptops have a stunning performance in terms of web surfing experience and M3 has taken this performance to a whole new level; MacBook Air 2024 outperforms Asus Ultrabook 2024 with a 65% difference in the Zoomit web browsing test. The stunning superiority of the MacBook Air shows that Apple’s laptop offers faster and smoother performance on the web.
Apple’s new ultrabook appears in almost the same level of computing processing as the last generation. It seems that M3 remains behind its Intel competitor by 25% in the processes that take place on the basis of the OpenCL framework; But instead, thanks to Apple’s exclusive Metal framework, it surpasses the performance of Core Ultra 7 in processes based on Vulkan, with a difference of 10%.
Let’s skip the benchmarks and talk about how the MacBook Air 2024 performs in professional software and games. For this, we considered Photoshop and Premiere Pro software, Python code execution, and the Rise of the Tomb Raider game.
The set of games available for macOS is much more limited than for Windows; However, thanks to the tool that Apple introduced at WWDC 2023 for porting Windows games (Game Porting Toolkit), some were able to run titles such as Medium and Cyberpunk 2077 on Macs with powerful graphics processors such as the M2 Max, and it is hoped that in the future, this same tool, pave the way for more games to be released.
We were able to run the old game Rise of the Tomb Raider at 1200p resolution, High graphics settings and an average frame rate of 50.5 fps, which shows an advantage of about 25 percent of the M3 compared to the M2.
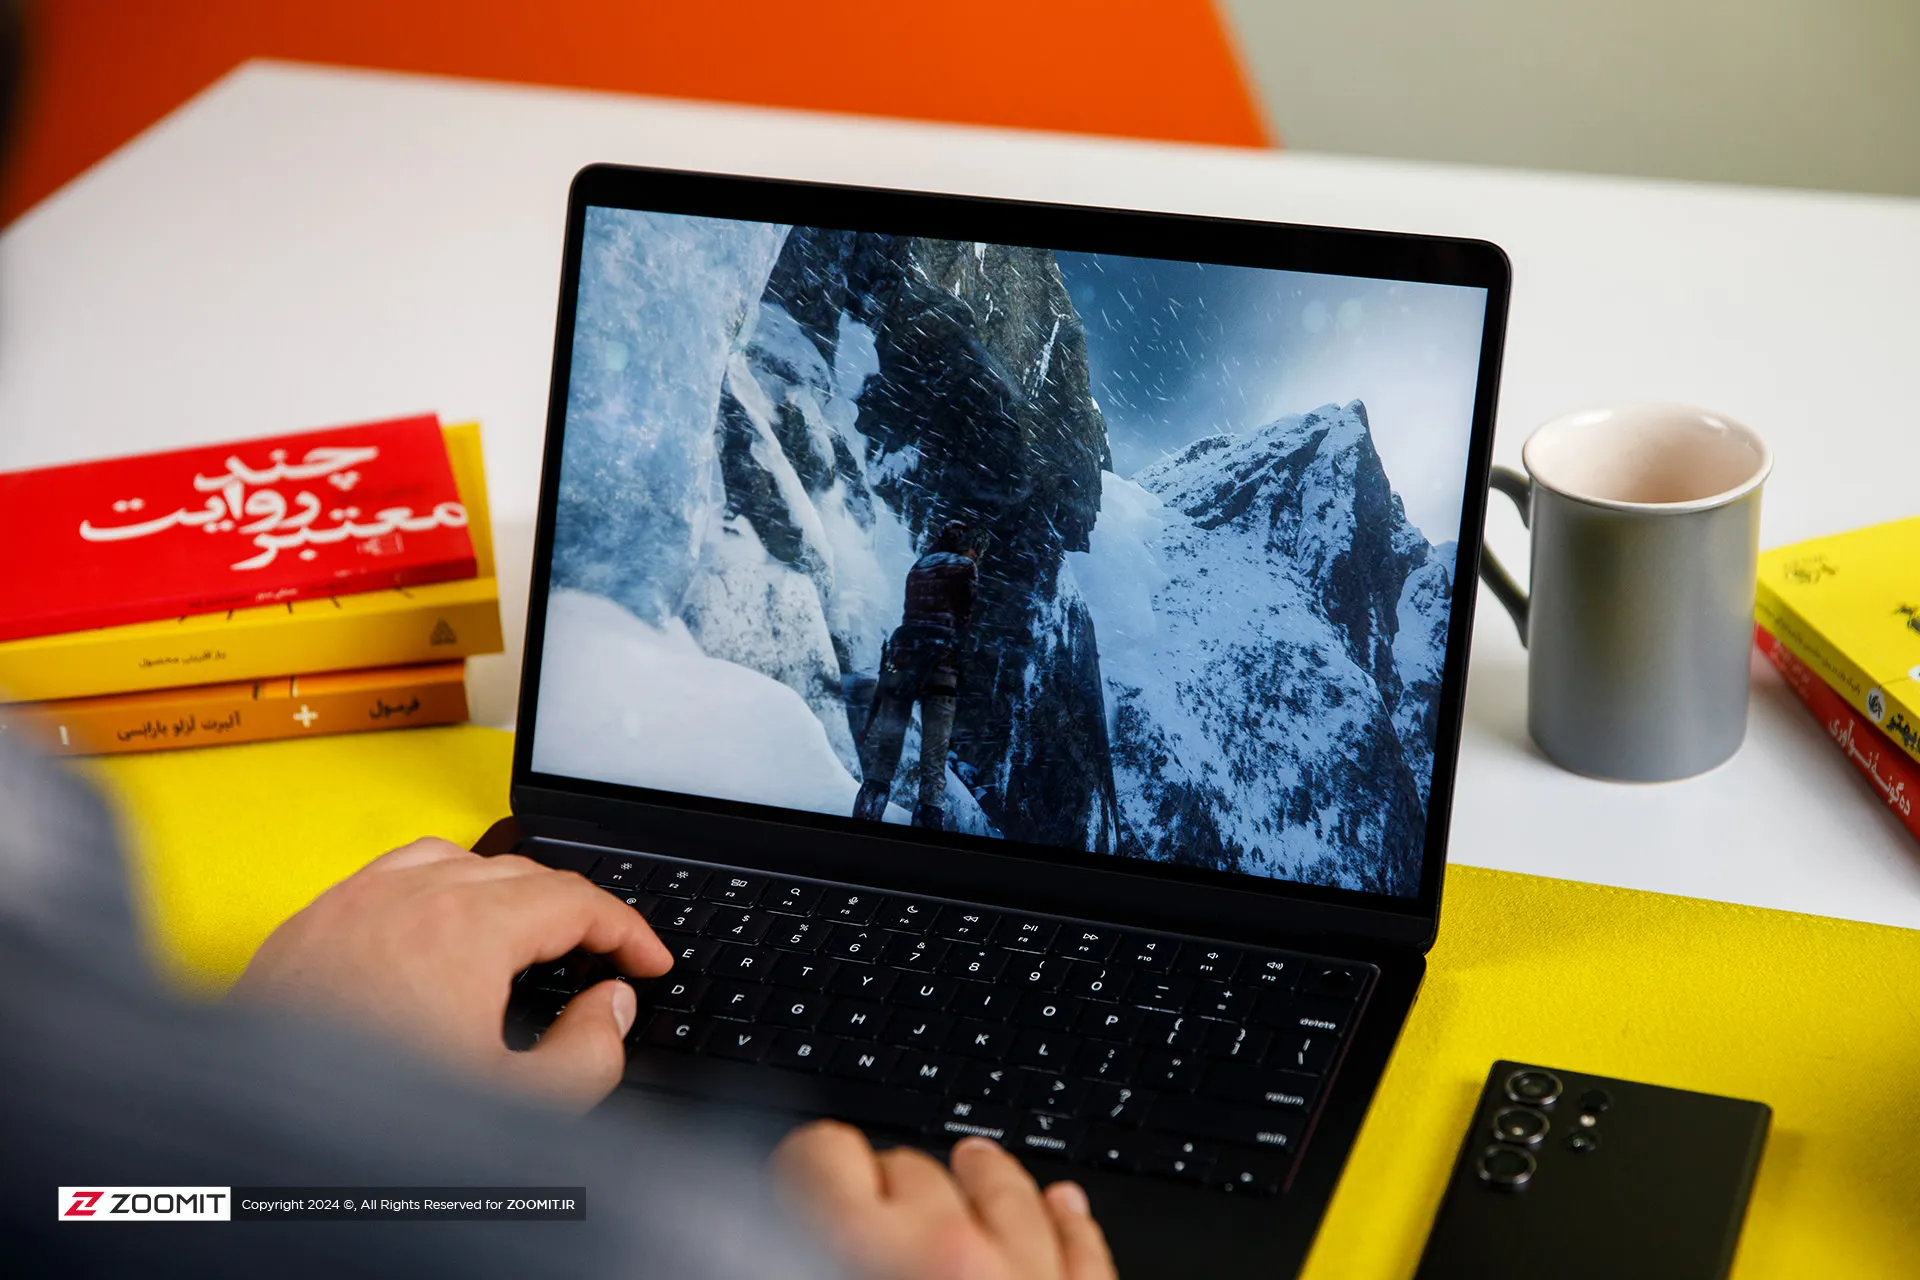
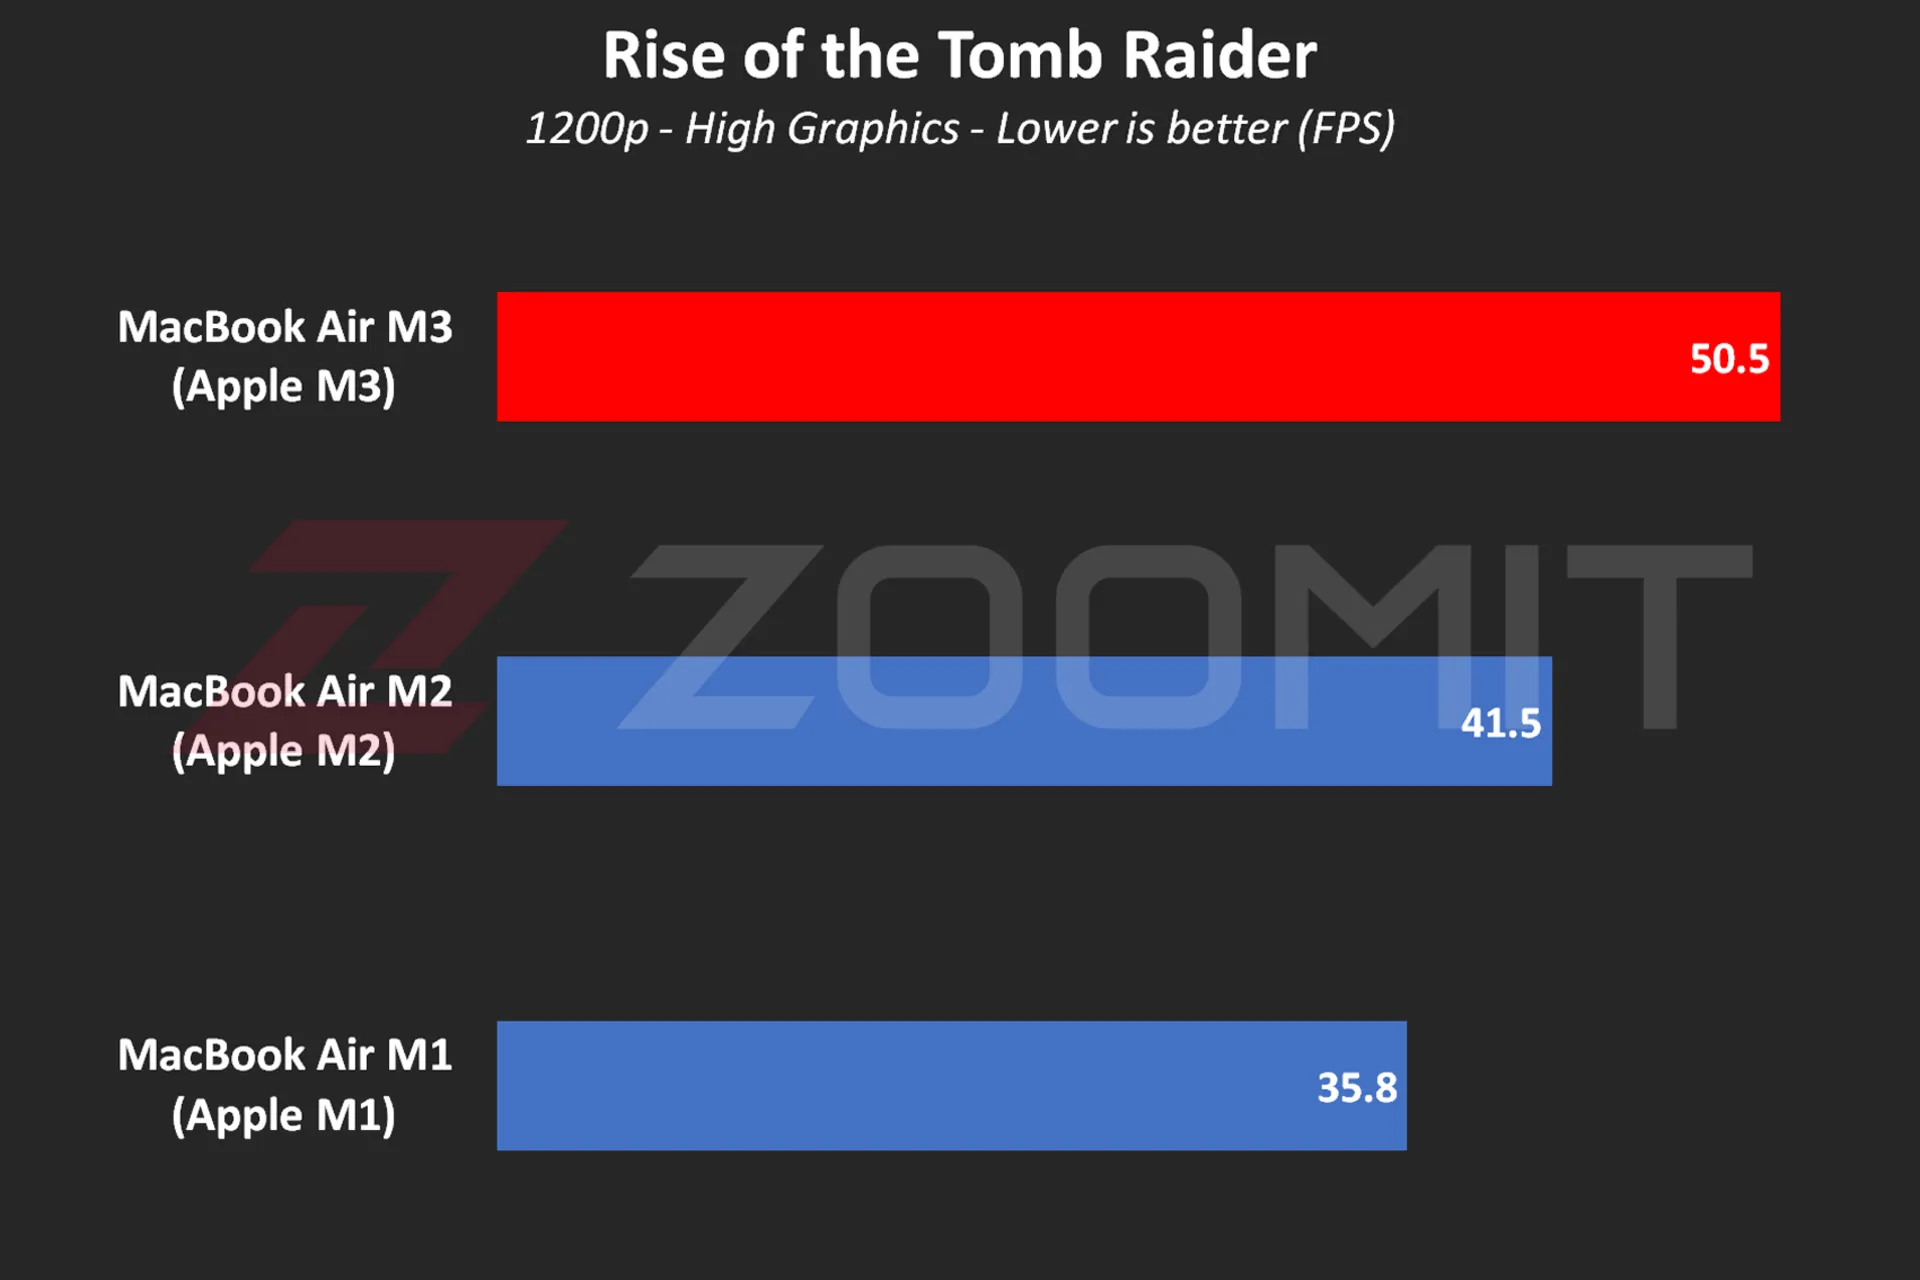 MacBook Air M3 performance while playing Rise of the Tomb Raider game
MacBook Air M3 works about 10 to 20 percent faster than its two previous generations and ZenBook 14 while using Photoshop software for tasks such as resizing large photos and implementing the blur effect or lens correction.
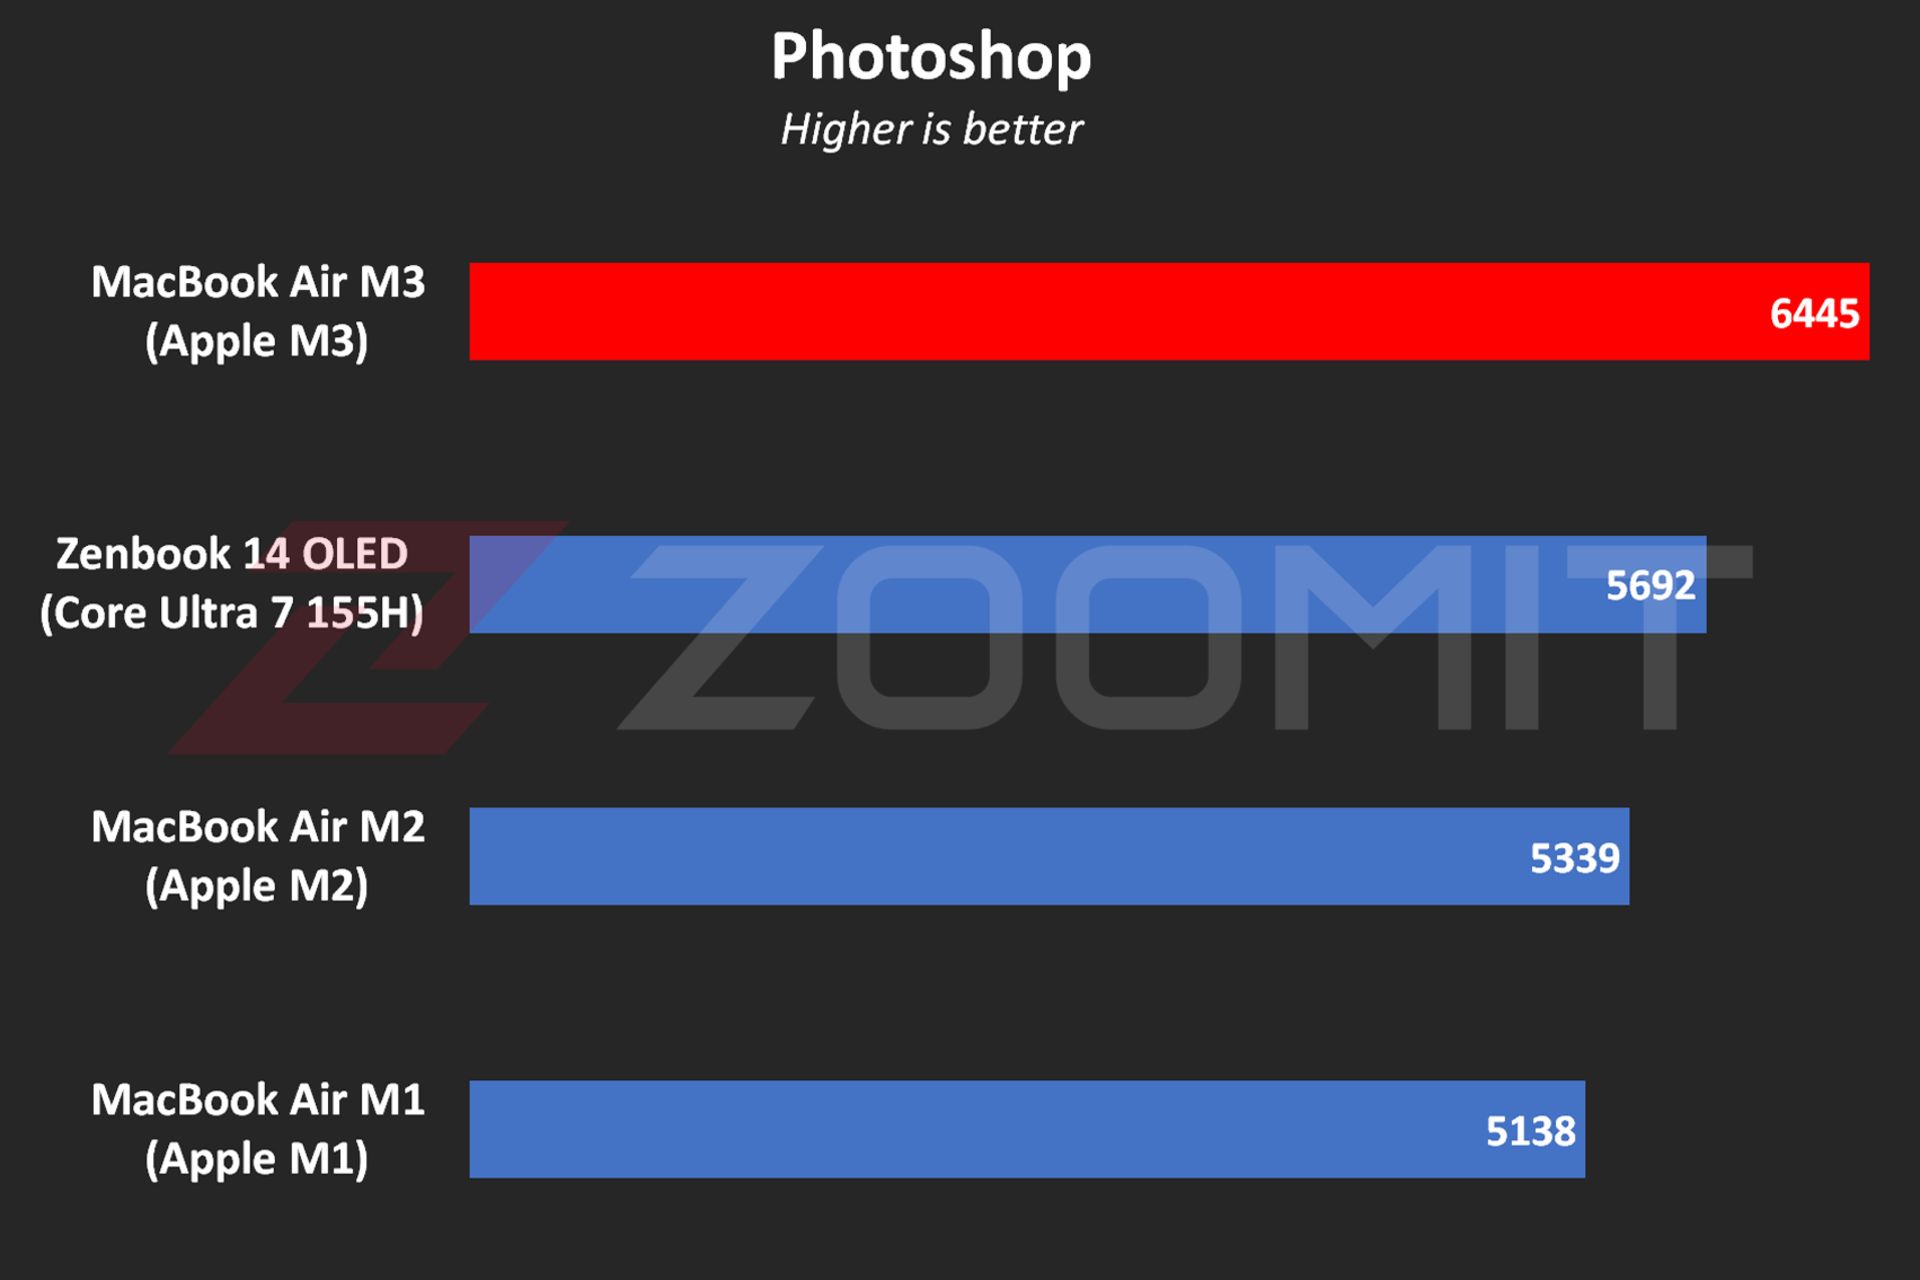 MacBook Air M3 performance in Photoshop software
In Premier Pro software, while performing tasks such as blur effect implementation, image sharpening, or 4K video output, the performance of the device is 20-30% better than the MacBook Air M2 and Zenbook 14.
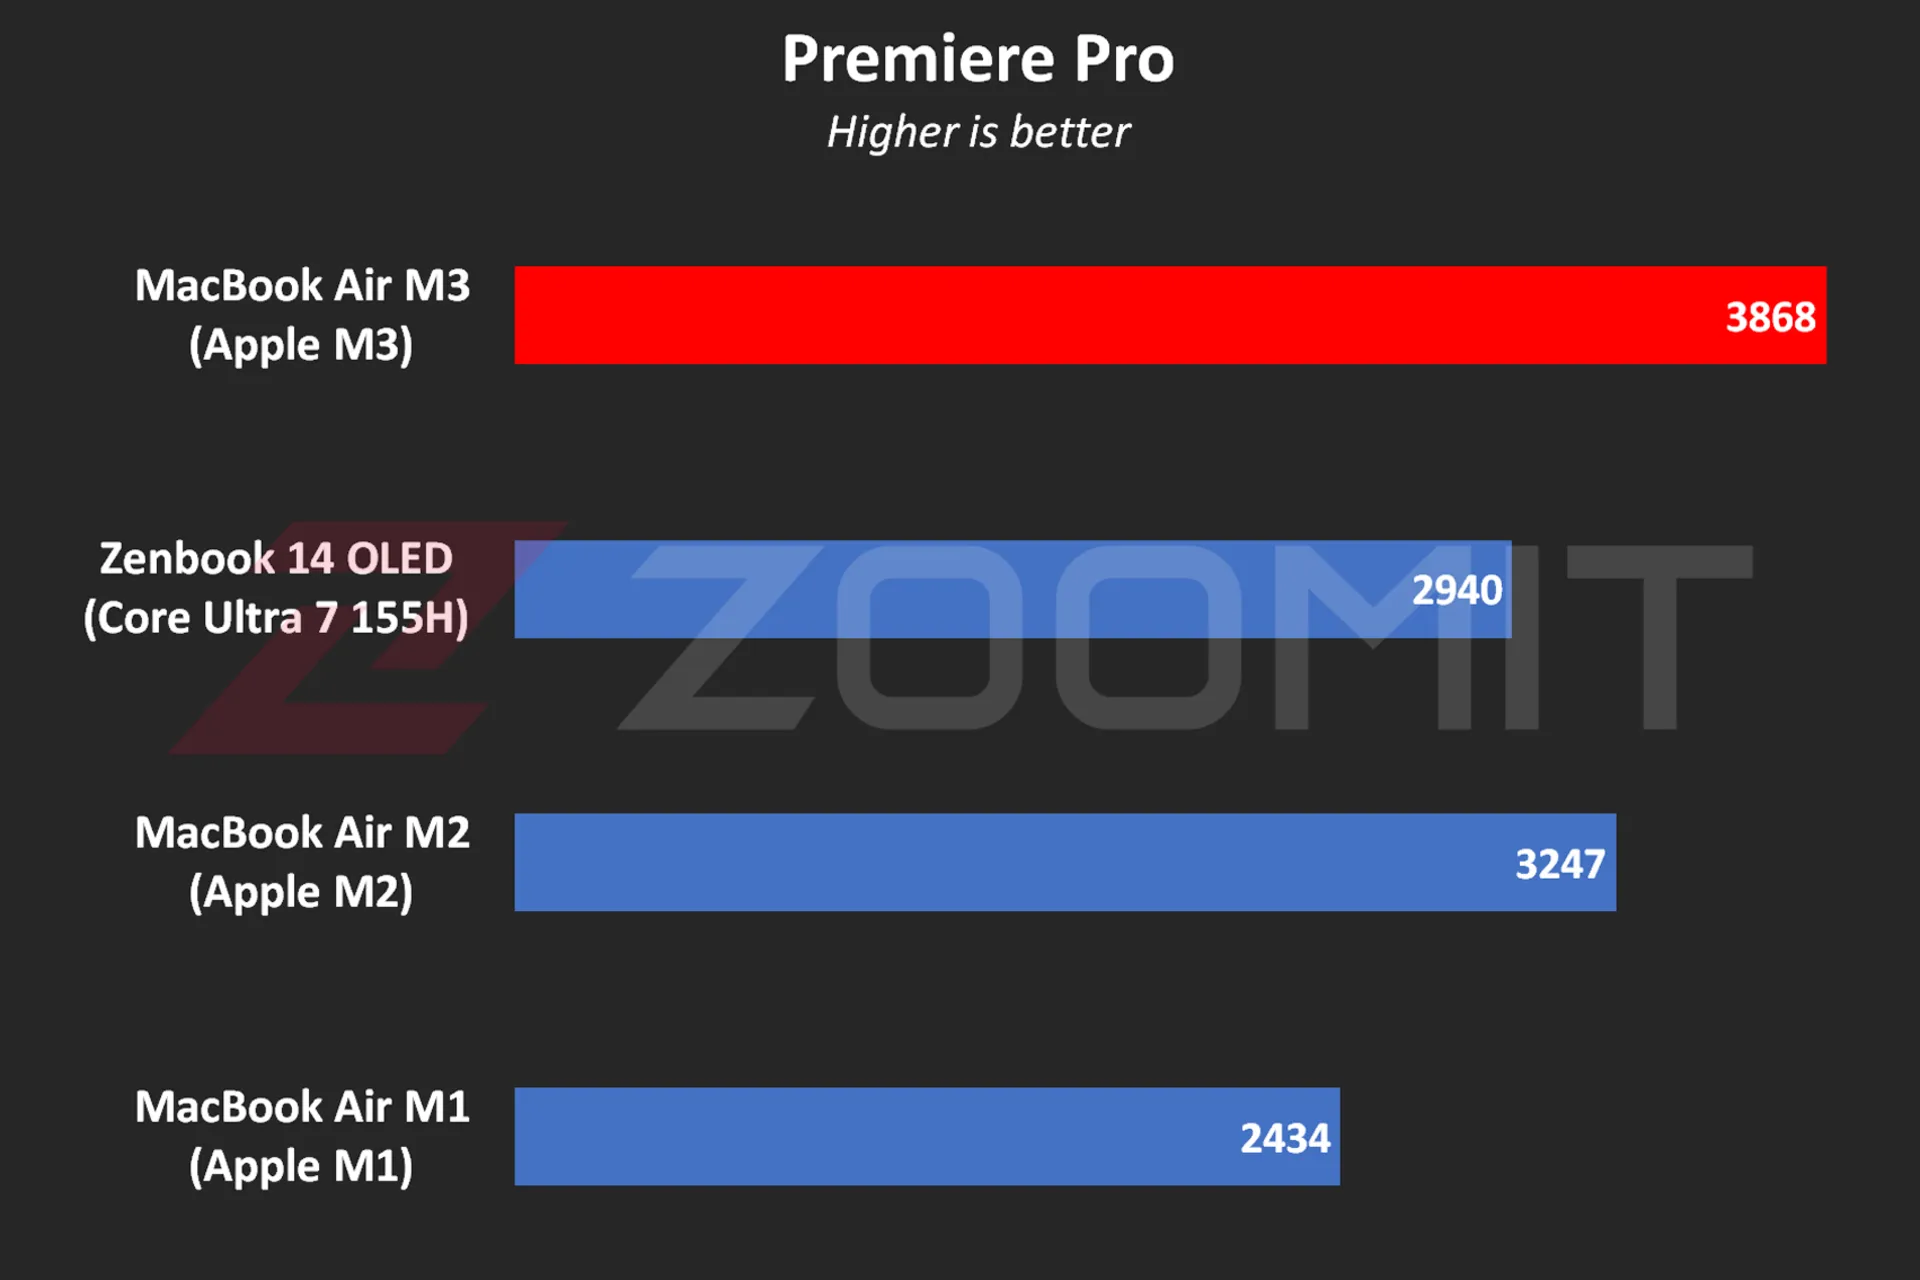 Performance of MacBook Air M3 in Premier Pro software
Note that in software such as Premiere Pro, where we are dealing with heavy projects, the low RAM overshadows the performance level and you may even get stuck in scenarios like editing 4K videos. Next, we will talk about the MacBook Air M3 RAM.
The MacBook Air was able to run Zoomit’s Python code in about 45 seconds, which is about 13 seconds faster than the M2 and 33 percent faster than the M1.
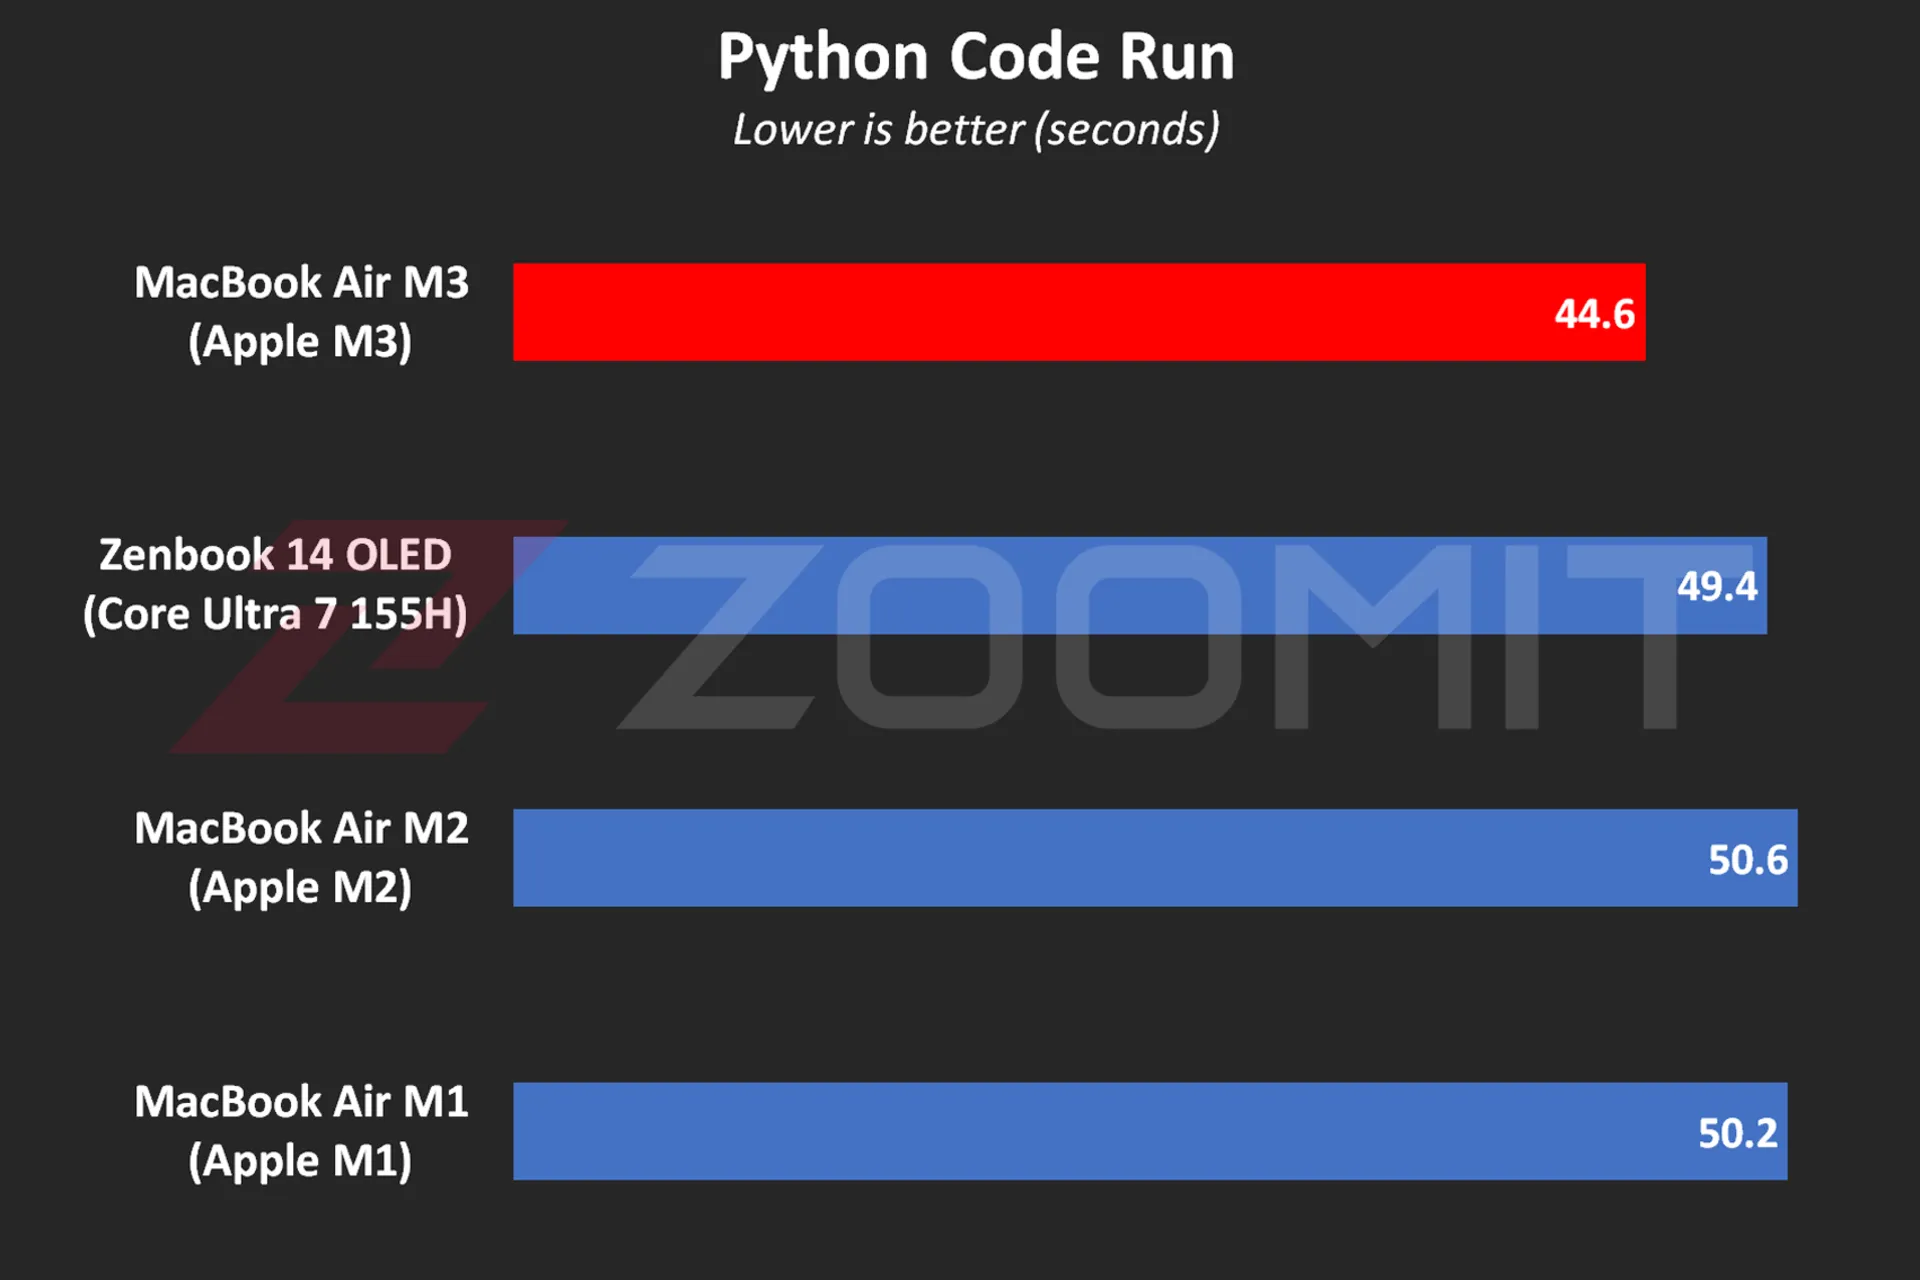 MacBook Air M3 performance while running Python code
One of the most attractive features of MacBooks is that they work equally well, whether connected to electricity or relying on batteries; For example, when running Python code while plugged in, the MacBook Air M3 beats the ZenBook 14 by just 4 seconds; But by disconnecting the laptops from the electricity and Zenbook’s performance drop, the time difference reaches 11 seconds!
In addition to running Python code, the MacBook Air also displays similar performance in other software in both plugged-in and battery-powered states; In the table below, you can see the difference in performance of MacBook Air M3 in Plugged and UnPlugged modes in a number of users:
|
Performance of MacBook Air 2024 when connected to electricity and with battery |
||
|---|---|---|
|
Test/Performance |
Plugged result |
Result UnPlugged |
|
CineBench 2024 (MultiCore) |
574 |
573 |
|
Speedometer 2.1 |
680 |
681 |
|
Photoshop |
6488 |
6588 |
|
Premiere Pro |
3868 |
3881 |
|
Python |
44.6 seconds |
44.7 seconds |
In the MacBook Air 2022 review, we said that the lack of an active cooling system (fan) makes this ultrabook unable to provide stable performance under continuous processing loads. Now it’s time for MacBook Air 2024 with the same cooling system; But this time with a more optimized chip, it will be wider. Does the MacBook Air M3 offer stable performance?
To evaluate the cooling system, the performance stability level and measure the power consumption and other parameters of the MacBook Air M3, we first ran the CineBench R23 multi-core test on the device for 30 minutes consecutively in both power-connected and battery-based modes; Then we went to the 20-minute Wild Life Extreme test.
|
MacBook Air 2024 laptop performance under continuous processing load |
||||
|---|---|---|---|---|
|
Laptop status |
CPU score at first |
CPU score after 30 minutes |
GPU score first |
GPU score after 20 minutes |
|
Connected to electricity |
9872 |
7841 |
6989 |
5207 |
|
with battery |
9833 |
8322 |
6996 |
5271 |
MacBook Air M3 shows more or less the same behavior whether in Plugged or UnPlugged mode; After 30 minutes, the CPU performance drops by about 15-20%, and in a 20-minute graphics processing load, the GPU drops by 25%.
Contrary to the numbers stated in the technical specifications of the M3 chip, the MacBook Air 2024, whether in multi-core or single-core processing, never reaches the frequency of 4.05 GHz in powerful cores; In my measurements, the frequency of the most powerful cores in the multi-core test remained at 3.7 GHz for a few seconds; But it immediately begins the gradual process of decline and reaches below 2.5 GHz from the 10th minute, which is lower than the stable 2.75 GHz frequency of low-power cores!
Read more: Asus Zenbook 14 OLED laptop review
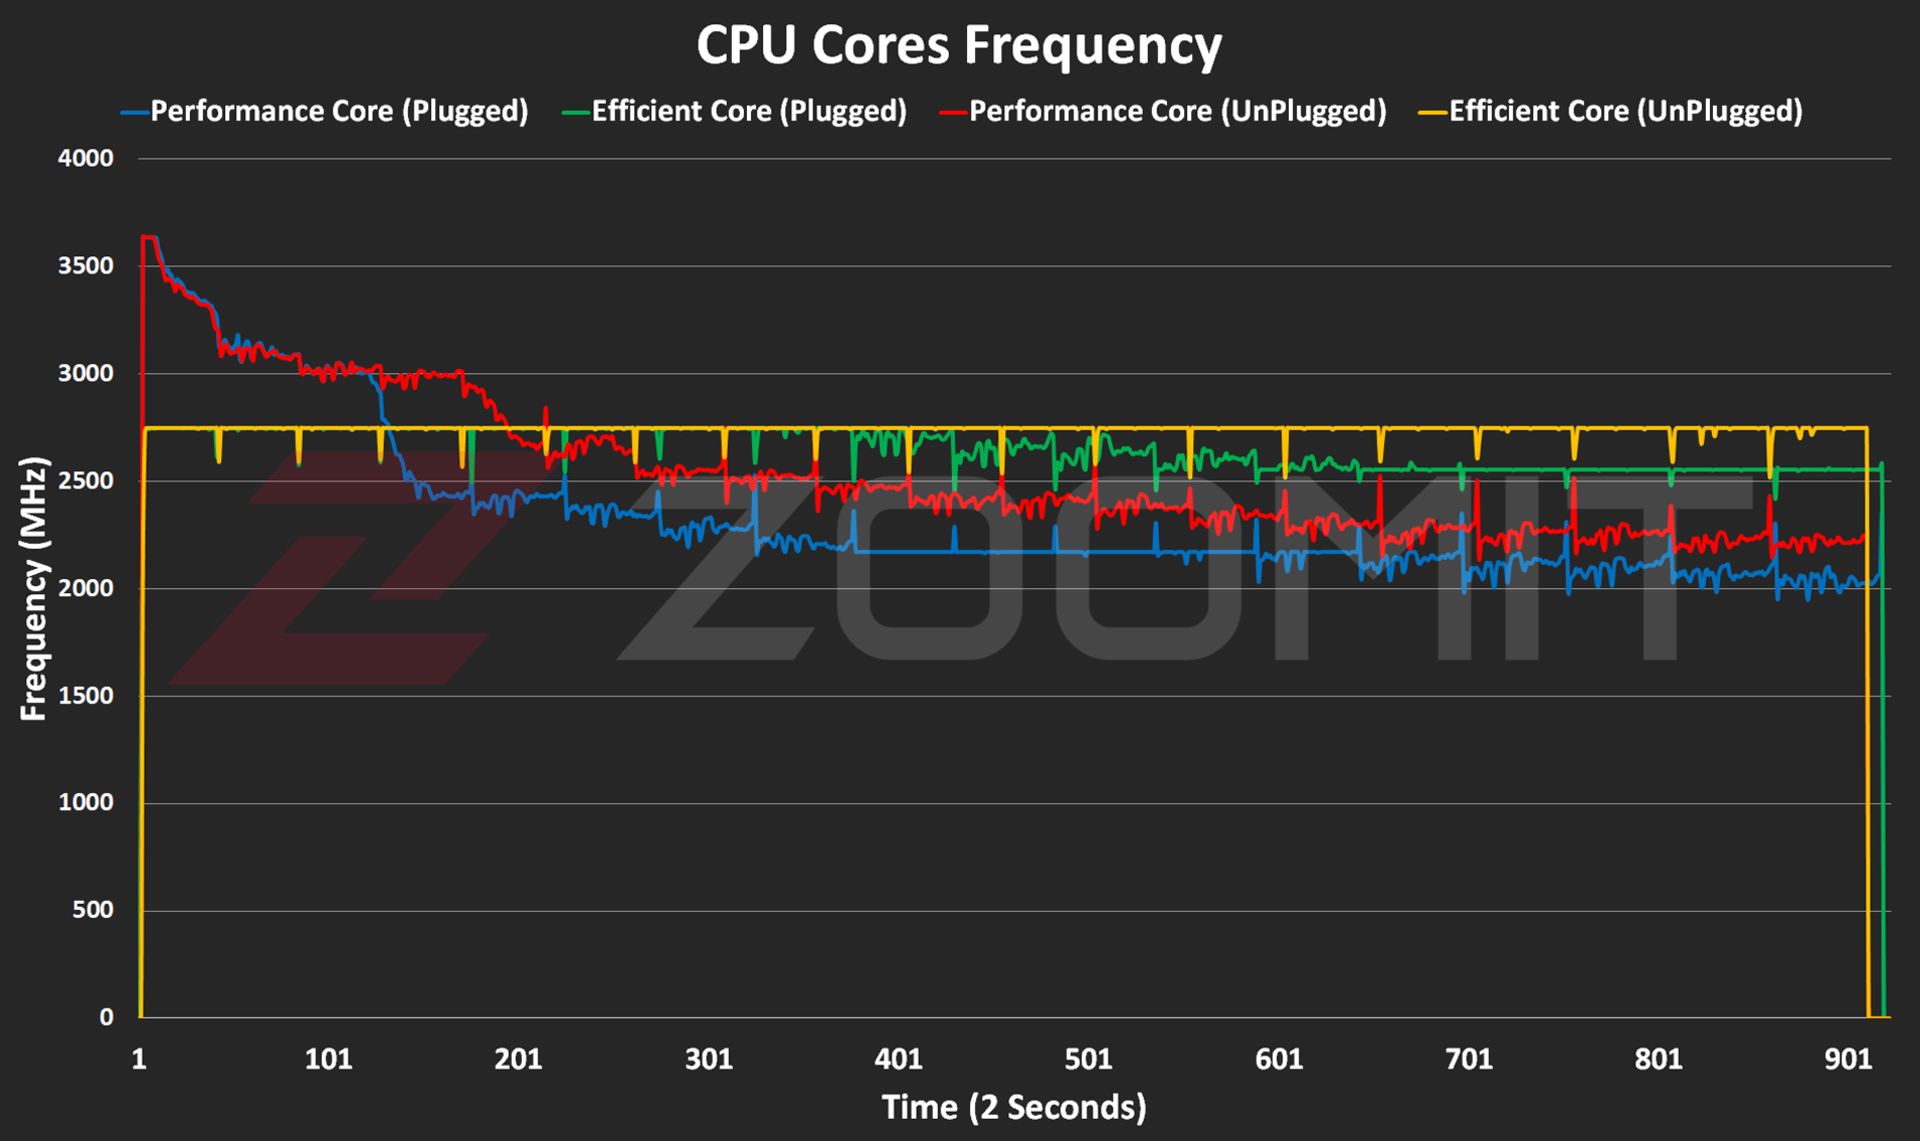 CPU frequency in MacBook Air M3
The frequency drop process starts when the temperature of the hottest point of the chip reaches 103 degrees Celsius; It seems that Apple has adopted a more conservative strategy this year; Because in MacBook Air M2, the maximum temperature of the chip reaches 109 degrees Celsius. The temperature of 103 degrees of the chip continues for 5-6 minutes and then, thanks to the frequency drop, it decreases to the range below 90 degrees Celsius.
 CPU temperature on MacBook Air M3
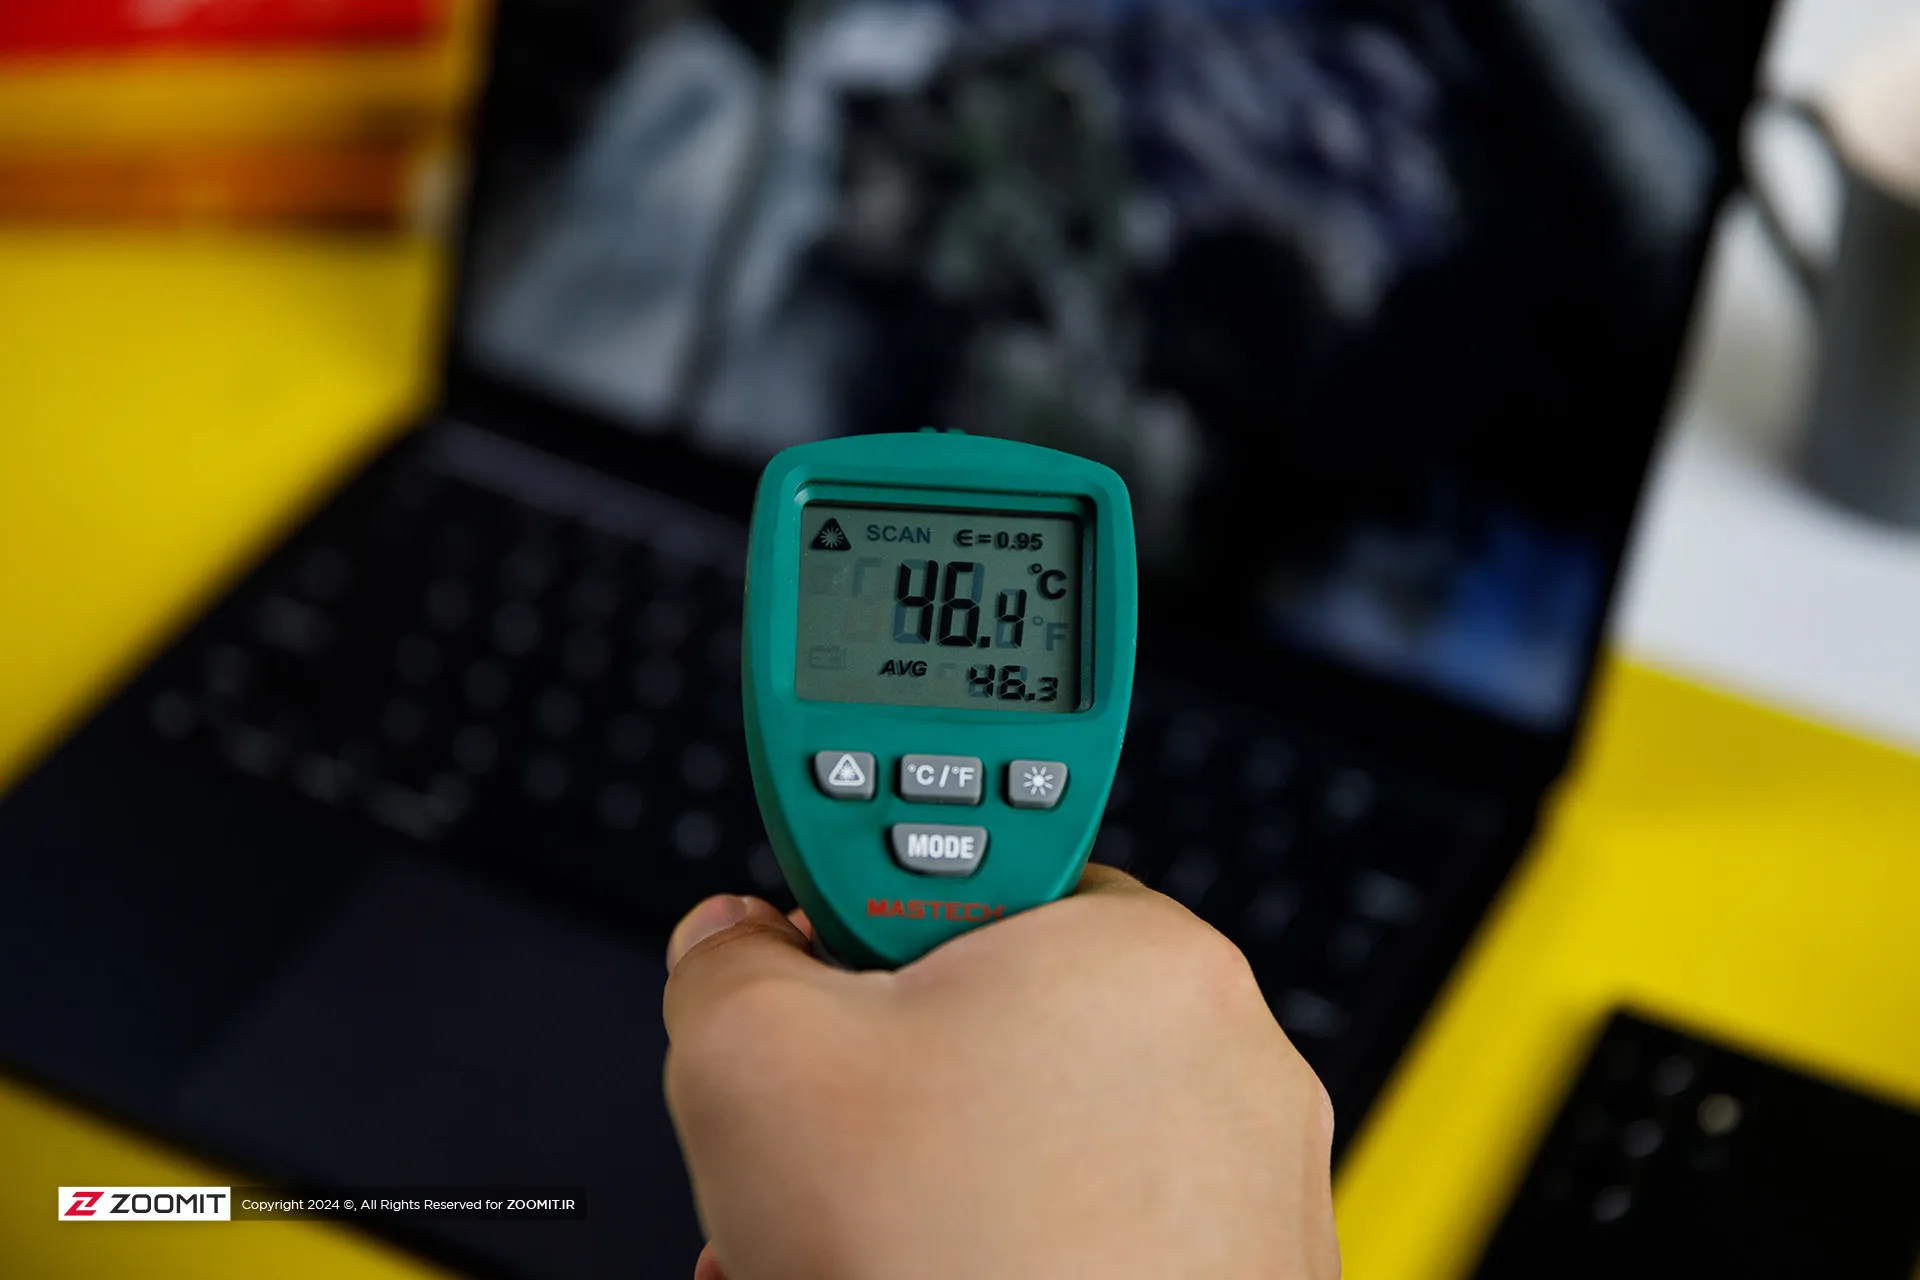
The temperature of the laptop body rises to 46-47 degrees Celsius, especially in the upper area of the keyboard; But in general, the body heat is not such that you cannot continue working with the laptop.
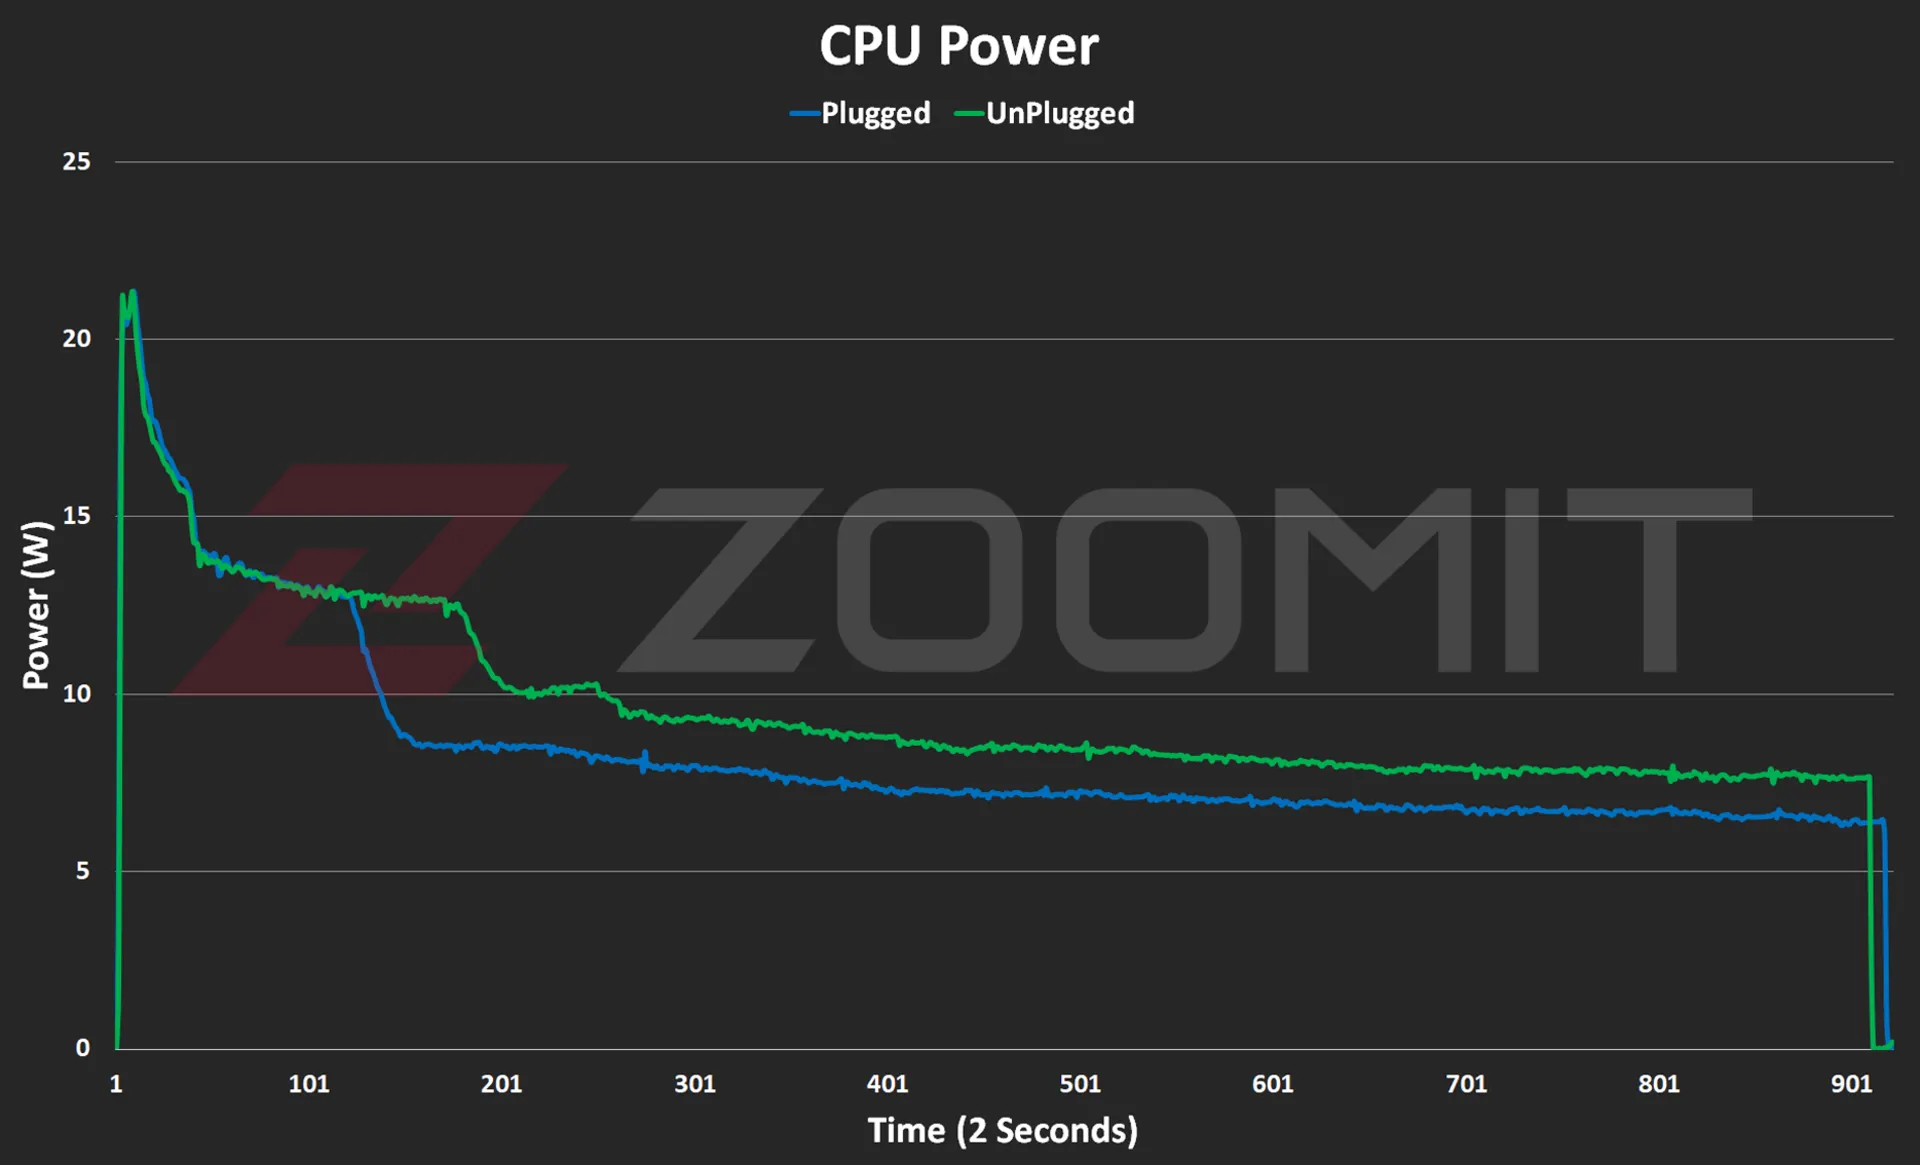 CPU consumption in MacBook Air M3
As you can see in the power consumption graph, the CPU consumes about 21 watts in the first few seconds; But as the body heats up, the power consumption gradually decreases and after a few minutes it reaches below 10 watts and reaches the range of 7-8 watts.
As you can see from the graphs below, the M3 GPU also follows a similar path to performance degradation from overheating the device.
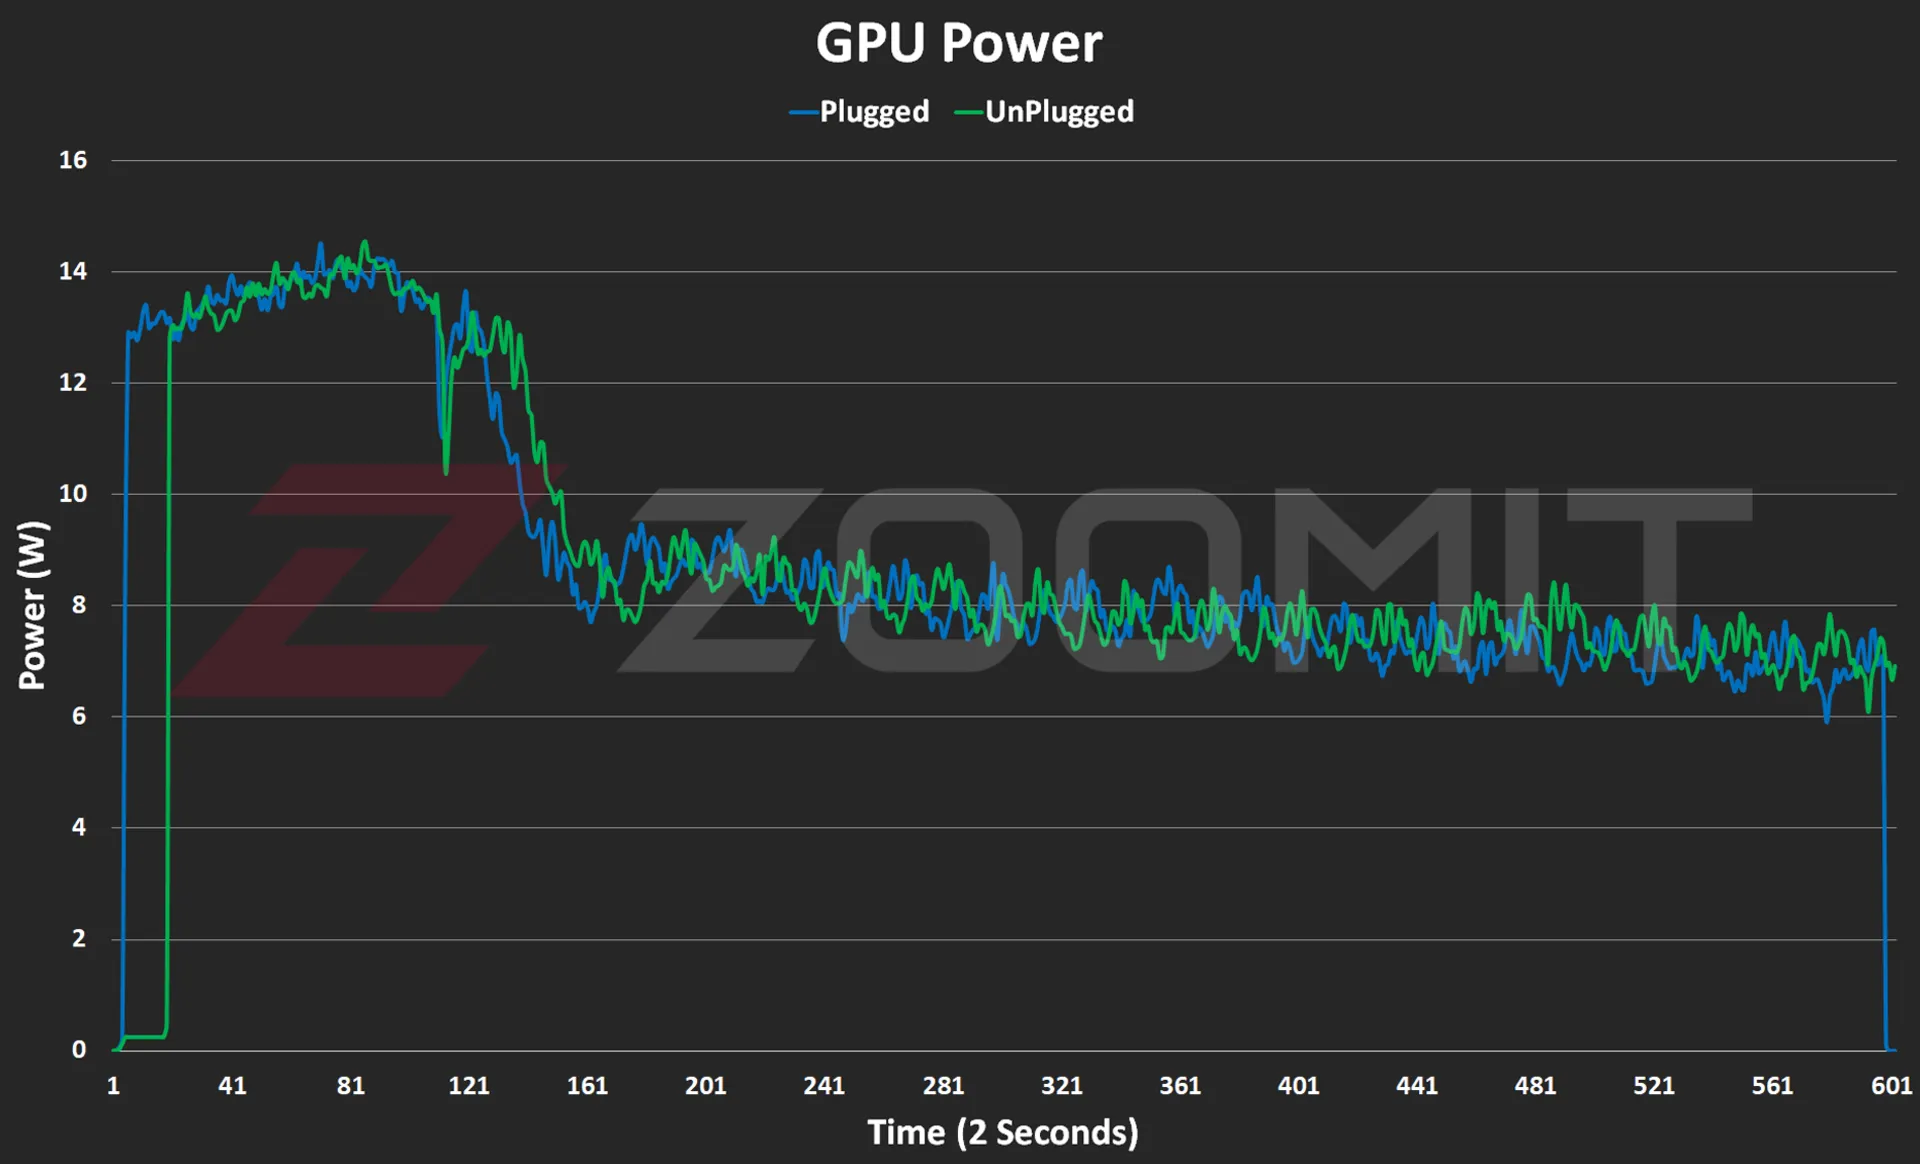 GPU consumption in MacBook Air M3
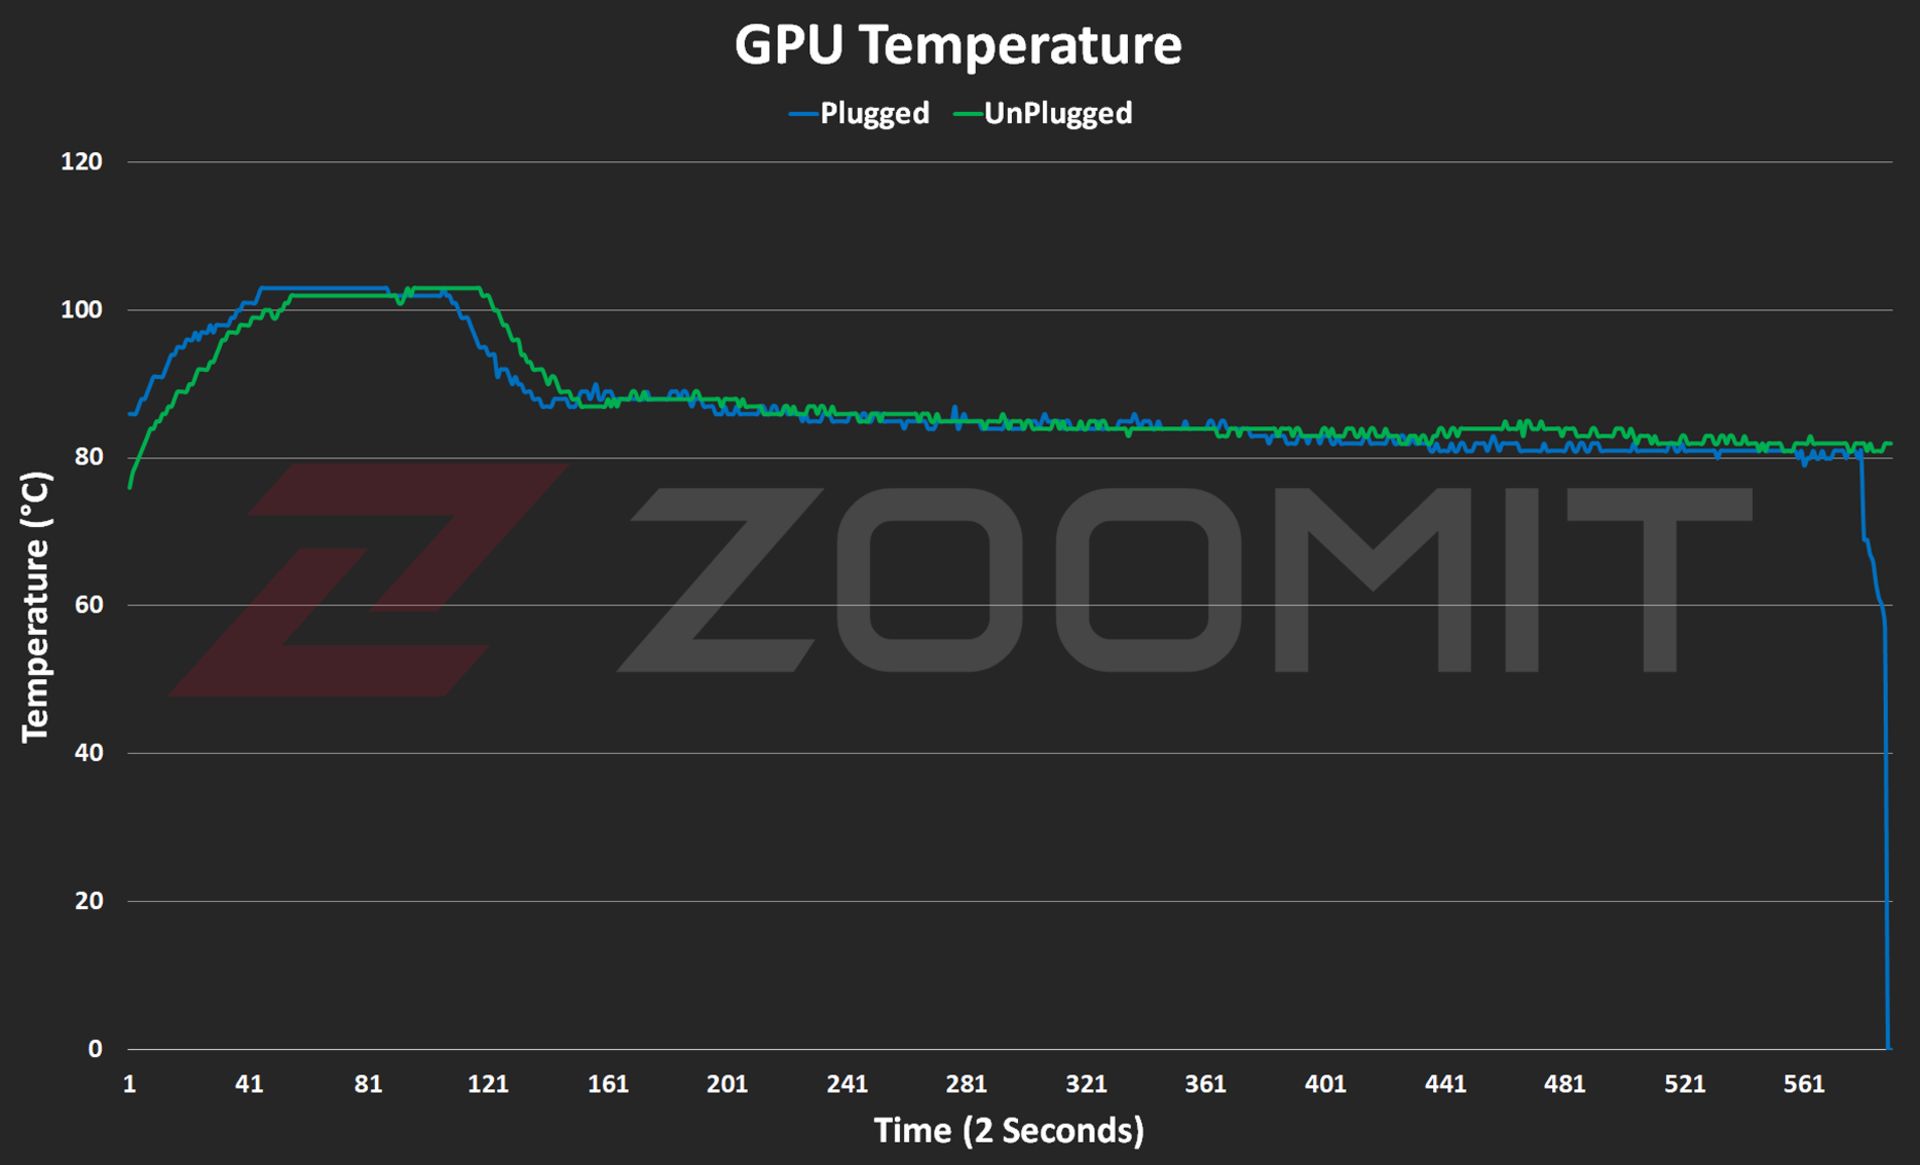
GPU temperature on MacBook Air M3
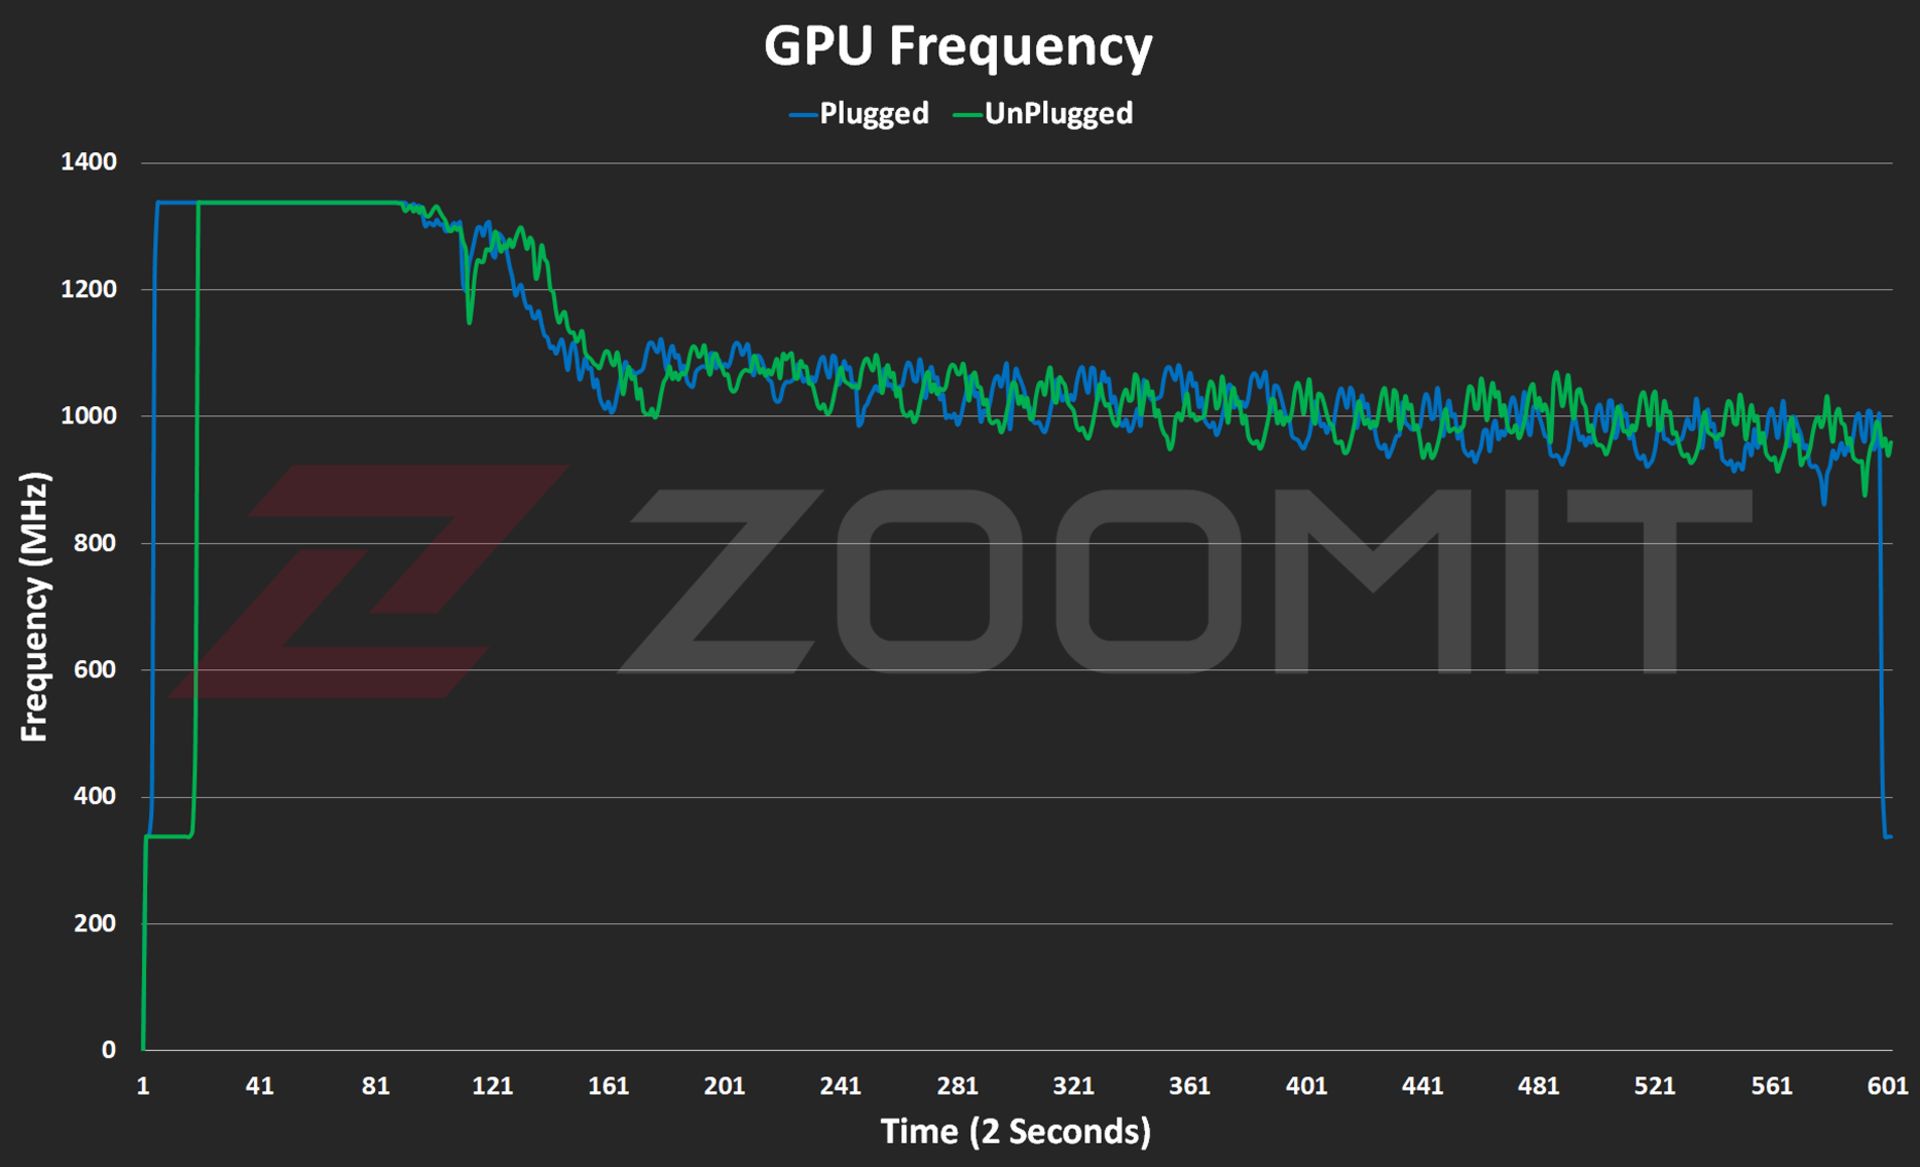
GPU frequency on MacBook Air M3
About 2-3 minutes after the start of graphic processing, in order to prevent the chip temperature from exceeding 103 degrees Celsius, the frequency of the GPU drops from about 1350 MHz and its power consumption from about 14 watts to 1000 MHz and below 8 watts. is approaching
My tests show that the MacBook Air M3 uses its powerful core stably with a frequency of about 3,750 MHz in single-core processing, this number is about 3,200 and 2,980 MHz in the MacBook Air M2 and MacBook Air M1 laptops, respectively.
In order to have a general outline and limits of architecture changes and IPC (the number of instructions executed per processing cycle), we can divide GeekBench’s single-core score by the chips’ single-core frequency; Note that this measure is not exact and only provides a general picture of the state of architectural changes. To accurately measure IPC, one should go to an expensive tool such as SPECView, which unfortunately is not available in Iran.
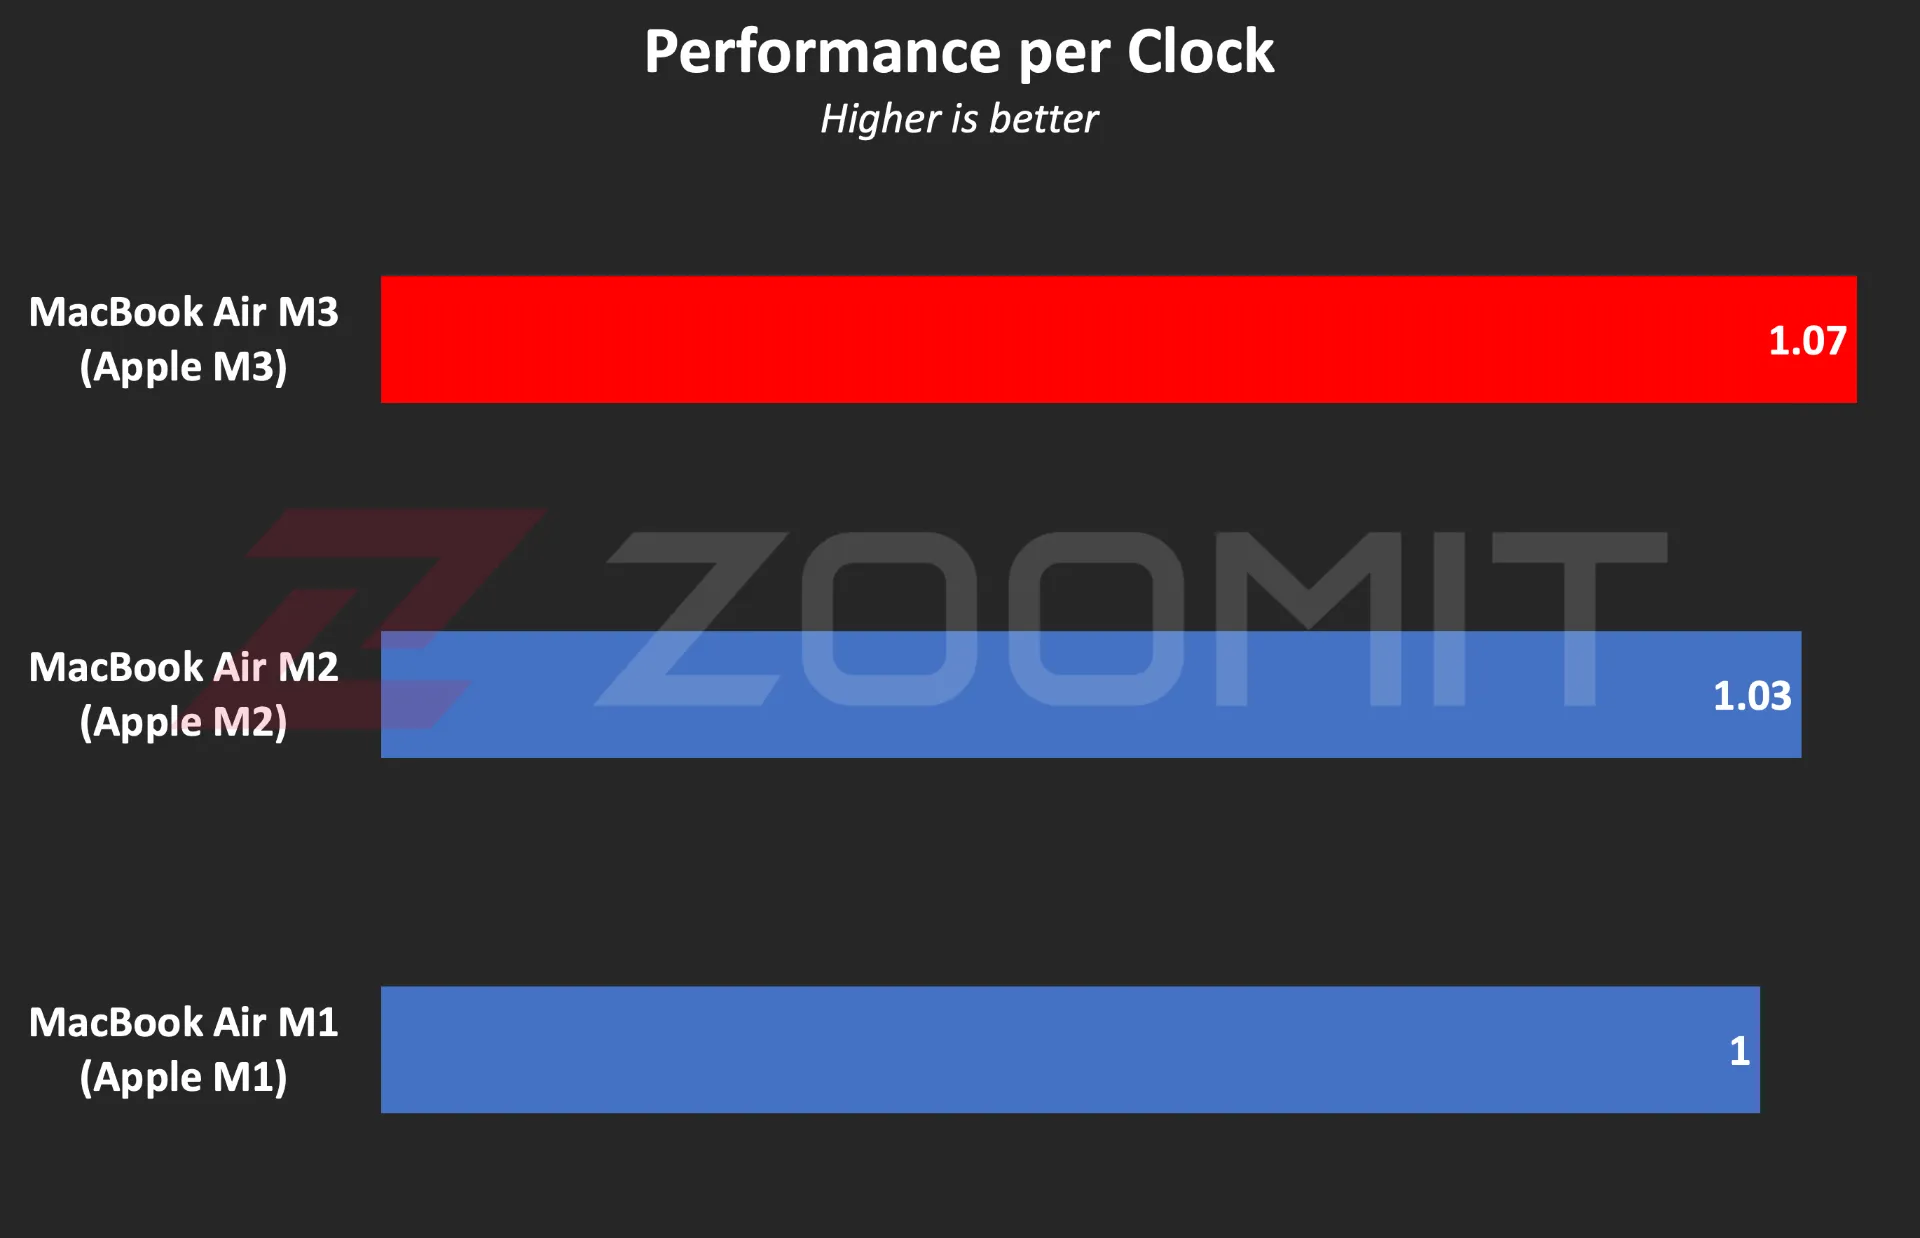 Ratio of performance to CPU frequency
To be more precise, what you see in the graph above is the ratio of single-core performance to CPU frequency in three generations of MacBook Air laptops with M1, M2, and M3 chips. In this chart, I have considered the MacBook Air M1 as a benchmark so that we can compare the other two chips relatively. The numbers say that the architectural changes in M3 have a 4 and 7 percent impact on the performance of this chip compared to M2 and M1, which is not a significant improvement.
In the graph below, you can see the ratio of M3’s performance to its power consumption compared to previous generations and the Core Ultra 7 155H chip. Note that the amount of power consumed by the chips is not stable and after a few seconds, it deviates from its maximum value; Therefore, the graph below was created by running CineBench R23 once and based on the average power consumption during the benchmark execution period, so that we can obtain the ratio of performance to power consumption in the best performance condition of the laptop.
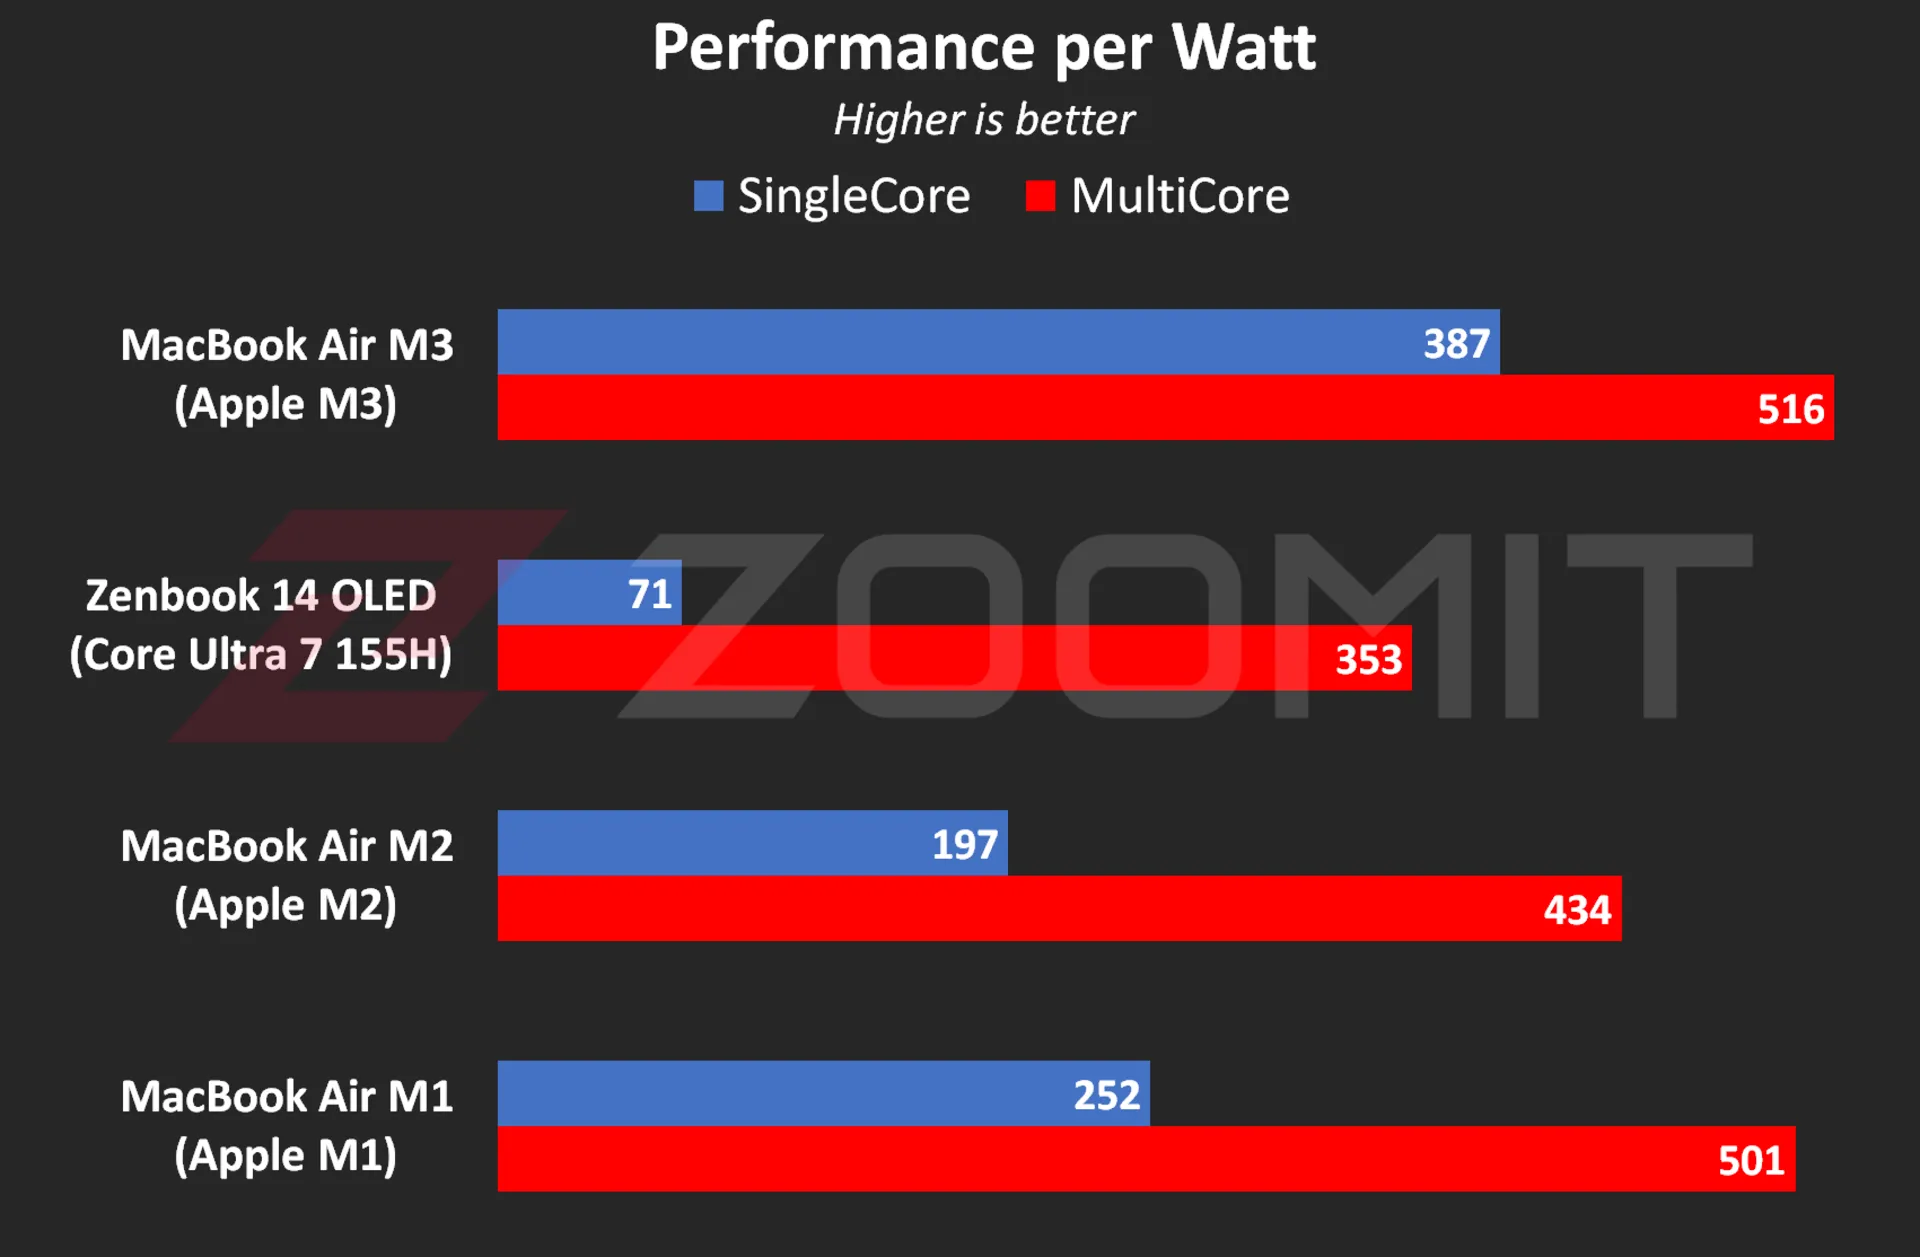 The ratio of performance to CPU power consumption
My measurements show that the M3 consumes an average of 4.9 and 19.1 watts when running the CineBench R23 single-core and multi-core benchmarks, respectively; While these numbers are equal to 8 and 20.2 watts for the M2 and 23 and 37.8 watts for the Core Ultra 7 155H, respectively, this shows the stunning efficiency of the M3; But if you consider the numbers obtained in the previous chart, you will realize that TSMC’s optimized manufacturing process has more influence on this amazing productivity than IPC and Apple’s architecture improvements.
The M3’s incredible efficiency also contributes to the MacBook Air M3’s excellent charging performance. Apple uses the same 52.6-watt-hour battery as the MacBook Air M2 in its new ultrabook and says that this laptop can charge for about 18 hours, just like the previous generation.
|
MacBook Air 2024 battery life compared to other laptops |
||||||
|---|---|---|---|---|---|---|
|
Laptop/Test |
Functional profile |
hardware |
Display |
Battery capacity |
Play offline video |
Everyday use |
|
Processor and graphics |
Dimensions, resolution, and refresh rate |
watt-hours |
720p Video |
PCMark 10 |
||
|
minute: hour |
minute: hour |
|||||
|
MacBook Air 2024 |
— |
Apple M3 8 core GPU |
13.6 inches and 60 Hz 1664 x 2560 pixels |
52.6 |
14:13 |
— |
|
Zenbook 14 |
Performance |
Core Ultra 7-155H Intel Arc |
14 inches and 120 Hz 1800 x 2880 pixels |
75 |
17:25 |
9:09 |
|
Galaxy Book 3 Ultra |
Performance |
Core i7-13700H RTX 4050 |
16 inches and 120 Hz 1880 x 2880 pixels |
76 |
11:00 |
6:21 |
|
MacBook Pro 2022 |
— |
Apple M2 10-core GPU |
13.3 inches and 60 Hz 1600 x 2560 pixels |
58.2 |
26:18 |
— |
|
MacBook Air 2022 |
— |
Apple M2 8 core GPU |
13.6 inches and 60 Hz 1664 x 2560 pixels |
52.6 |
14:11 |
— |
|
MacBook Pro 2020 |
— |
Apple M1 8 core GPU |
13.3 inches and 60 Hz 1600 x 2560 pixels |
58.2 |
16:47 |
— |
|
MacBook Pro 14-inch 2021 |
— |
M1 Max 24Core GPU |
14.2 inches and 120 Hz 1964 x 3024 pixels |
70 |
18:14 |
— |
The MacBook Air 2024 was able to play our benchmark HD video for a little over 14 hours, just like the previous generation, in standard Zoomit conditions, which includes 200 nits brightness (about 70% brightness) and flight mode activation, which is an impressive result; But it is about 3 hours less than the Asus Zenbook 14 Ultrabook with a larger 75 watt-hour battery.
… and 8GB RAM for everyone
Unfortunately, this year Apple did not fall short either, and in 2024, it released the basic version of its $1,100 ultrabook with 8 GB of RAM and 256 GB of SSD. If you buy from Apple’s website, you can order 16GB or 24GB of RAM and 512GB, 1TB, and 2TB of SSD; Of course, to go to each higher step, you have to pay 200 dollars more; For example, the MacBook Air 2024 with 16 GB RAM and 512 GB SSD will cost you about $1,500.
If the base version of the 8GB MacBook Air disappointed you, you can be glad that Apple has moved away from the cowardly strategy of using a NAND chip for the SSD of the base version of the MacBook Air, which ended up halving the read and write speeds, and this year all models with 2 sells NAND chips; The maximum speed of 4 and 3.5 GB/s for reading and writing is lower than Windows competitors; But it’s not bad either.
|
The average SSD speed of the base model MacBook Air 2024 compared to other MacBooks |
||
|---|---|---|
|
Models / Performance |
Sequential reading rate (UK gigabytes) |
Sequential write rate (UK gigabytes) |
|
MacBook Air M3 |
2.63 |
2.58 |
|
MacBook Air M2 |
1.03 |
2.32 |
|
MacBook Pro M1 |
2.28 |
2.46 |
There is a lot of debate on social networks about whether 8GB of RAM is sufficient or not. A number of Apple fans, with the logic that “MacBook RAM has high speed and memory swap technology is available to help SSD as RAM”, say that in many applications, 8 GB of RAM is enough; But you should pay attention to several points:
1. The data is not just traveling between the chip and RAM, which can compensate for the low capacity of the RAM by just having a high data exchange rate; In some applications, such as modeling or graphic work, several gigabytes of data may be stored in RAM for a relatively long time. Let’s say that the data exchange rate between the RAM and the M3 or M2 chip is no longer the best, and some chips such as the Core Ultra 7 155H offer a higher rate.
2. Memory swap is not a magical and new technology; The rest of the operating systems, such as Windows, also have similar technology; But it should be noted that swap memory reduces the useful life of SSD and the speed of SSD is not at the level of RAM that can fully play its role; For example, in MacBook Air M3, the data exchange rate between RAM and chip also reaches 102 GB/s; While the Mac SSD read and write rate is maybe one twentieth of this number.
3. Software tools are constantly developing, and their need for hardware resources, including RAM, also increases day by day. On the other hand, the user also buys the MacBook for a few years of use; Therefore, due to the lack of ability to upgrade RAM, one may face problems over time.
Aside from all the talk about Rome, a number of domestic sellers are also taking advantage of the opportunity; For example, Apple charges the same amount for a MacBook Air with 16 GB of RAM and 256 GB of SSD as for an 8 | 512 GB considered; But in Iran, configuring MacBook with more RAM is much more expensive than configuring with more SSD.
MacBook Air M3; Attractive and not very valuable
The MacBook Air M3 is by no means a bad product; But what makes buying this ultrabook illogical is the great value of its predecessors, especially the MacBook Air M1, especially if we consider their significant price difference.
For a person who does not have a laptop and is looking for a compact and well-made ultrabook for daily and light use, the base model of MacBook Air M1, which is currently sold at a price of 47-48 million Tomans, is a very desirable option; A device with an integrated metal body, a high-quality display, a very good keyboard and trackpad, excellent charging and fast performance that meets all the needs of an individual with daily use, journalism or light content production; Without the need to take an irrational action, about 25 million Tomans more will be spent to buy M3.
A person who already has a MacBook Air M2 and uses it for daily use should not go for the MacBook Air M3; Because it will not experience any significant changes; Except for the faster SSD, which is hardly noticeable in everyday use. For a current Mac M1 user, it might make more sense to upgrade to the M3.
For people who use laptops for tasks such as programming or video editing, the 8GB version of the MacBook Air M3 is not really a rational choice. If these people prefer macOS, it is better to go for used models with a budget of 70-75 million tomans, such as M1 Pro with 16 GB RAM, or if they are comfortable with Windows, high-quality options such as HP Envy with Core i9-13900H processor. And 16 GB of RAM will be a reasonable option for them.


What are the obstacles on the way for humans to reach Mars?


Unveiling of OpenAI new artificial intelligence capabilities


Samsung S95B OLED TV review


Discovery of the brain circuit that manages inflammation


History of the world; From the Big Bang to the creation of the planet Earth


Xiaomi Pad 6S Pro review


Is Telegram really safe?


The biography of Pavel Durov


AI PC; revolutionary technology of the future?


Samsung Galaxy A55 vs Galaxy S23 FE
Popular
-


 Technology10 months ago
Who has checked our Whatsapp profile viewed my Whatsapp August 2023
-


 Technology11 months ago
How to use ChatGPT on Android and iOS
-


 Technology10 months ago
Second WhatsApp , how to install and download dual WhatsApp August 2023
-


 Technology11 months ago
The best Android tablets 2023, buying guide
-


 AI1 year ago
Uber replaces human drivers with robots
-


 Humans1 year ago
Cell Rover analyzes the inside of cells without destroying them
-


 Technology11 months ago
The best photography cameras 2023, buying guide and price
-


 Technology11 months ago
How to prevent automatic download of applications on Samsung phones


